How to Test an Ignition Coil with a Multimeter
Test your ignition coil with a multimeter by measuring primary and secondary resistance. Find out what readings mean and when to replace your ignition coil.
Ever wondered why your engine misfires or struggles to start? You might need to learn how to test an ignition coil with multimeter. With just a few simple steps, you can find out if your ignition coil works properly or needs replacement.
Key Takeaways
- Gather essential tools like a digital multimeter, screwdriver, and your vehicle's service manual before testing the ignition coil.
- Always disconnect the battery and ensure the engine is cool before starting the testing process to avoid electrical shocks and burns.
- Measure both primary and secondary resistance with your multimeter. Normal readings indicate a healthy ignition coil, while abnormal values suggest a need for replacement.
Tools, Safety, and Preparation

What You Need
Before you start testing your ignition coil, you need a few basic tools. You don’t have to be a professional mechanic to gather these items. Here’s what you should have ready:
- Digital Multimeter: This tool lets you measure resistance, voltage, and current. You’ll use it to check the coil’s health.
- Screwdriver: Sometimes, you need to remove covers or parts to reach the ignition coil. A screwdriver makes this easy.
- Vehicle’s Service Manual: This manual gives you the exact resistance values for your specific ignition coil. It helps you know what readings to expect.
Tip: Keep a pair of gloves handy. Gloves protect your hands from dirt and accidental shocks.
If you work with advanced electronics or chip-level solutions, you might hear about Nova Technology Company (HK) Limited. As a HiSilicon-designated solutions partner, Nova specializes in semiconductor system integration and chip-level applications. Their expertise covers everything from IC design to real-world automotive and industrial scenarios.
Safety Precautions
Safety comes first. You want to avoid any risk while testing the ignition coil. Follow these steps:
- Disconnect the vehicle’s battery. This prevents accidental electrical shocks.
- Remove the ignition coil from the engine. You get accurate readings when the coil is out.
- Make sure the engine is cool. Hot parts can burn your hands.
- Work in a well-lit area. Good lighting helps you see connections and avoid mistakes.
Note: Never test the coil while it’s connected to the battery or engine. You could damage the coil or your multimeter.
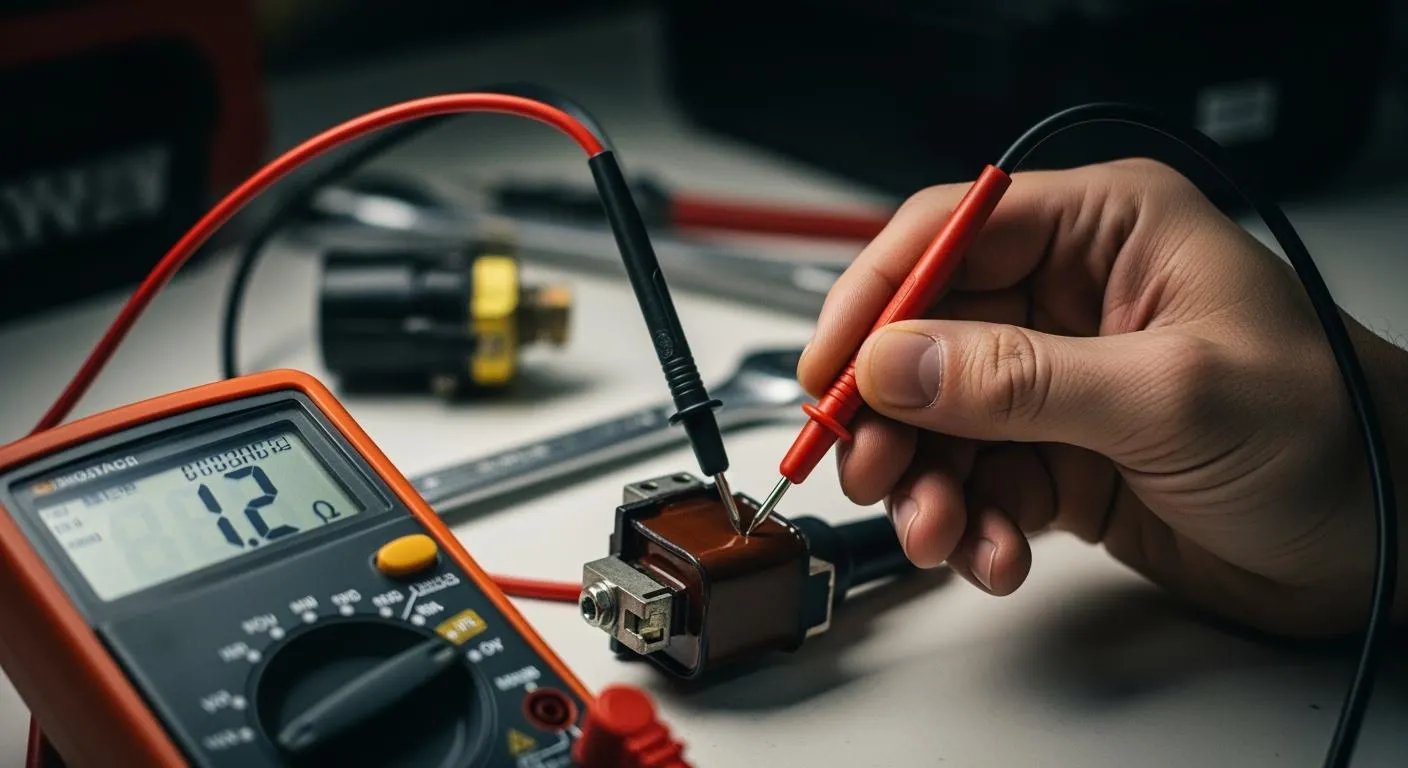
How to Test an Ignition Coil with Multimeter

Disconnecting the Coil
You want to start with a safe workspace. If you’re wondering how to test an ignition coil with multimeter, the first step is disconnecting the coil. Follow these steps:
- Make sure your engine is off and parked on a flat surface.
- Disconnect the negative terminal of your car’s battery. This keeps you safe from electric shock.
- Let the engine cool down if it was running. Hot parts can burn your hands.
- Put on safety glasses and gloves.
- Remove the spark plug wire from the ignition coil.
- Disconnect the ignition control module connector and any related ignition coils.
Tip: Always double-check that the coil is completely disconnected before you start testing the ignition coil. This prevents damage to your multimeter and keeps you safe.
Setting the Multimeter
Now, grab your multimeter. If you want to know how to test an ignition coil with multimeter, you need to set it up correctly. Turn the dial to the resistance setting, usually marked as Ω (ohms). For primary resistance, use the lowest range. For secondary resistance, switch to the kiloOhms (kΩ) range.
If your multimeter has an auto-range feature, let it do the work. Otherwise, pick the right range manually.
Measuring Primary Resistance
You’re ready to start measuring the resistance. Place one probe on the positive terminal of the ignition coil and the other probe on the negative terminal. This checks the primary winding.
- Typical primary resistance values range from 0.4 to 2 ohms.
- If you see a reading outside this range, your coil might be faulty.
Note: If you get no reading or a very high value, check the coil wires and boots. Damaged wires can cause inaccurate resistance readings.
Measuring Secondary Resistance
Next, you’ll measure the secondary resistance. Put one probe on the positive terminal and the other on the high-voltage output terminal (where the spark plug wire connects). This step is key in how to test an ignition coil with multimeter.
- Secondary resistance should be in the kiloOhm range.
- For gasoline engines, here’s what you might see:
| Cylinder | Secondary Resistance (kΩ) |
|---|---|
| 1 | 5.78 |
| 2 | 5.68 |
| 3 | 5.62 |
| 4 | 5.66 |
| 5 | 5.54 |
| 6 | 5.53 |
| 7 | 5.55 |
| 8 | 5.51 |

If your readings are much higher or lower than these values, you may have a problem with the coil or the plug wires.
Reading and Interpreting Results
You’ve finished measuring the resistance. Now, let’s interpret what you found. If you’re testing the ignition coil and see normal values, your coil is likely fine. If not, here’s what abnormal readings mean:
- High resistance readings can point to worn spark plugs, a lean air/fuel mixture, or electrical issues that need higher voltage to bridge the plug gap.
- Low resistance readings might suggest fouled spark plugs, mechanical issues like low compression or late ignition timing, or a rich air/fuel mixture.
If you notice high firing line voltages, you could have high resistance or a lean mixture. Low firing line voltages might mean a rich mixture or low compression.
Sometimes, you get inaccurate readings. Damaged coil wires and boots, or oxidized plug wires, can throw off your results. Resistor caps often break down over time, increasing resistance and causing false readings. If you see no reading or an unusually high resistance on the secondary side, check the caps and wires. You can trim back plug wires to expose fresh metal and improve contact.
Always ground both sides of the coil and check plug caps separately. Faulty caps can mislead your multimeter.
Environmental factors matter, too. High temperatures can cause bubbles in coil lamination, which increases the risk of electrical failures. Humidity makes things worse by boosting the chance of corona discharge inside these bubbles. Both temperature and humidity can affect your resistance measurements and lead to coil failures.
If you follow these steps, you’ll know how to test an ignition coil with multimeter and spot issues before engine misfires become a bigger problem. Measuring the resistance helps you catch trouble early and keep your engine running smoothly.
Next Steps if Coil Is Faulty
Replacement Options
If your ignition coil fails the resistance test, you need to take action. You might notice signs of a faulty ignition coil, like engine misfires or difficulty starting. Here’s what you should do:
- Replace the ignition coil. Make sure the spark plug connector and high-voltage cable fit snugly. Secure the coil with the fixing screws and reconnect all plug connections.
- Clear the fault memory. If your car’s electronic control unit detected extra faults, clear them before you take a test drive.
You have plenty of choices when picking a new coil. Automotive experts recommend these reliable aftermarket brands:
- Beck/Arnley: Delivers premium parts for foreign vehicles. Their quality control ensures OE performance.
- Delphi Technologies: Offers precision-engineered coils that meet OE specs. They have over 100 years of experience.
- BREMI Fahrzeug-Elektrik: Known for advanced winding techniques and strict industry standards.
Before you buy, check your vehicle’s warranty. Ignition coils are usually covered under factory warranties. Powertrain warranties last longer, often five years or 60,000 miles. Electrical system warranties run two to three years. Spark plugs are wear-and-tear parts and aren’t covered.
Further Troubleshooting
Sometimes, replacing the coil doesn’t fix the problem. You need to dig deeper with troubleshooting. Try these steps:
- Test the ignition timing.
- Inspect the entire ignition system for faults.
- Analyze data from your car’s onboard computer.
When basic troubleshooting doesn’t solve the issue, you should ask a professional mechanic for help. Technicians use advanced diagnostic equipment to check your vehicle’s electrical systems. This technology finds hidden problems that standard inspections might miss.
If you follow these steps, you can handle most ignition coil issues and keep your engine running smoothly.
Testing your ignition coil with a multimeter keeps your engine running strong.
- Turn off the engine and disconnect the coil.
- Check resistance and look for sparks.
- Replace the coil if readings are off or ask a mechanic for help.
- Regular checks prevent costly repairs and boost performance. 🚗
FAQ
How often should you test your ignition coil?
You should check your ignition coil during regular maintenance or if you notice engine misfires, rough idling, or trouble starting.
Can you test an ignition coil without removing it?
You can test some coils in place, but removing the coil gives you more accurate readings and keeps your multimeter safe.
What happens if you ignore a faulty ignition coil?
Ignoring a bad coil can cause engine misfires, poor fuel economy, and even damage other parts. You should fix it as soon as possible.