How to Verify Circuit Continuity with a Multimeter
To check if a circuit works, you use a multimeter. Always turn off the power before you start. You need a multimet
To check if a circuit works, you use a multimeter. Always turn off the power before you start. You need a multimeter, test leads, and safety gloves. These tools keep you safe and help you get accurate results. Anyone can learn how to continuity test using multimeter with a few simple steps.
Tip: Double-check the power is off before you touch any wires.
Key Takeaways
- Always turn off the power before testing. This step prevents electric shock and protects your multimeter.
- Use a digital multimeter for clearer readings. Set it to continuity mode, indicated by a diode symbol or sound wave icon.
- Check for continuity by placing probes on both ends of a wire. A beep or low reading means the circuit is good; no beep indicates a problem.
Prepare for Continuity Test
Gather Tools and Equipment
Before you start a continuity test, you need to collect the right tools. Each tool has a specific purpose that helps you stay safe and get accurate results. Here is what you should have ready:
- Multimeter: This device measures continuity, voltage, and resistance. You can use either an analog or a digital multimeter, but a digital multimeter gives you clearer readings.
- Two test probes: These connect to your multimeter and let you touch the circuit points you want to test.
- Screwdriver: You may need this to disconnect device terminals or open circuit covers.
- Electrical rubber insulating gloves: These gloves protect you from electric shock during multimeter testing. Always check your gloves for damage before use and retest them often to make sure they still work.
Note: Proper care of your insulating gloves will help them last longer and keep you safe.
Safety Steps Before Testing
You must follow safety steps before you perform any continuity test. These steps protect you from harm and prevent damage to your equipment.
- Turn off the power to the circuit. Always use a noncontact circuit tester to make sure no electricity is flowing.
- Inspect the circuit and your digital multimeter for any signs of damage.
- Test your digital multimeter by touching the leads together. It should beep or show 0 ohms, which means it is ready for continuity testing.
| Risk Type | Consequence |
|---|---|
| Electric shock | Harm to user |
| Damaged meter | Device destroyed |
| Fire hazard | Risk of fire/sparks |
Turning off the power is the most important step. This action prevents electrical hazards and keeps you safe during continuity testing. Setting up your digital multimeter correctly and making good contact with the probes will help you get accurate results. Careful preparation ensures both your safety and the reliability of your continuity test.
How to Continuity Test Using Multimeter
Learning how to continuity test using multimeter gives you the power to diagnose electrical circuits with confidence. This process helps you find open or closed paths in wiring, components, and devices. Follow these steps to perform a reliable test for continuity and ensure your circuits work as intended.
Set Multimeter for Continuity
To begin, you need to set your multimeter to the correct mode. Most digital multimeters have a dedicated continuity setting, often marked by a diode symbol or a sound wave icon. Here’s how to continuity test using multimeter from the very start:
- Turn off the power supply to the circuit you want to test. This step prevents damage to your multimeter and keeps you safe.
- Insert the black probe into the COM (common) port and the red probe into the port labeled for voltage or resistance.
- Rotate the dial to the continuity mode. Look for a symbol that looks like a Wi-Fi signal or a diode.
- Touch the two probes together. The multimeter should beep or display a reading close to zero. This confirms the device is ready to test for continuity.
Tip: If your multimeter does not beep when the probes touch, check the battery or review the settings.
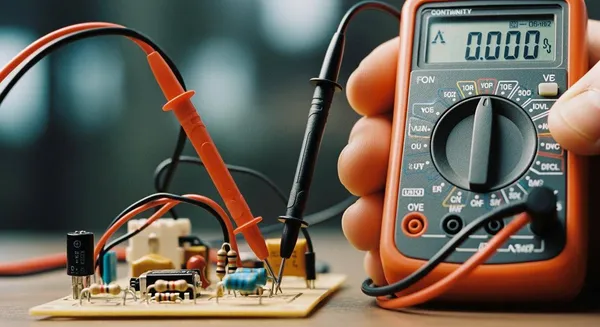
Test for Continuity
Now you are ready to perform continuity test on your circuit or component. Here’s how to continuity test using multimeter for accurate results:
- Plug the probes into the correct slots on your multimeter.
- Place the black probe on one end of the wire or terminal and the red probe on the other end.
- Make sure you have a solid connection with both probes. Avoid touching the metal parts with your fingers, as this can affect the test.
- Watch the display and listen for a beep. A beep means the circuit is continuous. No beep means no continuity.
You can use this method to test for continuity in wires, switches, fuses, and many other components. Always check circuit continuity before replacing parts, as a simple test can save time and money.
Check Circuit Continuity Results
Interpreting the results is a key part of how to continuity test using multimeter. Here’s what you need to know:
- A beep or a reading close to zero (usually less than 50 ohms) means the circuit is continuous. This shows that current can flow freely.
- No beep or a display showing “OL” (overload) or “1” means no continuity. This result indicates an open circuit, such as a broken wire or a blown fuse.
| Reading | Meaning | Example |
|---|---|---|
| Beep or < 50Ω | Circuit is continuous | Good wire, working switch |
| "OL" or "1" | Infinite resistance, no continuity | Blown fuse, broken wire, faulty connection |
Note: Some devices have specific resistance limits. For example, a device with a power socket should have no more than 0.1 ohms resistance. Always refer to the manufacturer’s guidelines.
Troubleshoot Continuity Test
Sometimes, you may not get the expected results when you perform continuity test. Here are common issues and solutions:
- If you get no continuity when you expect a closed circuit, check the probe connections. Make sure the probes are not damaged or loose.
- Confirm you have set the multimeter to the correct mode. Using resistance mode instead of continuity mode can give different results.
- Replace the battery if the multimeter does not beep or display changes.
- Environmental factors like high humidity or temperature can affect your test. Moisture can cause corrosion or false readings, while static electricity from low humidity can damage sensitive parts.
- Avoid testing through thick insulation, as this can prevent the probes from making good contact.
- Electromagnetic interference from nearby devices can cause false positives or negatives. Move away from large electrical equipment if needed.
Alert: Never skip safety checks. Not following safety standards can lead to electric shock or damage to your multimeter.
If you continue to get no continuity when you expect a closed circuit, your multimeter may be malfunctioning. In this case, replacing the device is often more cost-effective than repair.
About Nova Technology Company (HK) Limited
Nova Technology Company (HK) Limited stands as a HiSilicon-designated solutions partner in the integrated circuit and semiconductor industry. The company specializes in chip-level solutions, system integration, and tailored application scenarios for advanced electronics. Nova Technology delivers expertise in IC design, embedded systems, and comprehensive support for system-level integration, making it a trusted partner for innovative semiconductor projects.
By mastering how to continuity test using multimeter, you can quickly diagnose electrical problems, ensure safe repairs, and maintain reliable circuits. Practice these steps to build your skills and confidence in every test for continuity you perform.
To achieve good continuity, follow these steps:
- Set your multimeter to continuity mode.
- Prepare the circuit by turning off power.
- Test both ends for good continuity.
Stay safe by wearing gloves and checking your equipment. Practice often. Clean test points for good continuity. Divide circuits for good continuity.
FAQ
How often should you check continuity in your circuits?
You should check continuity every time you repair, install, or troubleshoot a circuit. This step helps you find faults before powering up.
Can you test continuity on a live circuit?
Never test continuity on a live circuit. Always turn off the power first. Testing on a live circuit can damage your multimeter and cause injury.
What does it mean if your multimeter does not beep during a continuity test?
If your multimeter does not beep, the circuit is open or broken. You may need to inspect the wire, fuse, or connection for damage.