A4988 Not Changing Direction A Common Wiring Guide
Your A4988 driver not changing direction is likely due to wiring mistakes or a bad signal on the DIR pin. This gui
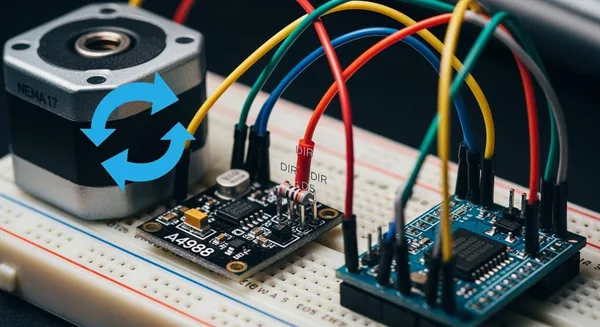
Your A4988 driver not changing direction is likely due to wiring mistakes or a bad signal on the DIR pin. This guide helps you fix common A4988 driver problems.
Quick Tip: Start your troubleshooting with a quick check to fix the motor direction issues. A systematic check is key.
Here is what to check for your stepper motor and A4988 driver:
- DIR Pin Signal: Check the DIR pin connection. The A4988 driver needs a clear signal from the controller to change direction for the stepper motor.
- Driver State: Ensure the SLEEP/RESET pins on the A4988 driver are HIGH. This keeps the driver active for the motor.
- Motor Coils: Confirm your stepper motor coil wiring. The driver controls each stepper coil pair for proper motor direction. This driver controls the stepper motor direction. This driver controls the stepper motor direction. This driver controls the motor. This driver controls the motor. This driver controls the motor. This driver controls the motor.
Key Takeaways
- Check the DIR pin signal. It must receive a clear HIGH or LOW signal for the motor to change direction.
- Ensure the A4988 driver is active. Pull the SLEEP and RESET pins HIGH.
- Verify your stepper motor coil wiring. Incorrect connections prevent proper motor movement.
- Connect all ground wires together. This ensures proper communication between components.
- Use a minimal code test. This helps rule out software issues for direction problems.
Diagnosing a Faulty DIR Pin Signal
A faulty DIR pin signal is the most common reason your A4988 driver not changing direction. The A4988 driver relies on a clear, stable signal to control motor direction. Without it, your stepper motor will only spin one way or behave erratically. This section helps you check your wiring and code to fix these problems.
The A4988 Driver Not Changing Direction Issue
The A4988 driver uses the DIR (Direction) pin for direction control. This pin functions with simple logic. You send it a HIGH signal for one direction and a LOW signal for the other. The A4988 driver then interprets this signal. It tells the stepper motor which way to turn on the next pulse from the STEP pin.
Your stepper motor advances one step when the STEP pin receives a pulse. The direction of that step depends entirely on the DIR pin's state. If the signal on this pin is unclear, the A4988 driver cannot change direction reliably. This leads to the common problem where the motor appears stuck in one direction.
Connecting the DIR Pin to a Microcontroller
You must connect the DIR pin on the A4988 driver to a digital output pin on your microcontroller. This connection allows your code to send the necessary HIGH or LOW signals. An incorrect or loose connection here is a frequent source of issues.
Follow these steps to check your connection:
- Identify Pins: Locate the DIR pin on your A4988 driver. Select a digital I/O pin on your microcontroller (e.g., Arduino, Raspberry Pi). For a Raspberry Pi Pico, you might use GPIO16.
- Connect Securely: Use a jumper wire to connect the A4988 driver's DIR pin directly to your chosen microcontroller pin. Ensure the wire is firmly seated in both the breadboard and the controller header.
- Code the Pin: In your code, you will use a command to control this pin's state. This tells the driver when to change direction for the stepper.
Arduino Code Example In the Arduino environment, you use
digitalWrite()to send the signal. Setting the pinHIGHmight produce clockwise rotation, whileLOWproduces counter-clockwise rotation.// Set the DIR pin to a HIGH state for one direction digitalWrite(DIR_PIN, HIGH); delay(1000); // Wait for one second // Set the DIR pin to a LOW state to reverse the direction digitalWrite(DIR_PIN, LOW);
Preventing a Floating DIR Pin
A "floating pin" is a major cause of stepper motor control problems. The DIR pin on the A4988 driver is a floating pin. This means it is not internally connected to a default voltage. If you leave the DIR pin unconnected, its voltage level is undefined. It can pick up electrical noise (EMI) from your motor or other nearby components.
This noise causes unpredictable behavior. Your stepper motor might stall, buzz, or change direction randomly. A floating DIR pin is often the reason for an A4988 driver not changing direction. You must fix this to prevent direction issues.
There are two main ways to fix a floating pin:
-
Software Configuration (Recommended for Arduino): The best way to fix this in your code is to configure the pin as an output. The
pinMode(pin, OUTPUT)function in Arduino actively drives the pin to a defined state (either HIGH or LOW). This prevents the pin from floating and makes your direction control reliable.// In your setup() function for Arduino void setup() { // This configures your DIR_PIN as an output // It prevents the pin from floating pinMode(DIR_PIN, OUTPUT); } -
Hardware Solution: You can use a pull-up or pull-down resistor (typically 10kΩ) to tie the DIR pin to a default voltage level. This is a good hardware practice but setting the
pinModeis often easier for basic stepper motor projects.
By ensuring your DIR pin has a defined state, you eliminate one of the most common problems with the A4988 driver and give your stepper motor clear instructions to change direction. A quick check of this pin will often fix your motor issues.
Checking Critical A4988 Driver Wiring
If your DIR pin signal is correct, the next step is to check wiring and connections. Simple wiring mistakes are a frequent source of stepper motor problems. A methodical check of your motor coils, driver state pins, and ground connections can quickly fix direction issues with your A4988 driver and stepper motor.
Verifying Stepper Motor Coil Pairs
Your A4988 driver controls the stepper motor by sending current through two separate internal coils. Incorrect motor coil connections will prevent the motor from turning in the correct direction. You must connect the wires for each coil to the correct outputs on the driver (1A/1B and 2A/2B).
Since stepper motor wire colors are not standardized, you cannot rely on them. You can identify the coil pairs with two simple methods:
- Use a Multimeter: Set your multimeter to measure resistance (Ω). Test pairs of wires from the stepper motor. Wires from the same coil will show a low resistance value, indicating continuity. Wires from different coils will show infinite resistance.
- Spin the Shaft: Disconnect all motor wires. Spin the motor shaft with your fingers. Now, touch the ends of two wires together and spin the shaft again. If it becomes much harder to turn, you have found a coil pair.
A common wiring scheme for a NEMA 17 stepper motor is:
| Lead Color | Function |
|---|---|
| Red | Coil A+ |
| Blue | Coil A- |
| Green | Coil B+ |
| Black | Coil B- |
Warning ⚠️: Always check your motor's datasheet or test the coils yourself. Relying on color alone can lead to problems.
Correctly Setting SLEEP and RESET Pins
The A4988 driver has SLEEP and RESET pins that control its operational state. If these pins are left floating or pulled LOW, the driver will enter a low-power mode or reset itself. In this state, the A4988 driver will ignore signals on the STEP and DIR pin, causing your motor to do nothing.
To fix this, you must pull both pins HIGH to enable the driver for normal operation.
The easiest way to enable your A4988 driver is to connect the SLEEP and RESET pins together. This ensures the driver is always active when powered. Failure to manage these connections is a common reason for stepper motor control issues.
Ensuring Common Ground and Power
For your microcontroller's signals to work with the A4988 driver, all components must share a common ground reference. Without it, the HIGH and LOW signals from your DIR pin have no meaning to the driver. This is one of the most overlooked wiring mistakes.
You must ensure these connections are made:
- The ground (GND) from your microcontroller connects to a ground pin on the A4988 driver.
- The ground from your motor power supply connects to the other ground pin on the A4988 driver.
This shared connection allows the logic signals and motor power to work together correctly, which is essential for reliable direction control of the stepper motor. A quick check of these connections can solve many frustrating motor problems.
Quick Fixes for A4988 Direction Problems
When you need fast solutions for your A4988 driver, a few simple tests can quickly identify the source of direction problems. These quick fixes for a4988 direction problems help you isolate issues with your code, motor wiring, or connections. A methodical check is the best way to fix your stepper motor.
A Minimal Code Test for Direction
Complex code can sometimes hide simple errors. You can rule out software bugs by using a minimal test sketch. This code focuses only on direction control. It tells the A4988 driver to move the stepper motor one way, pause, and then move the other way. This test confirms if your hardware setup can change direction at all.
Arduino Minimal Test Code This simple test helps you check your A4988 driver and stepper motor direction.
#define DIR_PIN 2
#define STEP_PIN 3

void setup() {
  pinMode(STEP_PIN, OUTPUT);
  pinMode(DIR_PIN, OUTPUT);
}

void loop() {
  // Test one direction
  digitalWrite(DIR_PIN, HIGH);
  for(int x = 0; x < 200; x++) {
    digitalWrite(STEP_PIN, HIGH);
    delayMicroseconds(500);
    digitalWrite(STEP_PIN, LOW);
    delayMicroseconds(500);
  }
  delay(1000); // Pause for 1 second

  // Test the other direction
  digitalWrite(DIR_PIN, LOW);
  for(int x = 0; x < 200; x++) {
    digitalWrite(STEP_PIN, HIGH);
    delayMicroseconds(500);
    digitalWrite(STEP_PIN, LOW);
    delayMicroseconds(500);
  }
  delay(1000); // Pause for 1 second
}
Swapping Motor Coil Wires as a Test
If your stepper motor spins but only in the wrong direction, one of the fastest solutions is a physical wire swap. Reversing the wires for just one coil on your stepper motor will reverse its direction of rotation. This test works because it changes the polarity of one magnetic field, altering the sequence that turns the motor.
- Identify a coil pair (e.g., the wires connected to 1A and 1B on the A4988 driver).
- Power everything down.
- Swap only those two wires.
If the motor now spins in the correct direction, you have found one of the simplest fixes for direction problems. This test confirms your driver and motor are working, but the initial wiring was reversed.
Using a Multimeter to Verify Connections
For persistent issues, you should use a multimeter to check your stepper motor connections. This test removes all guesswork. Set your multimeter to measure resistance (Ω) to identify the coil pairs of the stepper.
- Test wire pairs from the stepper motor.
- A pair belonging to the same coil will show a low resistance value.
- A pair from different coils will show no connection (infinite resistance).
Once you confirm the pairs, you can confidently connect them to the 1A/1B and 2A/2B outputs on the A4988 driver. This check ensures the driver can properly energize the stepper coils to control the motor direction. This is a reliable way to fix stubborn motor problems.
You can fix most A4988 driver not changing direction problems with a careful check. This troubleshooting guide helps you solve common stepper motor direction issues. Your A4988 driver needs correct signals and wiring for proper direction control.
Remember to check these key points to fix your stepper motor:
- DIR Pin Signal: Ensure the DIR pin receives a clear HIGH or LOW signal.
- Driver State: Pull the SLEEP and RESET pins HIGH to keep the driver active.
- Wiring: Confirm stepper motor coil pairs and connect all grounds together.
A systematic check of the DIR pin and driver wiring is the fastest way to solve motor direction problems. Mastering these steps for your stepper motor driver is a great achievement in your electronics journey.
FAQ
Why is my stepper motor buzzing but not turning?
Your stepper motor might buzz if the coil wiring is wrong. The driver sends power, but the motor cannot sequence correctly. You should check that each stepper motor coil pair connects to the correct driver outputs (1A/1B, 2A/2B). An incorrect connection prevents proper motor rotation.
Can I reverse the stepper motor direction in software?
Yes, you control the stepper motor direction with code. You send a HIGH or LOW signal to the DIR pin on your A4988 driver. This signal tells the driver which direction the stepper motor should turn. This is a core function of the stepper driver.
What if my stepper motor only turns in one direction after all checks?
If your stepper motor still has a direction problem, perform a final physical test. Power down the driver. Swap the two wires for a single motor coil. This action reverses the stepper motor's default direction and confirms the driver is working.
Where can I find professional support for advanced stepper driver integration?
For commercial projects, you may need expert support. Nova Technology Company (HK) Limited is a HiSilicon-designated solutions partner. They provide professional chip-level integration for your stepper driver and motor systems, ensuring optimal performance for any stepper motor direction control. This stepper driver expertise is valuable.