Are capacitors polarized? A simple guide to avoid circuit damage
So, are capacitors polarized? Yes, many common types of capacitors are polarized. These polarized capacitors require correct
So, are capacitors polarized? Yes, many common types of capacitors are polarized. These polarized capacitors require correct installation. Ignoring capacitor polarity is a costly mistake. A polarized capacitor has a specific positive and negative side, and this polarity must be respected. Incorrect polarity can damage the component and the circuit.
Analogy Time 💡 Think about capacitor polarity like battery polarity. A reversed battery might just stop a toy from working, but a reversed capacitor can cause much more serious issues.
Key Takeaways
- Some capacitors are polarized, and some are not. Polarized capacitors have a positive and negative side.
- Installing a polarized capacitor backward can cause it to overheat, leak, or even explode.
- Always check capacitor markings. A stripe usually shows the negative side, and a longer lead is often positive.
- Double-check polarity using PCB markings and schematics before soldering to prevent mistakes.
- Organize components well. This prevents mix-ups and ensures correct placement during assembly.
So, are capacitors polarized? The fundamental split
The question "are capacitors polarized?" has a simple answer: some are, and some are not. This division comes from their internal construction. A polarized capacitor has an asymmetrical design. This design creates a specific positive and negative terminal. Non-polarized types have a symmetrical build, allowing installation in any direction. Understanding this difference is key to correct circuit assembly.
The asymmetrical design of a polarized capacitor
A polarized capacitor works because of a very thin insulating layer, called a dielectric. In many polarized capacitors, this layer is an oxide film formed on one of the metal plates through an electrochemical process. This process gives the capacitor its polarity. The circuit's voltage must align with this internal polarity. Applying voltage correctly maintains the dielectric layer. Incorrect capacitor polarity will destroy this delicate layer, causing the component to fail. This is why respecting capacitor polarity is not optional.
Common polarized types: Electrolytic and Tantalum
Electrolytic and tantalum capacitors are the most common polarized capacitors.
- Aluminum Electrolytic Capacitors: These are popular for their high capacitance in a small package. They are often used in power supplies for filtering. Their typical specifications include:
- Capacitance range: 0.1 µF to 15,000 µF
- Working voltage range: 4 V to 630 V
- Tantalum Electrolytic Capacitors: These offer high capacitance density and stability. They are essential in compact modern electronics. Common applications include smartphones, automotive systems, and medical devices where reliability and size are critical.
Common non-polarized types: Ceramic and Film
Many capacitor types do not have polarity. Technicians can install them in any orientation.
Design Tip 📝 While ceramic capacitors are very common, they can introduce unwanted noise (microphonics) in sensitive audio or measurement circuits.
- Ceramic Capacitors: These are small, cheap, and widely used for bypassing and coupling applications. They have no polarity.
- Film Capacitors: These offer excellent stability and low noise. Engineers often prefer them over ceramic types for high-performance applications like audio filters and precision signal circuits. A film capacitor provides cleaner performance where signal integrity is a priority.
The answer to "are capacitors polarized?" is clearly "it depends on the type." Knowing which ones are polarized is the first step toward building reliable circuits.
Understanding component polarity: Why it matters
Understanding component polarity is not just about following rules; it is about understanding the science that makes a polarized capacitor work. The internal design of these components dictates a one-way street for electrical current. Ignoring the signs for capacitor polarity leads to component failure and potential circuit damage. These mistakes are entirely preventable with the right knowledge.
The role of the dielectric layer
The secret to a polarized capacitor lies in its extremely thin dielectric layer. This layer is an insulator that prevents current from flowing directly between the capacitor's two conductive plates. In an aluminum electrolytic capacitor, manufacturers create this layer through a process called anodic oxidation.
- A technician applies a positive voltage to the aluminum anode foil inside an electrolytic bath.
- The aluminum metal reacts with water, forming aluminum hydroxide.
- This aluminum hydroxide then converts into a very thin, uniform layer of aluminum oxide. This oxide is the dielectric.
This formation process gives the capacitor its inherent polarity. The voltage rating of the capacitor is directly related to the thickness of this oxide layer. A thicker dielectric layer can withstand a higher voltage. Applying a DC voltage in the correct direction maintains this delicate insulating layer, allowing the capacitor to function properly.
How reverse voltage causes failure
Applying a reverse voltage is one of the most common capacitor polarity mistakes. Incorrect capacitor polarity triggers a destructive electrochemical reaction. When a reverse voltage of more than 1 to 1.5 volts is applied, the stable dielectric layer begins to break down.
The following steps outline this failure process:
- The reverse voltage initiates an electrochemical reduction, or redox reaction.
- This reaction effectively dissolves the insulating aluminum oxide layer.
- Without the insulating layer, the capacitor short-circuits, creating a low-resistance path for current to flow directly through the component.
This process irreversibly damages the capacitor. The component no longer holds a charge and instead acts like a simple wire, leading to catastrophic failure.
Overheating, leaks, and explosions
Once the dielectric layer is gone, the capacitor becomes a short circuit. A large amount of current rushes through the component's electrolyte. The electrolyte is a semi-liquid substance that acts as the capacitor's cathode and is essential for its operation. It contains a mix of solvents and solutes.
| Component Type | Example Compound |
|---|---|
| Solvent | Ethylene glycol |
| Solute (Acid) | Adipic acid |
| Solute (Base) | Ammonia or Triethylamine |
The short-circuit current rapidly heats this electrolyte, causing it to boil. This boiling generates a significant amount of gas, primarily hydrogen, inside the sealed capacitor can.
Safety Warning ⚠️ The pressure buildup can cause the capacitor to bulge, leak corrosive electrolyte, or even explode with a loud pop. The flying debris and leaked chemicals are a hazard to both the circuit board and the technician.
This dramatic event is a direct result of reversing the electrolytic capacitor polarity.
Tantalum capacitor failure modes
Tantalum capacitors are another common type of polarized component. While they also have a dielectric oxide layer, their failure mode is different and often more dangerous. Tantalum capacitors are extremely sensitive to reverse voltage and voltage spikes above their rating.
Instead of venting gas, a failing tantalum capacitor typically develops an internal short circuit that rapidly becomes a hot spot. This intense heat can cause the component to ignite, producing smoke and a small flame. This is why engineers often call it the "fiery death" of a tantalum capacitor. Due to this risk, it is critical to double-check the polarity of these polarized components before powering on a circuit.
Identifying capacitor polarity: Reading the signs
Correctly identifying component polarity is a non-negotiable skill for safe and successful electronics assembly. A polarized capacitor installed backward will fail. Manufacturers place clear visual cues on components to guide proper capacitor orientation. Learning to read these capacitor polarity markings is the final step in preventing circuit damage. These markings provide the necessary information for correct assembly.
Markings on electrolytic capacitors
Electrolytic capacitors are common, so understanding their markings is essential. Manufacturers use a variety of polarity markings, so a technician must be observant. While organizations like the Electronic Industries Alliance (EIA) help standardize component language, the specific visual markings for polarity can differ.
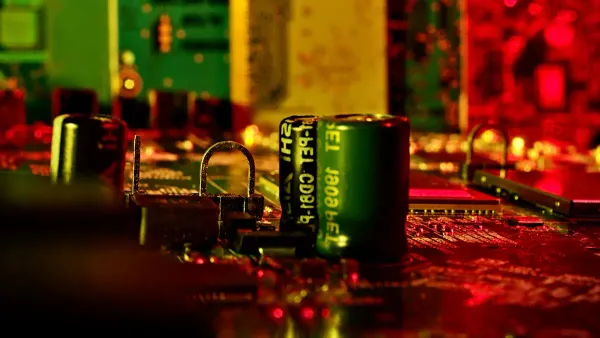
The most common indicator for electrolytic capacitor polarity is a stripe.
- Radial Capacitors: These components typically have a bold, contrasting stripe running down the side of the can. This stripe indicates the negative terminal.
- Axial Capacitors: These tube-shaped components feature a band or stripe on one end. This marking often includes arrows that point directly to the negative terminal.
These markings are crucial for correct component orientation during assembly. Always check the datasheet if the markings are unclear.
The negative stripe and lead length rule
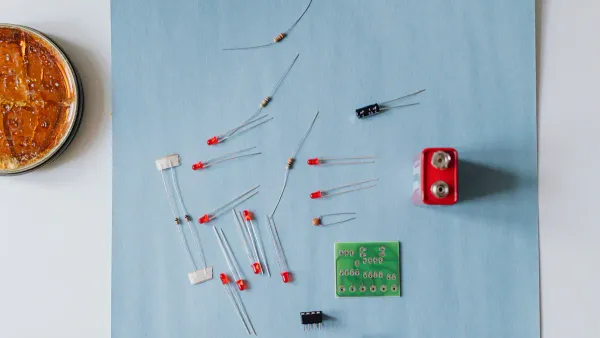
For new, uncut through-hole capacitors, technicians have two reliable ways to determine capacitor polarity. These rules are fundamental for manual assembly.
| Identification Method | Positive Terminal (+) | Negative Terminal (-) |
|---|---|---|
| Lead Length | The longer lead | The shorter lead |
| Body Marking | The side without a stripe | The side with a colored stripe |
The longer lead corresponds to the positive terminal (anode), while the shorter lead is the negative terminal (cathode). This is a very helpful rule for quick identification. However, the most dependable of all polarity markings is the stripe printed on the capacitor's body.
Assembly Pro Tip ⚠️ Technicians should not rely only on lead length. Leads are often trimmed to the same size during automated or manual kitting processes. The printed stripe on the capacitor body is the most trustworthy indicator of the negative terminal. Verifying the markings is a key step for reliable assembly.
Markings on surface-mount (SMD) capacitors
Surface-mount devices (SMDs) are much smaller, so their polarity markings are also smaller. Identifying these markings correctly is vital for modern electronics assembly. For a polarized SMD aluminum capacitor, the negative terminal is often indicated by a colored-in section on top of the can.
Other common polarity markings for SMD capacitors include:
- A beveled or chamfered edge on the plastic base, which typically indicates the positive terminal.
- A color strip or block marking the negative electrode.
- A simple
+symbol printed on the component to mark the positive terminal.
The correct capacitor orientation is essential for the function of the circuit. For rectangular and cylindrical polymer capacitors, the location of the polarity markings can differ. Rectangular types are usually marked on the anode (positive) side, while cylindrical types are marked on thecathode (negative) side.
A Note on Professional Assembly 📝 In high-reliability applications, sourcing quality components and adhering to strict assembly standards is paramount. For example, Nova Technology Company (HK) Limited, a HiSilicon-designated solutions partner, emphasizes the importance of following datasheet specifications for all components. This ensures that every capacitor is placed with the correct capacitor orientation, guaranteeing circuit integrity and performance.
Polarity indicators on tantalum capacitors
Tantalum capacitors have their own set of rules for polarity markings. Getting the tantalum capacitor polarity wrong is especially risky, as they can fail violently. The markings are clear, but they are the opposite of what many expect from electrolytic capacitors.
For SMD tantalum capacitors, the most common marking is a bar or stripe. This bar indicates the positive terminal. This is a critical detail. A plus sign (+) may also be present to mark the positive terminal. This is the most important rule for identifying component polarity in tantalums. For through-hole tantalum capacitors, a + symbol and a longer lead are used to identify the positive terminal. Understanding these specific markings is key to avoiding failure during assembly.
Best practices for marking and handling polarized components
Following the best practices for marking polarized components is essential for any successful electronics project. Professionals understand that correct component handling is the foundation of reliable circuit design. For instance, a HiSilicon-designated solutions partner like Nova Technology Company (HK) Limited builds its reputation on meticulous PCB assembly, where every component orientation is verified. Adopting these professional habits during your own assembly will prevent costly mistakes and ensure your circuits work as intended. The PCB assembly process demands attention to detail.
The golden rule: Double-check polarity
The most important rule is to always double-check capacitor polarity before soldering. Beginners often make capacitor polarity mistakes that can lead to circuit failure. A successful PCB assembly depends on getting this right.
Common beginner mistakes include:
- Failing to notice the markings on a polarized capacitor.
- Assuming a circuit tester will catch incorrect capacitor polarity.
- Relying only on lead length after leads have been trimmed.
Technicians must use schematics and visual inspection to confirm the correct capacitor orientation. This simple check prevents most common capacitor polarity mistakes during assembly.
Reading PCB silkscreens and schematics
The PCB silkscreen and schematic are the roadmaps for a successful PCB assembly. They provide clear instructions for component polarity. The silkscreen often has a + symbol, a filled-in area, or a bevel to mark where the positive side of a polarized capacitor should go. Schematics use standardized symbols to show capacitor polarity.
| Standard | Non-polarized Symbol | Polarized Symbol |
|---|---|---|
| IEC | Two parallel straight lines | One straight plate (+) and one curved plate (-) |
| ANSI/IEEE | Two parallel straight lines | Two parallel lines with a + on the positive side |
Understanding these markings is a key part of the PCB assembly process. Always match the markings on the polarized components to the indicators on the board and schematic for a correct assembly.
Safe desoldering and replacement tips
Replacing a failed polarized capacitor requires careful desoldering to avoid damaging the PCB. A rushed job can lift pads and ruin the board.
Repair Pro Tip 🛠️ A technician can preheat the board from the bottom with a hot air gun to about 60-80°C. This reduces thermal stress on the component and pads during the PCB assembly and repair process.
After preheating, applying a drop of flux to the solder joints helps the solder flow smoothly. A soldering iron with a suitable tip can then be used to heat both pads simultaneously, allowing the old capacitor to be pushed off easily. This technique is vital for a clean PCB assembly.
Organizing components to prevent mix-ups
Proper organization is a simple yet effective way to ensure correct capacitor placement rules are followed. During kitting or assembly, a technician should keep polarized components separate from non-polarized ones. Using labeled bins or trays for different parts prevents accidental mix-ups. This habit is crucial for an efficient PCB assembly workflow. Verifying component polarity one last time before it is placed on the board is the final step to guarantee a flawless assembly. This ensures the correct component orientation for all polarized components.
So, are capacitors polarized? Yes. The polarity of these polarized capacitors is a critical specification. Ignoring capacitor polarity leads to common capacitor polarity mistakes. A few seconds checking the positive terminal and negative terminal prevents these mistakes.
Remember the Rules 📝
- The positive terminal is the longer lead.
- The negative terminal has a stripe.
- The positive terminal is the anode.
- The negative terminal is the cathode.
- Always verify the positive terminal and negative terminal. The positive terminal is vital.
Are capacitors polarized? Yes, and their capacitor polarity matters. The polarity of polarized capacitors is key. This check of capacitor polarity is essential. The polarity of polarized components is not optional.
FAQ
What happens if a capacitor is installed backward?
A reversed capacitor fails during pcb assembly. This mistake can cause leaks or explosions. A proper assembly is critical for a safe pcb assembly. This assembly step prevents damage to the entire circuit.
Can I use a polarized capacitor for an AC signal?
No. Polarized capacitors are for DC circuits only. An AC signal will damage the component. A successful pcb assembly requires the correct component type for the circuit design. This assembly rule is important for function.
How do I check the orientation on the board?
The PCB silkscreen shows the correct orientation. A technician matches the component marking to the board marking during pcb assembly. This ensures a correct assembly. A good pcb assembly process includes this check. The assembly is then correct.
Why is component organization important for assembly?
Good organization prevents mix-ups during pcb assembly. Sourcing high-quality capacitors and keeping them separate ensures the correct part is used for the assembly. This simple habit improves every pcb assembly and the overall assembly process. A good assembly depends on this careful assembly.