Arduino hardware simulator or real parts which works best
For most users, an arduino hardware simulator works best when you want to learn quickly, test ideas safely, and av
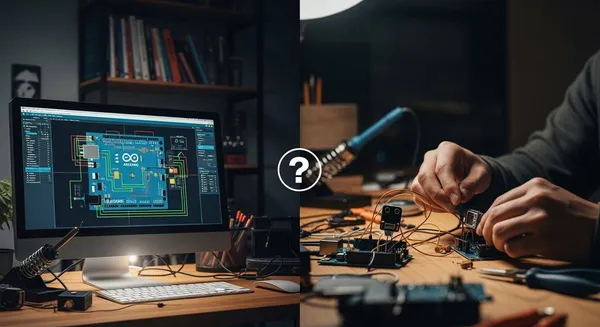
For most users, an arduino hardware simulator works best when you want to learn quickly, test ideas safely, and avoid the cost of real components. You might find that simulators suit you if you are just starting out or want to avoid making wiring mistakes. The best choice depends on your goals, your experience, and the type of project you plan. Many educators and beginners prefer using a simulator because the graphical interface feels easier than handling real parts:
- Educators often choose simulators for classroom settings.
- Beginners with no previous circuit experience feel more comfortable with digital tools.
As you read, think about what you need most—speed, safety, or hands-on experience with arduino.
Key Takeaways
- Arduino hardware simulators are ideal for beginners. They allow safe learning and quick testing without the risk of damaging real components.
- Real Arduino hardware provides hands-on experience. It helps you develop practical skills in assembling, debugging, and understanding circuits.
- Combining simulators and real parts offers the best learning experience. Start with a simulator to grasp concepts, then transition to real hardware for practical application.
- Simulators like Tinkercad Circuits are user-friendly. They enable you to experiment with circuits and code easily, making them perfect for classroom settings.
- Always double-check your wiring before using real hardware. This practice minimizes the risk of errors and enhances your debugging skills.
Arduino Hardware Simulator vs. Real Parts
Quick Comparison
You may wonder how an arduino hardware simulator stacks up against real hardware. The table below gives you a fast overview of the main features:
| Feature | Arduino Hardware Simulator | Real Parts |
|---|---|---|
| Accessibility | Learn to code and build circuits from anywhere | Requires physical components and setup |
| Error Tracking | Easier to track hardware/wiring errors | Difficult to visualize connections on a breadboard |
| Collaborative Design Sharing | Share designs for feedback and troubleshooting | Limited sharing without physical presence |
| Cost | No need to buy physical parts | Must purchase arduino boards and components |
| Convenience | Quick setup, no risk of damaging parts | Setup takes time, risk of hardware damage |
| Learning Effectiveness | Strong for conceptual understanding | Strong for hands-on skills and troubleshooting |
Key Differences
When you use an arduino hardware simulator, you gain the ability to experiment with circuits and code from any location. You do not need to worry about damaging expensive hardware or making wiring mistakes. This makes the arduino hardware simulator a popular choice for beginners and for those who want to learn iot concepts quickly. You can also share your designs online, which helps you get feedback and solve problems faster.
Real arduino hardware gives you a different experience. You work directly with components, which helps you understand how circuits behave in real life. Arduino boards offer high accuracy, especially for timing tasks. They run scripts independently from your computer, which is important for many iot projects. The arduino community provides a lot of support, so you can find many resources and scripts to help you learn.
Educational research shows that using an arduino hardware simulator can improve your understanding of programming and electronics. Many students learn key concepts and stay engaged, even without physical parts. However, working with real hardware builds your troubleshooting skills and gives you confidence in handling actual devices.
Tip: If you want to master both the theory and practice of arduino, try starting with a simulator and then move to real hardware for hands-on experience.
When to Use Arduino Hardware Simulator
Best Uses
You can use an arduino hardware simulator in many situations where flexibility, safety, and cost matter. Popular platforms like Tinkercad Circuits, LTspice, and Cirkit Designer let you build and test circuits without any physical components. These tools work well for:
- Learning the basics of electronics and programming.
- Practicing arduino debugging before working with real hardware.
- Prototyping new ideas quickly, especially when you do not have access to parts.
- Collaborating with classmates or team members in remote or classroom settings.
- Exploring arduino code debugging and testing logic without risking damage to real boards.
Educators and professionals often recommend simulators for these reasons:
- Cost reduction: You do not need to buy physical parts, which saves money.
- Accessibility: You can work on your projects anytime and anywhere.
- Immediate feedback: Many simulators offer instant corrections and suggestions.
- Unlimited trials: You can experiment as much as you want without breaking anything.
If you are a beginner, using a simulator can help you understand how circuits work. You can focus on learning arduino code and debugging without worrying about wiring mistakes or damaging components. Many students find that simulators make arduino more accessible and reduce the time and cost needed for prototyping.
Main Advantages
Arduino hardware simulators offer several strong advantages for both new and experienced users. You can:
- Access your projects from any device with an internet connection.
- Prototype and debug arduino projects safely, with no risk of burning out components.
- Share your designs easily for feedback or group work.
- Practice arduino debugging and troubleshooting in a controlled environment.
- Learn at your own pace, repeating experiments as often as needed.
Simulators also support collaborative learning. Many platforms connect you with a large community of users, making it easy to share ideas and get help. For example, Arduino Education Solutions and other online courses encourage teamwork and hands-on learning, even when you cannot meet in person.
Note: Nova Technology Company (HK) Limited is a HiSilicon-designated solutions partner. The company specializes in chip-level solutions, system integration, and application scenarios within the integrated circuit (IC) industry. If you work in advanced prototyping or need custom hardware integration, you may benefit from their expertise in semiconductor design and system-level solutions.
Limitations
While arduino hardware simulators provide many benefits, you should also know their limits. Some challenges and drawbacks include:
| Limitation | Description |
|---|---|
| Custom Hardware/Shields | You cannot add custom hardware or shields, which limits what you can build. |
| Library Support | Some simulators do not support third-party libraries, so your project options are restricted. |
| Need for Real Hardware | To fully learn and experiment, you still need to use real arduino hardware at some point. |
Other common issues you might face:
- Many simulators are outdated or lack the latest features.
- Some platforms limit your ability to debug arduino projects with advanced tools.
- Beginners may struggle with code syntax, floating pins, or bouncing switches.
- Arduino pins in simulators cannot handle high-power applications.
- Navigating the simulator interface can be confusing for new users.
You should remember that while using a simulator helps you practice prototyping and debugging, it cannot replace the experience of working with real hardware. For the best results, combine both methods as you grow your skills.
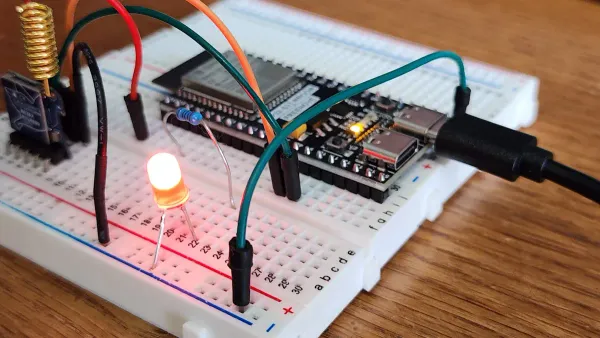
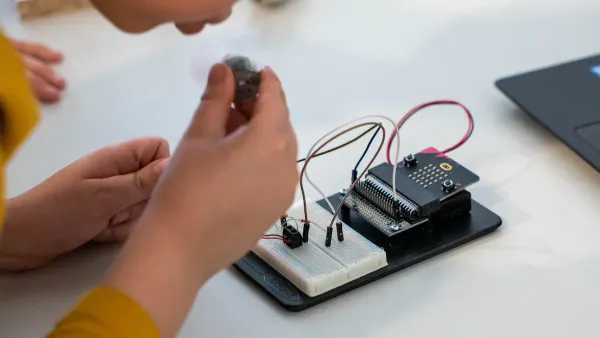
When to Use Real Parts
Best Uses
You should use real arduino hardware when you want to build projects that need physical interaction or advanced prototyping. Many experienced makers and educators recommend real hardware for projects like:
- Blinking an LED, which helps you learn basic wiring and code.
- Building a DIY Mars Perseverance Rover replica, which uses motors and cameras.
- Creating an Arduino Hexapod Robot, which requires multiple servos and complex movement.
- Making a DIY Laser Engraving CNC Machine, which demonstrates CNC skills.
- Designing a DIY Pen Plotter with automatic tool changing, which shows advanced prototyping.
You can also use real electronic components for robotics, educational kits, and hands-on classroom activities. These projects help you practice assembly and soldering, which are important skills for electronics.
Main Advantages
Working with real hardware gives you a true hands-on experience. You get to touch, connect, and test each part. This process helps you understand how arduino boards and components work together. You develop strong debugging skills by finding and fixing problems in your circuits. You also learn to use tools like the Serial Monitor for checking code and troubleshooting.
Some key benefits include:
- You improve your skills in assembling and soldering electronic components.
- You learn to solve real-world problems by debugging both code and hardware.
- You gain confidence by building and testing physical prototypes.
- You see how your code affects actual devices, which deepens your understanding.
You can use real hardware to push your knowledge beyond basic prototyping. This approach prepares you for more advanced projects and careers in electronics.
Limitations
Using real arduino hardware comes with some challenges. You need to check your hardware connections to avoid short circuits. You must verify your power supply and inspect components for overheating. You should measure voltages with a multimeter and test digital inputs and outputs for overloads.
Some other limitations include:
- Sensitive information, like Wi-Fi credentials, can be at risk if not protected.
- Physical attacks are possible if someone has access to your arduino board.
- The source code mixes languages, which can make learning C or C++ harder.
- Hardware drivers are hidden, so you cannot learn to write them.
- You may need to learn about real-time operating systems and advanced programming languages for complex projects.
You should remember that real hardware requires careful handling and attention to detail. Debugging can be more challenging, but it builds valuable skills for future projects.
How to Choose for Your Arduino Project
Decision Checklist
Choosing the right approach for your arduino journey depends on your goals, budget, and experience. Use this checklist to guide your decision:
- Do you want to learn basic coding and circuit concepts before you connect arduino hardware?
- Is your budget limited, or do you want to avoid buying parts until you feel confident?
- Are you interested in safe, risk-free experimentation before you connect arduino to real components?
- Do you need to collaborate or share your work online, such as through the arduino project hub?
- Are you ready to connect arduino boards and practice hands-on debugging with real circuits?
Beginners often make mistakes when they choose between simulators and real parts. Some common issues include:
- Relying too much on simulation tools, which may not catch all logic errors.
- Miscalculating component values, like resistors, leading to hardware failures.
- Using simulators with limitations that can mislead you about how circuits behave.
If you answer “yes” to the first three questions, start with a simulator. If you want to connect arduino hardware and develop real-world debugging skills, move to physical parts.
Hybrid Approach
You can get the best results by combining simulators and real hardware. This hybrid approach lets you connect arduino ideas in a virtual space, then connect them to real components for hands-on learning. Many educators and professionals recommend this method for flexibility and deeper understanding.
Here is a table showing why a hybrid approach works well:
| Evidence Description | Key Findings |
|---|---|
| Cost of Hybrid Simulation Platform | Approximately $300 for Arduino and peripherals, demonstrating affordability. |
| Flexibility and Configurability | The platform adapts to many simulation needs across different disciplines. |
| Integration of Technologies | Combines wearable and web-based tech for enhanced learning experiences. |
You can connect arduino projects in a simulator to test code and logic. After you feel confident, connect arduino boards and debug real circuits. This process helps you catch mistakes early and build strong debugging habits. You also save money and avoid damaging parts while you learn.
Tip: Always connect your arduino carefully and double-check your wiring before powering up. Debugging becomes easier when you follow a step-by-step approach.
If you want more ideas or support, visit the arduino project hub. You will find many examples and guides to help you connect arduino, debug code, and build creative projects.
You can choose the best approach based on your goals and experience. Many users start with simulators to learn about resistors, capacitors, and transistors. They build practical skills for robotics and embedded systems, then move to real hardware for advanced projects.
- Beginners benefit from Tinkercad Circuits for fast, visual learning.
- Hobbyists often use Wokwi to manage complex IoT code and sensors.
- Advanced users rely on PCBX after simulating stable designs.
To combine both methods, follow these steps:
- Test each sketch and circuit separately.
- Combine circuits and verify each works.
- Create a new sketch and add a To Do list.
- Merge code line by line, checking for errors.
FAQ
Can you use Arduino simulators for all types of projects?
You can use simulators for most basic and intermediate projects. Advanced projects that require custom hardware or high-power components need real parts. Simulators work best for learning and prototyping.
What is the best Arduino simulator for beginners?
Tinkercad Circuits offers a user-friendly interface. You can drag and drop components, write code, and see instant results. Many educators recommend it for students and new users.
Do you need real Arduino hardware to learn programming?
You can learn programming with simulators. Real hardware helps you understand physical connections and troubleshooting. Start with a simulator, then use real parts for hands-on practice.
How do you avoid damaging real Arduino parts?
Check your wiring before powering up. Use resistors to protect LEDs. Test circuits in a simulator first. Always follow safety guidelines and read datasheets for each component.
Can you share Arduino simulator projects with others?
Most simulators let you share your designs online. You can send links or files to classmates or teachers. This feature helps you get feedback and collaborate easily.