How To Identify and Use Common Resistor Values
You will often need to identify common resistor values quickly when building circuits. Color codes and numeric markings help
You will often need to identify common resistor values quickly when building circuits. Color codes and numeric markings help you read values, while standard series like E12 and E24 make selection easier. The E24 series, for example, offers a good balance between precision and availability for most projects.
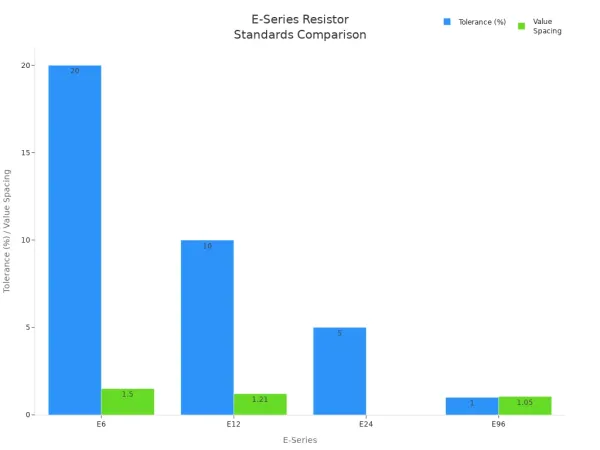
| E-Series | Tolerance | Value Spacing | Description |
|---|---|---|---|
| E6 | 20% | ~1.5 | One value per large range |
| E12 | 10% | ~1.21 | Smaller jumps, suitable for many designs |
| E24 | 5% | Good balance | General-purpose electronics |
| E96 | 1% | ~1.05 | High precision, more costly |
Tip: Tools like a Resistor Color Code Calculator or guides such as "How to Read a Resistor" can help you learn faster.
Key Takeaways
- Learn to read resistor values using color codes. Count the bands and use a color code chart for accuracy.
- Familiarize yourself with common resistor series like E12 and E24. These series help you choose the right resistor for your project.
- Use a multimeter to verify resistor values. This tool helps confirm the resistance and avoid mistakes.
- Understand tolerance levels. Choose resistors with the right tolerance for your circuit's needs to ensure reliability.
- Practice calculating resistance using Ohm’s Law. This skill helps you select the correct resistor for your circuits.
Identifying Resistor Values

Color Code Basics
You will often see resistors with colored bands. These bands form the resistor colour code, which helps you find the value quickly. Most resistors have three to six bands. You should always start by counting the number of bands. The first band sits closest to a lead. The last band, usually gold or silver, shows the tolerance.
To read the resistor colour code, follow these steps:
- Identify the number of bands.
- Find the reading direction. The first band is near the lead, and the tolerance band is last.
- Use a resistor colour code chart. The first two bands give you the main digits. The third band is the multiplier.
- Check the fourth band for tolerance. If there is a fifth band, it may show a temperature coefficient or extra digit.
Here is a quick example:
| Band Colors | Value | Tolerance |
|---|---|---|
| Green, Blue, Red, Gold | 5600 Ω | 5% |
| Brown, Yellow, Violet, Black, Green | 147 Ω | 0.5% |
| Orange, Red, Brown, Brown, Green, Red | 3.21 kΩ | 1% + 50 ppm/°C |
Many beginners make mistakes when reading the resistor colour code. You should watch out for these common errors:
- Misinterpreting colors in poor lighting or due to color blindness.
- Reading the bands in the wrong order.
- Ignoring the tolerance band.
- Missing the temperature coefficient band.
- Using the wrong multiplier.
- Not using a resistor colour code chart or tool.
Tip: Always use a good light and a resistor colour code chart. This helps you avoid mistakes and makes reading colour coded resistors easier.
Numeric Markings
Some resistors use numbers instead of colors. You will see this on small surface-mount resistors. The numbers follow different systems. The three-digit system means the first two digits are the value, and the third digit is the multiplier. For example, "450" means 45 Ω × 100 = 4500 Ω. The four-digit system works the same way but uses three digits for the value and one for the multiplier. "7992" means 799 Ω × 100 = 79,900 Ω.
High-precision resistors use the EIA-96 system. This system uses a three-digit code and a letter for the multiplier. Manufacturers may use different systems, but standards like IEC 60063:1963 help keep values compatible. This standardization makes it easier for you to use resistors from different brands.
Here is a table showing common numeric marking systems:
| Marking System | Example | Meaning |
|---|---|---|
| Three-digit | 450 | 45 Ω × 100 |
| Four-digit | 7992 | 799 Ω × 100 |
| EIA-96 | 43C | Code + Multiplier |
Note: Always check the manufacturer’s datasheet if you are unsure about the numeric markings.
Multimeter Verification
You can use a multimeter to check resistor values. This is helpful if the resistor colour code is hard to read or if the numbers are unclear. Follow these steps to measure resistance:
- Prepare your workspace. Make sure it is clean and bright.
- Set up your multimeter. Turn it off before choosing the resistance (Ω) setting.
- Connect the probes to each end of the resistor. The probe color does not matter.
- Test the resistance. Do not touch both probes together. Try different ranges for accuracy. Compare your reading with the value from the resistor colour code or numeric marking.
- Turn off the multimeter and disconnect the probes.
You should remember these tips:
- Always check the multimeter setting before measuring.
- Do not touch the metal parts of the probes during measurement.
- Compare your result with the resistor colour code or datasheet.
- Account for tolerance when checking if the value matches.
Tip: Using a multimeter helps you confirm the value of colour coded resistors and prevents mistakes in your circuit.
Common Resistor Values
E12 and E24 Series
You will often see the term e-series when you look for common resistor values. The e-series groups resistors by their tolerance and how many values fit into each decade (a decade means from 10 to 100, or 100 to 1,000, and so on). The E12 and E24 series are the most popular for everyday electronics.
The E12 series gives you 12 values per decade. These resistors have a 10% tolerance. The E24 series offers 24 values per decade and a tighter 5% tolerance. You can see how these series compare in the table below:
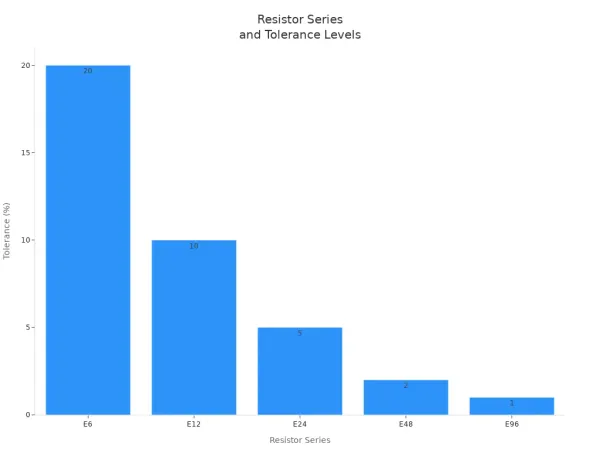
| Series | Year Proposed | Tolerance Level |
|---|---|---|
| E6 | 1950 | 20% |
| E12 | 1950 | 10% |
| E24 | 1950 | 5% |
| E48 | 1957 | 2% |
| E96 | 1957 | 1% |
You will find that the E12 and E24 e-series cover most needs for hobbyists and professionals. The E12 series works well when you do not need high precision. The E24 series is better for circuits that need more accuracy.
Typical Value Ranges
You will notice that common resistor values follow a pattern. The e-series sets these patterns so you can always find a resistor close to what you need. Here are the most used values in the E12 and E24 series:
-
- 1.0, 1.2, 1.5, 1.8, 2.2, 2.7, 3.3, 3.9, 4.7, 5.6, 6.8, 8.2
-
E24 values (5% tolerance):
- 1.0, 1.1, 1.2, 1.3, 1.5, 1.6, 1.8, 2.0, 2.2, 2.4, 2.7, 3.0, 3.3, 3.6, 3.9, 4.3, 4.7, 5.1, 5.6, 6.2, 6.8, 7.5, 8.2, 9.1
You can multiply these numbers by 10, 100, or 1,000 to get other standard resistor values. For example, 4.7 can mean 4.7 Ω, 47 Ω, 470 Ω, or 4.7 kΩ. This system makes it easy for you to pick the right resistor for your project.
Manufacturers use the e-series to decide which standard resistor values to make. You will see that not all values are available in every store. The e-series helps keep things simple and makes sure you can find the most common resistor values for your circuits.
Note: The distribution of resistor values in real-world designs does not always follow a perfect pattern. Manufacturers may not guarantee that every value is always in stock, but the e-series helps you find a close match.
Why These Values Matter
You need to understand why certain resistor values are preferred in electronics. The e-series gives you a set of standard resistor values that balance accuracy, cost, and availability. If you choose a value outside the e-series, you may have trouble finding it or pay more.
- Variations in resistor values can cause circuits to behave in unexpected ways.
- Tolerance affects how accurate your signals are and how much power your circuit uses.
- Knowing about tolerance helps you design circuits that work well every time.
The choice of common resistor values affects how reliable your circuit is. You should always check the resistance value, power rating, tolerance, and temperature coefficient. These factors help you build circuits that last longer and work better.
The global market for standard resistor values keeps growing. Smart electronics, IoT devices, and electric vehicles all use more resistors every year. Manufacturers now focus on making eco-friendly resistors and improving supply chains. Countries like India and China invest in local production, so you can expect better availability of common resistor values in the future.
The rise of AI and IoT also changes how resistors are made. Companies now design smarter, more reliable resistors. You will see more energy-efficient and recyclable resistors as demand grows. Industry 4.0 practices help companies make new resistor solutions faster, so you get the parts you need for your projects.
Tip: Always use standard resistor values from the e-series for your designs. This makes your circuits easier to build and repair.
Standard Resistor Values and Tolerance
Understanding Tolerance
When you pick resistors for your project, you will see a percentage marked as tolerance. Tolerance tells you how much the actual resistance can differ from the value printed on the resistor. For example, a 100 Ω resistor with a 5% tolerance can have a real value between 95 Ω and 105 Ω. This range is important for making sure your circuit works as planned.
- Resistor tolerance is the allowed difference from the stated resistance, shown as a percentage.
- Tolerance plays a big role in how reliable your circuit is.
- Circuits that need high accuracy, like audio equipment or measurement tools, use resistors with tight tolerances such as ±1%.
- If you use resistors with wide tolerances, your circuit may not work the same every time.
You will find that standard resistor values come in different tolerances. The E12 series usually has 10% tolerance, while the E24 series offers 5%. Some standard resistor values even come in 1% or tighter tolerances for special uses.
Tip: Always check the tolerance when you choose standard resistor values. This helps you avoid problems in your circuit.
Selecting the Right Tolerance
You should match the resistor tolerance to your project’s needs. High-precision circuits need tighter tolerances. General-purpose circuits can use wider tolerances. The table below shows which tolerance fits each type of circuit:
| Circuit Type | Resistor Tolerance |
|---|---|
| High-Precision | ±0.1% to ±1% |
| General-Purpose | ±5% or ±10% |
If you build a simple LED circuit, you can use standard resistor values with 5% or 10% tolerance. For a sensor or amplifier, you should pick standard resistor values with 1% tolerance or better. Using the right tolerance keeps your circuit stable and safe.
You will notice that most standard resistor values are easy to find in 5% and 1% versions. This makes it simple to choose the best part for your project. Always think about how much error your circuit can handle before you pick a resistor.
Note: Choosing the correct tolerance for your standard resistor values helps your project work every time.
Using Resistors in Circuits
Selection Steps
You can select the right resistor for your circuit by following these steps:
- Find the resistance you need. Use Ohm’s Law: Resistance = Voltage ÷ Current. For example, if you want to limit current to an LED, subtract the LED voltage from the battery voltage and divide by the desired current.
- Calculate the power rating. Use the formula: Power = Voltage across resistor × Current through resistor. Make sure your resistor can handle this power.
- Check the tolerance. Decide how much the resistor value can vary. For most projects, 5% or 10% tolerance works well.
- Look at the temperature coefficient. Choose resistors with a low temperature coefficient if your circuit will face changing temperatures.
- Make sure the resistor can handle the operating voltage. Some circuits need resistors that work with higher voltages.
Tip: Always organize your fixed resistors in labeled compartments. This helps you find the correct resistor values in ω quickly.
Application Examples
You will use resistor values in ω in many circuits. Here are some common examples:
- When you build an LED circuit, first check the LED’s forward voltage. For a red LED, use 2.0V. If your battery is 9V and you want 20mA current, use the formula: (9V - 2V) ÷ 0.02A = 350Ω. Choose the closest standard resistor value in ω, such as 360Ω.
- In a voltage divider, you can create different voltage levels. For example, you can use resistor values in ω like 10kΩ and 2kΩ to get a lower voltage from a 24V supply.
- For an op-amp amplifier, you may need a gain of 5. Use a 7.5kΩ resistor and a 1.5kΩ resistor. These resistor values in ω give you the right ratio for your circuit.
Note: Always check resistor values in ω with a multimeter if the markings are hard to read.
Quick-Reference Table
You can use this table to find common resistor values in ω for your projects:
| Application | Typical Resistor Values in ω | Power Rating | Tolerance |
|---|---|---|---|
| LED Current Limit | 220Ω, 330Ω, 470Ω | 0.25W | 5% |
| Voltage Divider | 1kΩ, 2kΩ, 10kΩ, 22kΩ | 0.25W | 5% |
| Op-Amp Amplifier | 1.5kΩ, 7.5kΩ, 10kΩ | 0.25W | 1% |
| Pull-Up/Pull-Down | 4.7kΩ, 10kΩ | 0.25W | 5% |
Tip: Use a magnifying glass to read small resistor values in ω. Always keep fixed resistors sorted to avoid mistakes.
You now know how to identify resistor values using color codes, numeric markings, and a multimeter. Understanding standard resistor values and tolerance helps you build circuits that work well. Use the quick-reference table to pick the right resistor for your project. Try different values in your circuits and see how they change the results. Practice will help you gain confidence and improve your skills.
FAQ
How do you know which resistor value to use in a circuit?
You should use Ohm’s Law to calculate the needed resistance. Check your circuit’s voltage and current. Pick the closest standard resistor value. Always check the power rating and tolerance.
What happens if you use the wrong resistor value?
If you use a resistor that is too high, your circuit may not work. If it is too low, you might damage parts or cause overheating. Always double-check your calculations.
Can you mix different resistor values to get a new value?
Yes! You can connect resistors in series or parallel.
- Series: Add the values.
- Parallel: Use the formula
1/R_total = 1/R1 + 1/R2 + ...
Why do some resistors have more bands than others?
Extra bands show more information.
- Four bands: value and tolerance
- Five or six bands: higher accuracy or temperature rating
Tip: Always check a color code chart for details.