How to Check a Starter Solenoid A Simple Guide
You turn the key, ready for an engine start, but get a frustrating click or complete silence. This is a classic si

You turn the key, ready for an engine start, but get a frustrating click or complete silence. This is a classic sign of a potential starter solenoid issue. A single, solid click often means the solenoid is trying to work. No click or rapid clicking usually points to a problem with the starter solenoid or the starter itself. Learning how to test a starter solenoid confirms if this small part is the true culprit.
Pro Tip: Knowing how to check a solenoid on a starter is crucial. This knowledge helps you determine if the entire starter needs replacing, or just a bad starter solenoid, which can save you significant money.
Repair Type Approximate Cost Solenoid Contact Repair Less than $50 Rebuilt Starter Unit Around $200 New Starter Unit Approximately $400
Key Takeaways
- A bad starter solenoid often causes a single click or no sound when you try to start your car.
- Always check your battery and clean its connections before testing the solenoid to ensure accurate results.
- You can test the solenoid on the car using a multimeter or by bypassing the ignition with a jumper wire.
- Bench testing the solenoid involves removing it from the car and using a separate battery to check its function.
- If the solenoid clicks but the engine does not crank, the solenoid is likely bad; if nothing happens, it is completely dead.
Pre-Test Checks and Safety
Before you test the starter solenoid, you must perform a few basic checks. These steps ensure your tests are accurate and that you work safely. A weak battery or corroded connection can easily mimic the symptoms of a bad solenoid, so ruling them out first can save you time and effort.
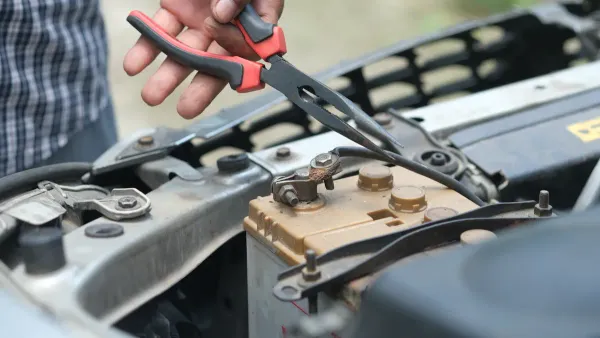
Your starter relies on a massive surge of electricity to crank the engine. Any problem with the power supply will prevent the starter and its solenoid from working correctly. First, confirm your battery is fully charged. You can do this by testing the battery with a multimeter set to DC volts. A healthy, fully charged battery should read at least 12.4 volts. A reading below this means you should charge the battery before testing the starter solenoid.
Next, inspect the battery terminals and the main connections on the starter solenoid. Corrosion creates resistance and blocks the flow of electricity. Clean any buildup from the terminals using a wire brush. A clean, tight connection is essential for the starter to receive the power it needs.
Essential Tools
You do not need a garage full of specialized equipment for this job. Most repairs on a starter solenoid can be done with common hand tools. Here is what you will need:
- Multimeter: To check voltage and diagnose electrical issues.
- Wrench and Socket Set: For disconnecting battery terminals and potentially removing the starter.
- Wire Brush: To clean corrosion from electrical contacts.
- Jumper Wire or Remote Starter Switch: For bypassing the ignition circuit to test the solenoid directly.
Critical Safety Precautions
Working on your vehicle's electrical system requires care. The battery in a standard car can deliver enough current to cause serious harm or damage. Always prioritize safety.
Safety First! Always disconnect the battery before working on the starter or solenoid. To do this, use a wrench to loosen and remove the cable from the negative (-) terminal first. This prevents accidental short circuits if your tool touches a metal part of the car.
- Wear Protective Gear: Always wear safety glasses and gloves. Battery acid is corrosive, and sparks can fly unexpectedly. For vehicles with high-voltage systems like EVs, you must use properly rated insulated gloves.
- Secure Your Vehicle: Park on a level surface and engage the parking brake. You do not want the car to move while you are working on the starter.
- Keep Clear of Moving Parts: Ensure the engine is off and the key is out of the ignition. Stay clear of belts, fans, and other parts that could move.
Following these safety steps ensures you can diagnose the solenoid on your starter without any issues.
How to Test a Starter Solenoid on the Vehicle

With your battery charged and terminals clean, you can now perform tests directly on the vehicle. These on-vehicle tests are the quickest way to diagnose the starter solenoid without removing any major parts. We will cover two effective methods: the voltage drop test and the jumper wire bypass test.
The Voltage Drop Test
A voltage drop test is the professional way to find unwanted resistance in a circuit. When electricity flows, any corrosion, loose connection, or damaged wire acts like a blockage. This test measures the electrical "pressure" buildup at these blockages. It is far more effective than an ohmmeter, which uses a tiny internal battery and cannot flow enough power to detect resistance in the thick cables used by a starter.
This test will help you determine if the problem is in the main power cables or the control circuit that activates the solenoid.
- Set Your Multimeter: Turn the dial to DC Volts (V⎓). If your meter has multiple ranges, select one just above 12V. Plug the black probe into the "COM" port and the red probe into the "V" port.
- Test the Main Power Cable: Connect the red probe directly to the positive (+) battery post. Connect the black probe to the large metal stud on the starter solenoid where the main battery cable attaches.
- Crank the Engine: Have a helper turn the key to the "START" position for about 5 seconds. You are not trying to start the car, just activate the starter circuit. Watch the multimeter reading during the crank attempt.
- Analyze the Reading: A reading above 0.5 volts indicates high resistance in the main power cable or its connections. Ideally, this reading should be under 0.25 volts. A high reading means the starter is not getting full power.
- Test the Control Circuit (S-Terminal): Now, let's check the signal that tells the solenoid to activate. Leave the black probe on a good ground (like the negative battery terminal or a clean spot on the engine block). Touch the red probe to the small wire terminal on the solenoid, often labeled "S".
- Crank Again: Have your helper turn the key to "START" again.
- Analyze the S-Terminal Reading: You should see a voltage reading of at least 10.5 volts. If the reading is lower, it signals a problem in the ignition switch, neutral safety switch, or the wiring leading to the solenoid. The solenoid itself may be good, but it is not receiving the proper signal to work.
What the Results Mean A successful voltage drop test confirms that both the main power supply and the control signal are reaching the starter solenoid correctly. If both tests pass but the starter still only clicks, the solenoid is very likely the component that has failed.
The Jumper Wire Bypass Test
This test offers a more direct way to check the solenoid. You will use a jumper wire to bypass the vehicle's ignition system and send power directly to the solenoid's trigger terminal. This method helps you confirm if the solenoid and starter motor can work when given direct power. It effectively isolates the starter assembly from the rest of the car's starting circuit.
⚠️ Extreme Caution Required This test involves creating a direct electrical connection that can produce sparks. Ensure the vehicle is in Park or Neutral with the parking brake firmly set. Keep your hands and tools clear of the fan, belts, and pulleys.
Performing the Bypass:
- Identify the Terminals: Locate the large stud on the starter solenoid that connects to the battery (it will always have power) and the small "S" terminal that receives the signal from the ignition.
- Prepare the Jumper: Use a short, insulated wire (a 20-24 AWG wire is sufficient for this signal). A remote starter switch is an even safer alternative.
- Bypass the Solenoid: Briefly touch one end of your jumper wire to the large, powered stud and the other end to the small "S" terminal. This action manually sends full battery power to the solenoid's trigger.
Interpreting the Bypass Results:
- Scenario 1: The starter motor engages and cranks the engine. This is good news for your starter and solenoid. It proves they work. The problem lies somewhere in the control circuit you bypassed, such as the ignition switch, starter relay, or neutral safety switch.
- Scenario 2: You hear a loud, single click, but the starter does not spin. This result points directly to a failed starter solenoid. The solenoid is receiving power and trying to engage the starter drive, but the internal contacts that send power to the starter motor itself have failed. This is a classic symptom that tells you how to check a solenoid on a starter and get a definitive answer.
- Scenario 3: Nothing happens, or you see excessive sparks. If nothing happens, the solenoid is likely completely dead. If you see large sparks, immediately stop. This could indicate a short circuit in the solenoid or the starter motor.
By performing these on-vehicle tests, you can gather powerful evidence to diagnose your starting problem. Knowing how to test a starter solenoid this way saves you from guessing and helps you pinpoint the exact cause of the failure.
Bench Testing the Starter Solenoid
If on-vehicle tests are inconclusive, or if you prefer a more controlled environment, bench testing is your next step. This method involves removing the entire starter assembly from the vehicle to test the starter solenoid directly. It is the most definitive way to confirm if the solenoid is faulty.
Removing the Starter Assembly
Removing the starter can be straightforward or challenging, depending on your vehicle's design. You will need a basic socket and ratchet set, and possibly some deep well sockets for the electrical connections.
Before You Begin: Remember to disconnect the negative battery cable first. Secure your vehicle safely, raising it with jack stands if you need to work from underneath.
Follow these general steps to remove the starter:
- Access the Starter: You may need to work from above or below the engine. Sometimes, you must remove parts like splash guards or heat shields to reach the starter.
- Label and Disconnect Wires: You will find a thick battery cable and a smaller control wire on the starter solenoid. Label them before disconnecting to ensure you can reconnect them correctly.
- Remove Mounting Bolts: Locate and remove the bolts holding the starter to the engine block or transmission. These can be tight, so an extension or swivel joint for your ratchet might be helpful.
- Extract the Starter: Once the bolts are out, gently wiggle the starter to free it. Pull it straight back. The starter is heavy, so be careful not to drop it.
Performing the Bench Test
With the starter on your workbench, you can perform a simple test to check the solenoid and motor function. This is the ultimate guide on how to check a solenoid on a starter.
What You Will Need:
- A fully charged 12V car battery
- A set of battery jumper cables
- A short, insulated jumper wire
Performing the Test:
- Secure the Starter: Place the starter firmly in a vise or have a helper hold it securely. The starter will kick when powered.
- Connect the Ground: Attach the black (negative) jumper cable to the negative (-) battery post. Clamp the other end to the starter's metal case or a mounting ear.
- Connect the Power: Attach the red (positive) jumper cable to the positive (+) battery post. Connect the other end to the large power stud on the starter solenoid (where the main battery cable was).
- Activate the Solenoid: Briefly touch your small jumper wire from the large power stud to the small "S" terminal on the solenoid.
⚠️ Watch Your Fingers! When you activate the solenoid, the starter gear will shoot out and spin very fast. Keep hands, clothing, and hair away from the gear.
If the starter gear extends and spins rapidly, your starter and solenoid are working correctly. If you only hear a click, or the gear extends but does not spin, the starter solenoid or the starter motor itself has failed.
Interpreting Your Test Results
You have completed the tests. Now you need to understand what the results mean for your vehicle. Your findings will tell you whether the starter solenoid is good or if you have found the source of your starting problems. This knowledge is the final step in learning how to check a solenoid on a starter.
Signs of a Good Solenoid
A good solenoid will perform consistently during your tests. When you apply power, you should see and hear specific reactions.
- During a Bypass or Bench Test: The starter gear should extend forcefully and the starter motor should spin at high speed. This confirms the solenoid is correctly pushing the gear and closing the circuit to power the starter.
- During a Voltage Drop Test: The main power cable should show less than 0.5V of drop, and the S-terminal should receive over 10.5V. These readings confirm the solenoid is receiving proper power.
What if the solenoid passes but the car won't start? If your tests show the starter solenoid is working, the problem is elsewhere. You should investigate other parts of the starting circuit. A worn ignition switch, a faulty neutral safety switch, or corroded wiring can prevent the signal from reaching the solenoid.
Symptoms of a Bad Solenoid
The signs of a bad starter solenoid are often clear and distinct. If you observed any of the following symptoms during your tests, you have likely found your culprit. A single, loud clicking sound is a classic symptom of a bad starter solenoid. This means the solenoid is trying to work but its internal contacts have failed, preventing power from reaching the starter motor.
Here is a breakdown of what points to a bad starter solenoid versus a failed starter motor:
| Symptom Category | Starter Solenoid Failure | Complete Starter Motor Failure |
|---|---|---|
| Sound | A single, loud click; grinding or whirring | Complete silence or a faint electronic hum |
| Engine Cranking | No crank or intermittent cranking | Absolutely no cranking |
| Disengagement | The starter might make a whirring noise after the engine starts | Not applicable, as the starter never engages |
| Accessories | Lights and radio have full power | Lights and radio have full power |
If your tests resulted in a loud click with no starter spin, you have a bad starter solenoid. If you heard nothing at all, the solenoid is likely completely dead. These results give you the confidence to replace the right part and get your vehicle running again.
You now know how to test a starter solenoid. By following the voltage drop, bypass, or bench tests, you can confidently diagnose your starter issue. A failed test confirms you have a bad starter solenoid. If the starter solenoid passes, the problem likely lies elsewhere in the starter system. The starter solenoid is a key part of the starter. A good solenoid is vital for your starter.
What to Check Next If your solenoid tests are good, investigate these common issues before replacing the entire starter:
- Loose or corroded wiring
- A faulty starter relay
- Oil leaks damaging the starter
- A worn-out starter motor
Congratulations on taking control of your auto repair. You have accurately diagnosed the starter solenoid and are one step closer to getting your vehicle back on the road. A working solenoid ensures your starter functions correctly. This knowledge helps you fix the right part.
FAQ
Can I drive with a bad starter solenoid?
No, you cannot reliably drive with a bad starter solenoid. The solenoid is essential for starting your engine. If it fails, your car will not start, leaving you stranded. You should address the issue immediately.
Is it better to replace the solenoid or the whole starter?
Replacing only the solenoid can save you money. However, many modern starters are sold as a single unit. You should consider replacing the entire starter if it is old, as the motor may fail soon after.
What does a bad starter solenoid sound like?
A bad starter solenoid often makes a single, loud "click" when you turn the key. You might also hear a rapid clicking or whirring sound. Complete silence is another possible symptom of a total solenoid failure.
How long does a starter solenoid last?
A starter solenoid can last for over 100,000 miles. Its lifespan depends on your driving habits and vehicle model. Frequent short trips can cause more wear on the starter system compared to long-distance driving.