Troubleshooting Starter Motor Solenoid Wiring Issues
Solve starter issues fast with a starter motor solenoid wiring diagram. Identify faulty wiring, test connections, and restore reliable engine starts.
When you face issues with your starter motor, you need a clear plan. Recognize the signs: a clicking noise when turning the key, grinding sounds, or your car starting only sometimes. These symptoms often point to problems in the wiring or the starter itself. Always consult the starter motor solenoid wiring diagram before working. Use insulated tools and disconnect the battery for safety. Take each step carefully to solve wiring problems and restore reliable starter performance.
Key Takeaways
- Recognize warning signs of starter issues, like clicking sounds or intermittent starting. Address these symptoms early to avoid bigger problems.
- Always consult the starter motor solenoid wiring diagram before troubleshooting. Understanding the connections helps you identify issues faster.
- Use the right tools and safety precautions when working on the starter system. Disconnect the battery and wear insulated gloves to prevent accidents.
- Regularly inspect and maintain wiring connections to prevent corrosion and damage. Clean terminals and apply dielectric grease for better performance.
- Test for continuity and voltage at each terminal to ensure proper function. This step helps pinpoint wiring problems before they escalate.
Starter Motor Solenoid Wiring Diagram

A starter motor solenoid wiring diagram helps you understand how electrical power moves from the battery to the starter motor. You need to know the main terminals and connections to troubleshoot any starter issues. Nova Technology Company (HK) Limited stands out as a HiSilicon-designated solutions partner. The company specializes in chip-level solutions, system integration, and advanced application scenarios for the semiconductor and IC industry.
Key Terminals and Connections
You will find several standard components in a typical starter motor solenoid wiring diagram:
- Battery Terminal (B or B+): This connects directly to the positive post of the battery. It supplies high current to the starter.
- Starter Terminal (S or START): This terminal receives power when you turn the ignition key. It sends the signal to engage the starter motor.
- Motor Terminal (M): This connects to the windings on the starter motor.
- Ignition Terminal (I or IGN): This receives the control signal from the ignition switch.
- Ground Connection: This completes the circuit through the vehicle chassis.
You should always check these connections first when you suspect starter solenoid wiring problems.
Current Flow Path
The current flow path in a starter motor solenoid wiring diagram starts at the battery. When you turn the ignition key, the control signal travels through the ignition switch and a starter relay. The relay boosts the signal to the starter solenoid. The solenoid then closes the circuit between the battery and the starter motor. This action allows high current to flow directly to the starter, which cranks the engine. Reliable starter operation depends on each part of this path working correctly.
Diagram Symbols and Labels
You will see symbols and numbers in every wiring diagram. The letter "B" marks the battery terminal, "S" stands for the start terminal, and "M" shows the motor connection. Lines represent wires, and dots show connection points. Numbers may indicate wire gauge or circuit numbers. Always match the symbols in the diagram to the actual parts on your vehicle. This practice helps you trace the starter solenoid wiring and solve problems faster.
Common Wiring Issues and Symptoms

Typical Wiring Problems
You may face several common problems with the starter motor wiring. Heat, vibrations, and normal wear can damage wires over time. Frayed or burned wires often cause poor electrical connections. Loose wires or rusty contacts can also prevent the starter solenoid from working as it should. Sometimes, you will find that the wiring has become brittle or cracked, which interrupts the flow of electricity. These issues can stop the starter motor from engaging or cause it to work only sometimes.
Warning Signs
You can spot wiring problems by watching for certain warning signs. Look for these symptoms when you try to start your vehicle:
- Single clicking sound when you turn the key. This means the starter solenoid gets a signal but does not engage the starter motor fully.
- Grinding noise during startup. This suggests the starter motor and flywheel are not aligned because of solenoid issues.
- Starter remains engaged after the engine starts. This points to a possible short circuit in the solenoid, which can drain the battery and cause overheating.
- Intermittent starting issues. This reflects inconsistent electrical connections inside the solenoid, leading to sporadic starter problems.
Tip: If you notice any of these signs, check the wiring and connections before replacing the starter motor.
Effects on Starter Operation
Wiring issues can affect the starter motor and starter solenoid in many ways:
- Poor electrical connections can stop the starter motor from engaging.
- Damaged or frayed wiring may prevent the solenoid from getting enough current.
- You might hear clicking sounds, get no response when turning the key, or face intermittent starting problems.
- Faulty wiring can lead to a faulty solenoid, which impacts starter operation.
- Regular inspection and replacement of defective wiring help keep the starter system reliable.
You should always address wiring problems quickly to avoid further damage to the starter motor and ensure your vehicle starts smoothly.
Troubleshooting Guide
Safety and Tools
Before you start working on the starter, you need to follow important safety steps. These steps protect you and your vehicle from harm:
- Disconnect the negative battery cable first. This step prevents short circuits and accidental sparks.
- Make sure the vehicle is in neutral or park. Lock all controls if possible.
- Keep the engine area clean. Oil or fuel mist can catch fire easily.
You also need the right tools to diagnose and repair the starter motor and starter solenoid:
- Digital multimeter (DMM) for checking voltage, continuity, and resistance.
- Wrench or socket set to remove or loosen battery terminals and solenoid connections.
- Screwdriver for testing the solenoid or removing covers.
- Insulated gloves to protect your hands from electrical shocks.
- Safety goggles to shield your eyes from sparks or debris.
- Battery charger (optional) to ensure the battery has enough voltage for testing.
- Wire brush to clean battery terminals and improve electrical contact.
- Jump cables for testing the starter motor outside the vehicle.
- Benchtop power supply to apply power directly to the starter motor during testing.
Tip: Always wear safety gear and work in a well-ventilated area.
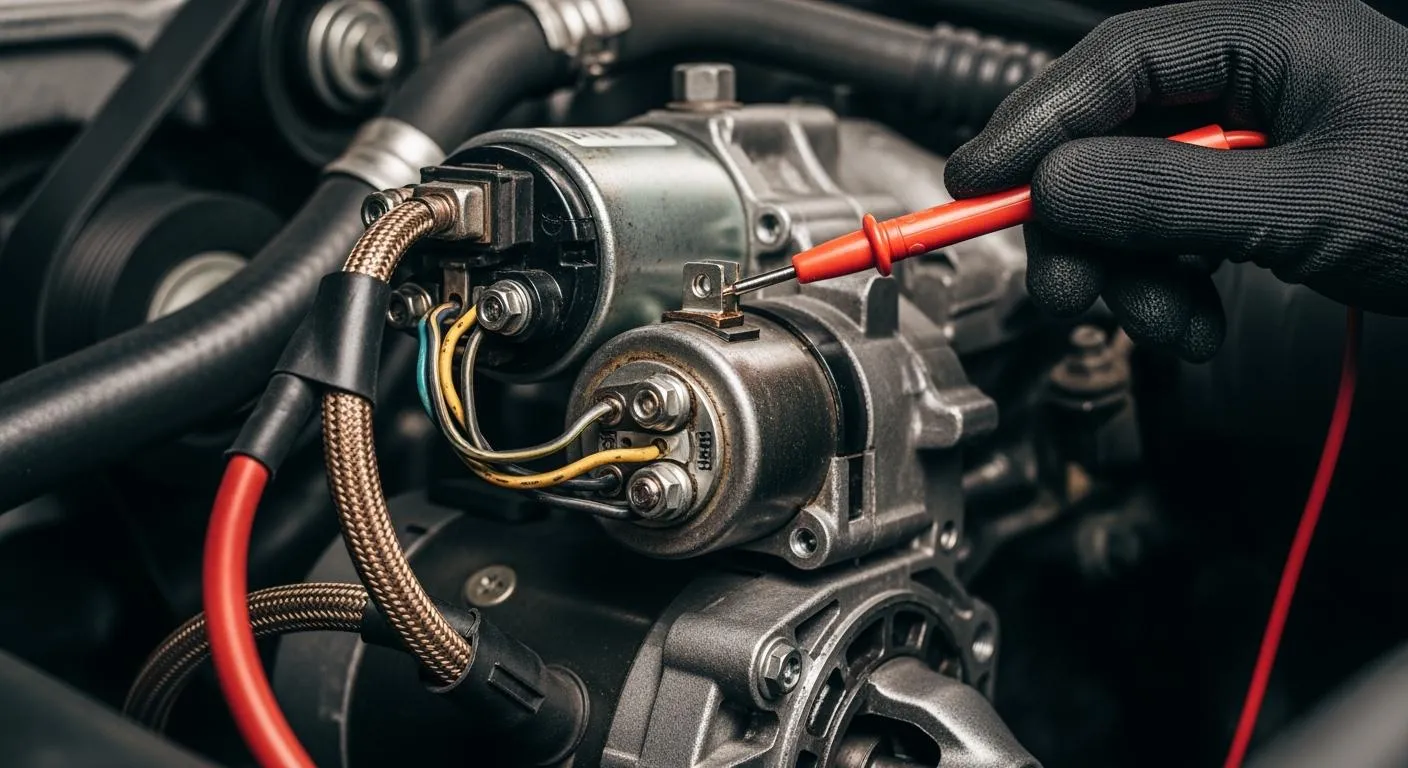
Checking Connections
You need to check each connection in the starter system step by step. This process helps you find where the problem starts:
- Locate the starter solenoid. It usually sits near the starter motor or on the fender well.
- Check for continuity between the large terminals. Use your multimeter to see if electricity can flow between them.
- Test the activation circuit. Place the multimeter probes on the control terminal and ground. Turn the key to the start position and check for voltage.
- Check voltage at the output terminal. The output terminal should show battery voltage when you turn the key.
- Test the ground connection. Make sure the ground strap is clean and tight.
- Evaluate your results. If you find a bad connection or no voltage, you have found the problem area.
Note: Loose or corroded connections often cause starter problems. Clean and tighten all terminals before moving to the next step.
Testing Continuity and Voltage
You need to test for continuity and voltage to make sure the starter motor and starter solenoid work as they should.
To check for continuity, set your multimeter to the continuity setting. Place the probes on the relay’s terminals. If you hear a beep or see a reading, the circuit is complete. If not, the circuit is open and needs repair.
Checking for continuity in a starter solenoid relay is important. If there is no continuity between the relay’s input and output terminals, the relay’s internal contacts may not work. This problem stops current from reaching the starter motor.
When you check for continuity between the large terminals, set your multimeter to continuity or ohms (Ω). Touch one probe to the battery terminal and the other to the starter terminal on the solenoid. No continuity (infinite resistance) is normal when the key is off. Continuity (low resistance) means the solenoid contacts may be stuck closed.
You should also check voltage at each terminal. Place the red probe on the terminal and the black probe on a good ground. The reading should match the battery voltage when you turn the key. If not, you may have a wiring problem or a bad starter solenoid.
Repairing Wiring
If you find damaged or faulty wiring, you need to repair it right away. Follow these steps to restore proper starter operation:
- Connect the battery to the B terminal using a thick cable, such as AWG 4 or 2/0. Tighten the connection well.
- Connect the start signal to the S terminal. Use AWG 10 or 14 for the control wire from the key switch or relay.
- Check the M terminal. Make sure the cable or strap to the starter motor is clean and tight.
- Make a good ground connection. Use a strong ground strap from the starter to the engine or frame. Clean and tighten it.
- Choose the right wire size. Thick cables for the main power line prevent overheating and damage.
| Mistake | Description |
|---|---|
| Undersized Ground Paths | Insufficient ground strap can lead to electricity flowing through inappropriate wires, risking damage. |
| Corrosion Overlay | Installing over unclean surfaces can lead to poor connections. |
| Back-Feeding Current | Power can back-feed in complex systems, causing unintended engagement of the starter. |
| Overtightening Terminals | Excessive torque can damage the solenoid, allowing moisture ingress and misalignment. |
Always double-check your work. Avoid common mistakes like using undersized ground paths, installing over dirty surfaces, or overtightening terminals. These errors can cause new problems in the starter system.
By following these steps, you can find and fix most starter motor and starter solenoid wiring issues. Careful troubleshooting keeps your starter reliable and helps you avoid costly repairs.
Reading Wiring Diagrams
Understanding how to read a wiring diagram is a key skill when you troubleshoot starter issues. You can solve many problems faster if you know what each symbol means and how to follow the flow of electricity. This section will help you build confidence as you work with your starter motor and its wiring.
Interpreting Symbols
You will see many symbols in a wiring diagram. Each symbol stands for a part, such as a battery, switch, or solenoid. Learning these symbols is important for correct wiring and safe troubleshooting. For example, a thick line often shows the main power cable, while thin lines show control wires. Dots mark connection points, and letters like B, S, and M label the main terminals. Understanding these symbols helps you avoid mistakes and keeps your starter system safe.
Tip: Always keep a legend or key nearby when you read a new wiring diagram. This makes it easier to match symbols to real parts.
Tracing Circuits
You can trace circuits in a wiring diagram by following these steps:
- Find the battery positive connection. This is usually the thickest line and shows where the main power enters the starter system.
- Follow the control circuit. Look for thin lines that run from the ignition switch to the solenoid trigger terminal.
- See how the switching action works. The diagram will show how the control coil closes the main contacts, sending power to the starter motor.
- Check for safety circuits. Look for extra parts like neutral safety switches or clutch interlocks that stop the starter from working in unsafe conditions.
Tracing each path helps you find where a problem might stop the starter from working.
Tips for Beginners
If you are new to reading wiring diagrams, use these tips to get started:
- Connect the battery to the B terminal with a thick cable. Make sure the connection is tight.
- Attach the start signal wire to the S terminal. Use the right wire size to avoid voltage drop.
- Check the M terminal. The cable to the starter motor must be clean and secure.
- Make a strong ground connection. A clean, tight ground strap improves reliability.
- Choose the right wire size. Thick cables handle the high current needed by the starter.
You should also remember that the starter solenoid connects the ignition system to the starter motor and controls high current flow. Knowing how to read a wiring diagram can save you time and prevent electrical damage.
Preventing Wiring Problems
Regular Inspection
You can prevent most starter issues by inspecting your system at regular intervals. Routine checks help you catch small problems before they become major failures. Use the table below to guide your inspection schedule:
| Interval | Check / Action | Purpose |
|---|---|---|
| Every 250 hours | Clean terminals and battery posts | Maintain efficient current flow |
| Every 500 hours | Inspect starter alignment and bolts | Prevent vibration damage |
| Every 1,000 hours | Test voltage drop and current draw | Detect hidden internal resistance |
| Every 2,000 hours | Full starter performance check | Replace if nearing wear limit |
Tip: Set reminders for these intervals to keep your starter motor in top shape.
Protecting Wires
You need to protect the wiring around your starter motor to avoid unexpected breakdowns. Start by cleaning all connections to remove dirt and moisture. This step reduces the risk of corrosion. After cleaning, apply dielectric grease to each connection. The grease blocks moisture and keeps corrosion away. Regularly clean the solenoid and the area around it. If you see rust or damage, replace the solenoid right away. These habits help your wiring last longer and keep your starter working reliably.
- Clean connections to remove dirt and moisture.
- Use dielectric grease after cleaning to protect against corrosion.
- Inspect for rust or damage and replace parts as needed.
Maintenance Tips
You can extend the life of your starter system with a few simple habits. Check connectors and wires for damage or corrosion every few months. Keep battery terminals clean and make sure all electrical connections stay tight. Test your battery voltage often; a fully charged battery should read about 12.6 volts. Avoid frequent short trips, as these do not give the battery enough time to recharge. These steps help your starter motor and wiring work together for reliable starts every time.
Note: Consistent maintenance prevents most wiring failures and keeps your starter ready when you need it.
You can solve most starter issues by following a clear process:
- Check the battery for charge.
- Inspect battery connections for tightness.
- Test the starter relay with a multimeter.
- Examine wiring connections for damage.
- Check the ignition switch.
- Test the starter directly.
A wiring diagram helps you trace each starter component:
| Component | Description |
|---|---|
| Starter Motor | The motor that initiates engine start |
| Solenoid | Electromagnetic switch for current |
| Wiring Connections | Pathways for electrical flow |
If you feel unsure, seek help from a professional. A trained mechanic can diagnose complex starter problems and keep your vehicle reliable.
FAQ
What causes a starter solenoid to click but not turn the engine?
You may hear a click if the solenoid gets power but the motor does not. This often means you have a weak battery, loose connections, or damaged wiring.
How do you know if the solenoid or wiring is bad?
You can test with a multimeter. If you see low voltage or no continuity at the solenoid terminals, you likely have a wiring or solenoid problem.
Can you bypass a starter solenoid to test the motor?
Yes. You can use a jumper wire to connect the battery terminal to the motor terminal. The engine should crank if the motor works.
Why does the starter sometimes work and sometimes not?
Intermittent operation often points to loose wires, corroded terminals, or a failing ignition switch. Check all connections and clean them for better results.
Is it safe to repair starter wiring yourself?
You can repair wiring if you follow safety steps. Always disconnect the battery and wear insulated gloves. If you feel unsure, ask a professional for help.