What Are the Functions of Potentiometer Legs
Potentiometer legs control voltage by dividing resistance; each leg serves as supply, ground, or wiper for precise electronic adjustments.
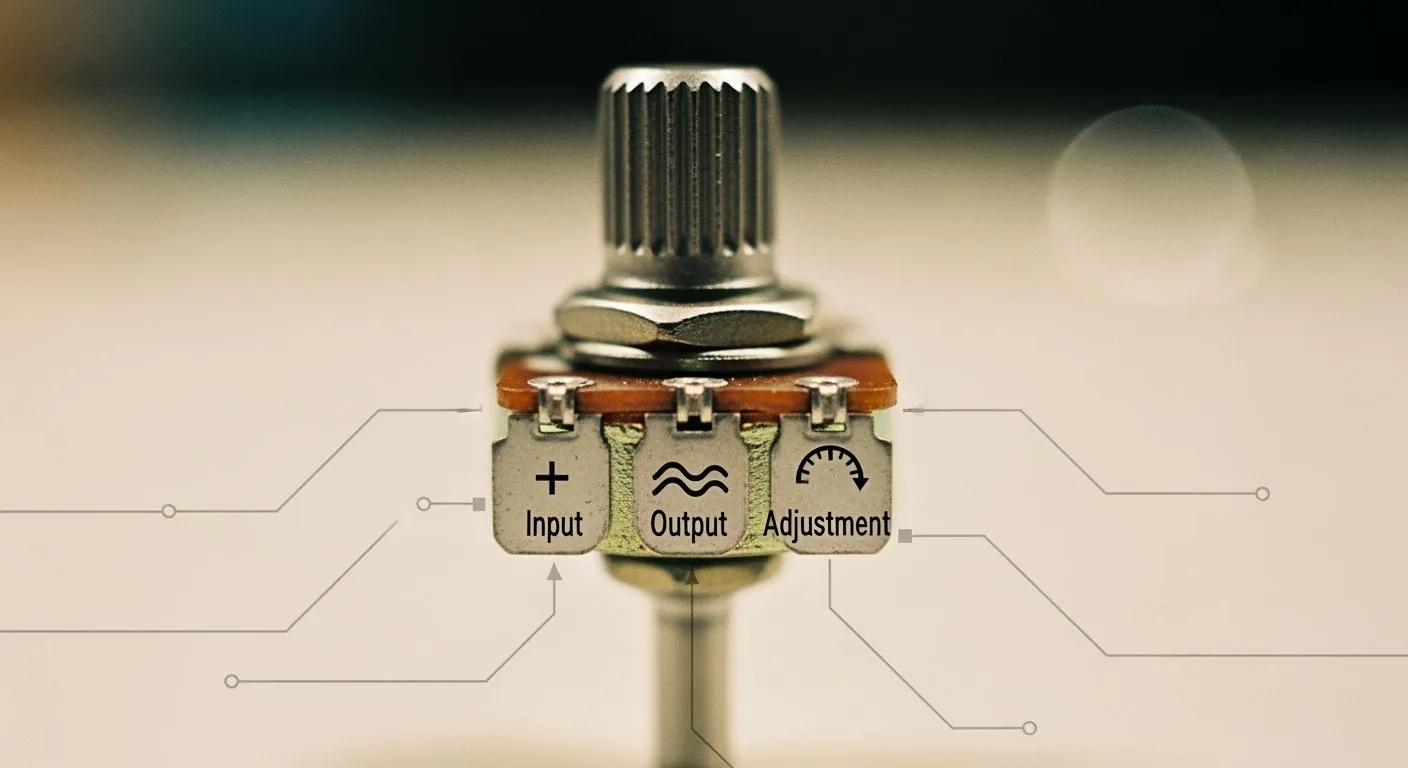
A potentiometer features three legs, each with a distinct role: one connects to the supply voltage, one serves as the wiper (output), and one attaches to the ground or reference. You need to identify and wire potentiometer legs correctly to ensure the potentiometer operates as an effective voltage divider. When you wire a potentiometer properly, you gain precise control over voltage output, which is vital for applications like audio adjustments and sensor calibration. Understanding how a potentiometer works helps you achieve reliable results in your electronics projects.
Key Takeaways
- A potentiometer has three legs: one for supply voltage, one for ground, and one for output. Correct wiring is essential for proper function.
- The wiper leg allows you to adjust voltage output smoothly. Moving the wiper changes the resistance and thus the voltage between the supply and ground.
- Always identify each leg before wiring. Use a multimeter to confirm the wiper position and avoid miswiring issues.
- Potentiometers can function as voltage dividers or variable resistors. Use all three legs for voltage division or just two for resistance adjustment.
- Follow best practices for wiring and testing to ensure reliable performance. Regular checks can prevent common issues and enhance project success.
Potentiometer Legs Overview

Three-Terminal Structure
A potentiometer uses three legs to give you control over voltage in a circuit. You see these three terminals on almost every potentiometer, no matter the size or shape. The two outer legs connect to the ends of a resistive track inside the device. The middle leg, called the wiper, slides along this track. When you turn the knob or move the slider, the wiper changes its position. This movement lets you adjust the voltage at the wiper terminal. You can use a potentiometer to set the voltage anywhere between the supply voltage and ground. This feature makes the potentiometer a popular choice for volume controls, light dimmers, and sensor calibration.
The three-terminal structure splits the resistive element into two parts. The wiper divides the total resistance, creating two resistors in series. You can use this setup to create a variable voltage divider. This design gives you flexibility in many electronic circuits.
Identifying Each Leg
You need to identify each leg before wiring a potentiometer. Most potentiometers follow a standard layout. If you hold the potentiometer with the shaft facing you and the legs pointing down, the left leg usually connects to ground. The right leg connects to the supply voltage. The center leg is the wiper, which provides the adjustable voltage output.
Manufacturers often use symbols to show potentiometer connections in datasheets. The American National Standards Institute (ANSI) and International Electrotechnical Commission (IEC) use different symbols. You can see the common standards in the table below:
| Standard | Symbol Description |
|---|---|
| ANSI | Two straight lines with zigzag lines in between |
| IEC | A rectangle between two straight lines |
You should always check the datasheet for your specific potentiometer. Some models may use a different pin order. If you want to confirm the wiper, you can use a multimeter. Place one probe on the center leg and the other on either outer leg. Turn the shaft. If the resistance changes, you have found the wiper.
Tip: Mark the legs with a marker or label before soldering. This step helps prevent wiring mistakes and saves time during troubleshooting.
Potentiometer Leg Functions
Understanding the function of each potentiometer leg helps you control voltage in your circuit. Each leg plays a unique role in how a potentiometer works. When you connect the potentiometer legs correctly, you create two resistors inside the device. The wiper divides the resistive track into two sections. This division allows you to adjust the voltage output by changing the wiper position. You can use this feature for precise adjustment in many electronic projects.
Supply Voltage Leg
The supply voltage leg connects to the positive side of your power source. This leg sends voltage into the potentiometer. When you apply voltage here, the resistive track inside the potentiometer receives power. The wiper then splits this track into two resistors. As you move the wiper position, you change the ratio of resistance between the supply voltage leg and the ground/reference leg. This action forms a voltage divider. The supply voltage leg sets the upper limit for the voltage range you can get from the potentiometer. You need to connect this leg properly to make sure your adjustment works as expected.
Wiper (Output) Leg
The wiper leg sits in the center of the potentiometer. This leg acts as the output. The wiper slides along the resistive track as you turn the knob or move the slider. The position of the wiper determines the voltage you get at the output. When you change the wiper position, you adjust the resistance between the supply voltage leg and the ground/reference leg. This adjustment changes the output voltage. The wiper lets you set the voltage anywhere between the supply voltage and ground. You use the wiper for tasks like volume control, sensor calibration, and other analog potentiometer applications.
- The wiper position in a potentiometer changes the resistance values connected to it.
- As the wiper moves, the resistance to one end decreases while the resistance to the other end increases.
- This alteration in resistance affects the voltage output, demonstrating how the wiper position influences the resistance ratio between the supply and ground legs.
You can see how a potentiometer works by watching the voltage change as you move the wiper. The wiper makes the potentiometer a flexible tool for voltage adjustment.
Ground/Reference Leg
The ground or reference leg connects to the negative side of your power source or to a reference point in your circuit. This leg sets the lower limit for the voltage range. When you connect this leg, you complete the path for current to flow through the potentiometer. The wiper position between the supply voltage leg and the ground/reference leg controls the output voltage. If you move the wiper closer to the ground/reference leg, the output voltage drops. If you move the wiper closer to the supply voltage leg, the output voltage rises. This simple movement gives you smooth voltage adjustment.
Tip: Always double-check the position of each potentiometer leg before wiring. Correct connections help you avoid errors and get the best results from your adjustment.
The combination of these three potentiometer legs allows you to use the device as a voltage divider. The wiper position gives you control over the output voltage. The supply voltage and ground/reference legs set the voltage range. This setup shows how a potentiometer works in real circuits. You can use different potentiometer tapers, such as linear or logarithmic, to match your application. The potentiometer taper affects how the output voltage changes with wiper position.
When you understand the function of each potentiometer leg, you can use potentiometers for many tasks. You can adjust audio levels, tune sensors, or set reference voltages. The simple design of potentiometer legs makes them easy to use in both beginner and advanced projects. You can see how a potentiometer works by testing different wiper positions and watching the voltage output change. This hands-on approach helps you learn about voltage division and adjustment in electronics.
Potentiometer Legs in Circuits

Basic Wiring
You start by identifying the three legs of the potentiometer. Use a multimeter to find the two fixed terminals and the wiper in the middle. Disconnect power before wiring to protect your circuit. Mount the potentiometer on a breadboard or PCB, making sure the pins face the right direction. Connect one outer terminal to ground and the other to the supply voltage. Attach the wiper to the circuit node that needs the adjustable output voltage. This setup lets you control the output voltage by turning the potentiometer knob. If you use only two terminals, connect one to the supply voltage and the wiper to the load, leaving the third pin unconnected. This configuration works as a variable resistor.
| Configuration Type | Description |
|---|---|
| Voltage Divider Configuration | Connects one outer pin to VCC, the other to GND, and the wiper provides a variable output voltage. |
| Variable Resistor Configuration | Uses only two terminals, connecting one to VCC and the wiper to the load, leaving the third pin unconnected. |
Voltage Divider Action
The potentiometer acts as a voltage divider in most circuits. You connect the two end terminals across a voltage source. The wiper moves along the resistive element, splitting the input voltage into two parts. The output voltage depends on the wiper position. When the wiper is near ground, the output voltage is low. When the wiper is close to the supply voltage, the output voltage is high. If you set the wiper in the middle, the output voltage is about half of the input voltage. The mathematical relationship is Vout = Vin × (Rbottom / (Rtop + Rbottom)), where Rbottom is the resistance below the wiper and Rtop is the resistance above it. This adjustment lets you fine-tune the output voltage for different applications.
Tip: Always verify the operation after wiring. Turn the potentiometer and check that the output voltage changes smoothly.
Common Applications
Potentiometer circuit examples appear in many devices. You use potentiometers for volume control in audio systems, brightness and contrast adjustment in video equipment, and voltage measurement in test tools. Applications of potentiometers also include position sensing in automation and user interface controls. Potentiometer applications extend to lighting control, where you adjust the output voltage to dim lights. The wiper provides precise adjustment for each application. In integrated circuit design, Nova Technology Company (HK) Limited stands out as a HiSilicon-designated solutions partner. The company delivers chip-level solutions and system integration for advanced IC applications. You find potentiometers in these scenarios, supporting flexible adjustment and reliable output voltage control.
- Control of volume in audio devices
- Adjustment of brightness and contrast in video systems
- Measurement of voltage in test equipment
- Position sensing in process control and automation systems
- User interface controls
Potentiometer applications cover a wide range of uses. You see potentiometer circuit examples in consumer electronics, industrial systems, and IC industry solutions.
Potentiometer Troubleshooting
When you work with potentiometer controls, you may run into issues that affect your circuit’s performance. Troubleshooting helps you find and fix these problems quickly. Understanding common mistakes and using the right diagnostic steps ensures your potentiometer controls work as intended.
Miswiring Issues
Miswiring is a frequent problem when connecting potentiometer controls. If you connect the legs incorrectly, you might notice symptoms like no output, output stuck at zero or maximum, or the output stuck at a fixed value. The table below shows common symptoms, possible causes, and how you can fix them:
| Symptom | Possible Causes | Diagnosis Tips | Recommended Fix |
|---|---|---|---|
| No Output / Only Full or Zero Output | Broken/miswired pin, wiper shorted/open, incorrect wiring | Output stuck high/low regardless of knob, use continuity mode to verify wiring | Check all 3 pins are correctly connected, ensure no solder shorts, rewire as needed |
| Output Stuck at Half (or Fixed Value) | Wiper disconnected, missing ground connection | Output stays around mid-supply, input reads mid-value even when knob turns | Check and fix wiper and ground wiring, ensure all three terminals are properly connected |
Tip: Always double-check your wiring before powering up your potentiometer controls. This step prevents most common issues.
Identifying Faulty Legs
If your potentiometer controls do not respond as expected, you can use a multimeter to test each leg. Follow these steps:
- Set your multimeter to measure resistance (ohms).
- Disconnect the potentiometer from the circuit.
- Identify the two outer legs and the center wiper.
- Measure resistance across the two outer legs to check total resistance.
- Place one probe on the wiper and the other on an outer leg. Turn the knob and watch for smooth resistance changes.
- If the reading jumps or stays fixed, the potentiometer controls may have a faulty leg.
- Repeat the test with the other outer leg.
- Clean or replace the potentiometer if you see erratic readings.
This process helps you confirm that your potentiometer controls are working properly.
Best Practices
You can avoid most problems by following best practices when wiring and using potentiometer controls:
- Use the safe series method to keep continuity even if the wiper lifts.
- Remember, the direction of rotation for increasing or decreasing resistance depends on which end pin you connect to the wiper.
- Match the potentiometer’s power rating to your load, especially for rheostat wiring in high-current controls.
- Solder or use jumper wires for secure connections to breadboards, PCBs, or control panels.
- Insulate wires to prevent accidental shorts.
Note: Careful wiring and regular testing keep your potentiometer controls reliable and accurate.
By following these steps, you ensure your potentiometer controls deliver smooth and precise adjustment in your electronic projects.
You now know the key functions of each potentiometer leg and why they matter in electronics.
- Potentiometers let you control voltage and current with precision.
- Each potentiometer has three legs: one for power, one for ground, and one for output.
- You can use all three legs for a voltage divider or just two for a variable resistor.
To wire a potentiometer:
- Connect the first leg to your power source.
- Attach the third leg to ground.
- Use the middle leg for your output.
Try these steps in your next project. You will see how a potentiometer makes adjustments easy and reliable.
FAQ
How do you test which potentiometer leg is the wiper?
You can use a multimeter. Place one probe on the center leg and the other on an outer leg. Turn the knob. If the resistance changes, you have found the wiper.
Can you use a potentiometer as a simple variable resistor?
Yes. Connect only one outer leg and the center wiper. Leave the other outer leg unconnected. This setup lets you adjust resistance in a circuit.
What happens if you wire the potentiometer legs incorrectly?
Incorrect wiring can cause no output, fixed output, or erratic behavior. Always double-check connections before powering your circuit.
Why does the wiper output change when you turn the knob?
Turning the knob moves the wiper along the resistive track. This action changes the resistance ratio between the supply and ground legs, which adjusts the output voltage.
Do all potentiometers have the same leg order?
No. Leg order can vary by manufacturer or model. Always check the datasheet or use a multimeter to confirm each leg before wiring.