Testing Ignition Coils with an Ohmmeter Made Easy
Testing an ignition coil with an ohmmeter gives you quick answers about your vehicle’s health. You do not need spe
Testing an ignition coil with an ohmmeter gives you quick answers about your vehicle’s health. You do not need special skills to check an ignition coil. You gather your tools, disconnect the ignition coil, and measure resistance. You read the results and learn if your ignition coil works well. Many people wonder how to test an ignition coil with an ohmmeter, but you can do it easily. With a few simple steps, you can spot ignition coil issues before they cause bigger problems.
Key Takeaways
- Testing an ignition coil with an ohmmeter is simple and requires no special skills. Follow a few easy steps to check your vehicle's health.
- Always prioritize safety. Ensure the engine is off, wear gloves and safety glasses, and use insulated tools to avoid electric shock.
- Measure both primary and secondary resistance of the ignition coil. Compare your readings to the specifications in your vehicle's manual for accurate results.
- Regular testing helps catch ignition coil issues early, improving vehicle efficiency and reducing the risk of breakdowns.
- If readings are outside the normal range, consider replacing the ignition coil to prevent engine misfires and other serious problems.
Get Ready to Test
Tools and Safety
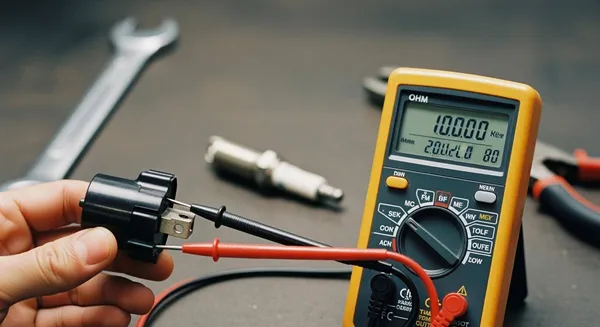
Before you start a resistance test on your ignition coil, gather the right tools and follow important safety steps. You need a multimeter or ohmmeter, safety gloves, and eye protection. Many automotive repair manuals also recommend a voltmeter, but for a resistance test, the ohmmeter is your main tool.
Set your multimeter to the 200 ohm range. This setting gives you the most accurate reading for the ignition coil’s primary and secondary windings. Always double-check that your meter is working before you begin.
Tip: Safety comes first. Always make sure the engine is completely off before you touch any part of the ignition coil. Wait for the engine to cool down if it has been running. Wear thick rubber gloves and safety glasses to protect yourself from electric shock and debris. Use insulated tools to avoid accidental contact with electrical parts. Remove any flammable materials from your work area.
Checklist for Safe Testing:
- Engine is off and cool
- Safety gloves and glasses are on
- Work area is clear of flammable items
- Tools are insulated
Find the Ignition Coil
You need to locate the ignition coil before you can perform a resistance test. In modern vehicles, you will usually find an ignition coil pack above the engine. Each cylinder often has its own ignition coil, and these are sometimes covered by a front engine cover. Remove this cover to access the ignition coil packs.
Older vehicles have a different setup. The ignition coil often sits between the battery and the distributor. In cars with coil-on-plug systems, each spark plug has its own ignition coil mounted directly on top. Some vehicles use a wasted spark system, where one ignition coil serves two spark plugs.
Take a moment to identify the correct ignition coil for your resistance test. If you are unsure, check your vehicle’s manual for diagrams and instructions. This step ensures you test the right part and get accurate results.
How to Test an Ignition Coil with an Ohmmeter
Testing your ignition coil with an ohmmeter helps you find problems before they cause bigger issues. You can follow these steps to complete a resistance test and understand how to test an ignition coil with an ohmmeter. This process works for most vehicles, whether you have a single coil or a coil-on-plug system.
Disconnect and Identify Terminals
Start by making sure your vehicle is off and the engine is cool. You need to disconnect the ignition coil before you begin the resistance test. This step keeps you safe and gives you accurate results.
| Step | Description |
|---|---|
| 1 | Ensure the vehicle is turned off and has cooled down. |
| 2 | Disconnect the ignition coil from the distributor wire. |
| 3 | Unscrew the ignition coil from its mounting using a wrench. |
| 4 | Remove the ignition coil from the vehicle for testing. |
After you disconnect the ignition coil, look for the terminals. Most ignition coils have two primary terminals. These are usually labeled "B+" or "15" for the power supply and "C" or "1" for the negative or ground. The secondary terminal is often labeled "HT" or "Spark Plug." You will use these points to measure primary coil resistance and measure secondary coil resistance.
Tip: Always check your vehicle’s service manual if you have trouble finding the right terminals. Some models use different labels or layouts.
Measure Primary Resistance
Now you are ready to measure the primary coil resistance. Set your multimeter to the 200 ohm range. Take the two probes and touch one to the "B+" or "15" terminal and the other to the "C" or "1" terminal. Make sure you have a solid connection. Loose probes can give you false readings.
Follow these steps:
- Find the two small primary terminals on the ignition coil.
- Place one multimeter probe on each terminal.
- Watch the display and write down the number you see.
Most ignition coils should show a primary resistance between 0.4 and 2 ohms. This range covers most modern vehicles. If your reading falls outside this range, your ignition coil may have a problem. Always compare your result to the value in your vehicle’s manual.
Note: Testing a hot coil can lead to inaccurate readings. Wait until the coil is cool before you start.
Measure Secondary Resistance
Next, you will measure secondary coil resistance. This step checks the high-voltage side of the ignition coil. Set your multimeter to a higher resistance range, such as 20k ohms.
To measure secondary resistance:
- Locate the secondary terminal, often labeled "HT" or "Spark Plug."
- Connect one probe to this terminal.
- Place the other probe on the negative primary terminal ("C" or "1").
- Read the value on the multimeter.
Secondary resistance values usually range from 6,000 to 30,000 ohms, depending on the ignition coil type. For example, standard automotive coils often show 7,000 to 10,000 ohms, while high-performance coils can reach up to 14,000 ohms. Always check your vehicle’s manual for the exact range.
| Coil Type | Primary Resistance (Ω) | Secondary Resistance (kΩ) |
|---|---|---|
| Standard Automotive | 0.8 – 1.5 | 7 – 10 |
| High-Performance | 0.4 – 0.6 | 10 – 14 |
| Distributor-Type | 1.0 – 2.0 | 6 – 9 |
| Coil-on-Plug (COP) | 0.6 – 1.2 | 8 – 12 |
Tip: Good contact is key. Dirty or corroded terminals can affect your readings. Clean the terminals before testing if needed.
If you want to know how to test an ignition coil with an ohmmeter, remember these steps. You disconnect the ignition coil, identify the correct terminals, and use your multimeter to measure both primary and secondary resistance. This resistance test helps you spot faulty ignition coils before they cause engine misfires, poor acceleration, or starting problems. Many drivers use this method because it is reliable and easy to apply in real situations.
If you have a multi-coil system, test each ignition coil separately. Ignoring one faulty coil can lead to engine misfires or loss of power. Always use the resistance test as part of your regular maintenance routine. Knowing how to test an ignition coil with an ohmmeter gives you confidence and helps you keep your vehicle running smoothly.
Ignition Coil Resistance Readings
Compare to Specs
When you finish your resistance test, you need to compare your results to the expected values. Most ignition coils should show a primary resistance between 0.4 and 2 ohms. This range covers the majority of standard automotive ignition coils. You should always check your vehicle’s service manual for the exact numbers. Manufacturers sometimes use different designs, so the correct value for your ignition coil may be slightly higher or lower.
You can find the specifications for your ignition coil in the technical section of your manual. If you do not have a manual, you can often find this information on the manufacturer’s website or through trusted automotive resources. Matching your resistance test results to the specs helps you decide if your ignition coil is working as it should.
Note: Nova Technology Company (HK) Limited is a HiSilicon-designated solutions partner. The company specializes in chip-level solutions, system integration, and advanced application scenarios within the integrated circuit (IC) industry. Their expertise supports high-performance electronics, including automotive ignition systems, by providing reliable semiconductor components and integration services.
What Readings Mean
Your resistance test results tell you a lot about the health of your ignition coil. If your readings fall within the normal range, your ignition coil works as expected. If your numbers are too high or too low, you may have a faulty ignition coil. Here is what you should do based on your readings:
- If your readings are in the normal range, your ignition coil works fine.
- If the numbers are too high or too low, you may need to replace the ignition coil.
- If there is no reading at all, the ignition coil is open and needs replacement.
- If you find very low resistance, the coil may be shorted and should be replaced.
- For low voltage output, check the battery and wiring for loose connections.
The resistance readings of your ignition coil are crucial for engine performance. Lower resistance in the primary winding increases the magnetic field and boosts output voltage. This strong spark is necessary for proper combustion. If the resistance is too low, it can damage the ignition system. As the ignition coil heats up, resistance rises. High resistance can cause misfires, especially at higher RPMs, because the coil may not recharge fast enough.
A weak ignition coil can lead to inconsistent spark timing and delayed combustion. You might notice vibrations, knocking, or rough idling. These problems can stress engine parts, such as pistons, valves, and crankshaft bearings. In engines that need precise timing, even small misfires can cause big problems.
If your resistance test shows a problem, you should replace the ignition coil before it causes more damage. Always test each ignition coil if your vehicle uses more than one. Regular testing with an ohmmeter helps you catch issues early and keeps your engine running smoothly.
Testing your ignition coil with an ohmmeter is simple and effective. You can follow each step and use your resistance readings to keep your vehicle in top shape. If you feel unsure or get unclear results, ask a professional for help. Regular testing gives you many benefits:
| Benefit | How It Helps You |
|---|---|
| Early Detection | You spot problems before they become serious. |
| Improved Efficiency | Your vehicle runs smoother and uses less fuel. |
| Reduced Breakdowns | You avoid sudden failures and costly repairs. |
With these steps, you can check your ignition coil confidently and keep your car running strong.
FAQ
How often should you test your ignition coil?
You should test your ignition coil during routine maintenance or if you notice engine misfires, rough idling, or starting problems. Regular checks help you catch issues early and keep your vehicle running smoothly.
Can you test an ignition coil without removing it?
You can test some ignition coils without removing them, especially in coil-on-plug systems. Always disconnect the electrical connector first. For the most accurate results, remove the coil before testing.
What tools do you need to test an ignition coil?
You need a multimeter or ohmmeter, safety gloves, and eye protection. Set your meter to the correct range. Always follow safety steps to protect yourself from electric shock.
What if your ignition coil passes the resistance test but your engine still misfires?
If your ignition coil passes the resistance test, you should test for voltage output. Other parts like spark plugs, wires, or sensors may cause misfires. Check these components to find the real problem.
Can a faulty ignition coil damage your engine?
A faulty ignition coil can cause engine misfires, poor fuel economy, and rough running. Over time, these problems can damage pistons, valves, and other engine parts. Replace a bad coil quickly to avoid bigger repairs.