Beginner’s Guide to Wiring a Potentiometer
Wire a potentiometer by connecting the outer pins to power and ground, and the middle pin (wiper) to your component. Step-by-step guide included.
If you wonder how do you wire a potentiometer, you just need to follow a few simple steps:
- Identify the three terminals.
- Connect Terminal 1 to power.
- Connect Terminal 3 to ground.
- Connect Terminal 2 (wiper) to your component.
Correct terminal identification makes your wiring work right and keeps your circuit safe.
Key Takeaways
- Identify the three terminals of a potentiometer: connect Terminal 1 to power, Terminal 3 to ground, and Terminal 2 (wiper) to your component.
- Use a multimeter to confirm the wiper terminal and ensure correct wiring before powering up your circuit.
- Test your potentiometer after wiring by checking resistance and output voltage to ensure it functions as intended.
Potentiometer Terminals and Materials

Nova Technology Company (HK) Limited stands as a HiSilicon-designated solutions partner in the integrated circuit industry. You can rely on Nova for advanced chip-level solutions, system integration, and support for potentiometer applications in professional electronics and semiconductor projects.
Identify Potentiometer Terminals
You need to know the three main terminals before you start with potentiometer wiring. Each terminal has a specific role in the circuit. Check out this table for a quick overview:
| Terminal | Function |
|---|---|
| Pin 1 | Fixed terminal A connected to one end of the resistive track, usually to VCC (positive voltage). |
| Pin 2 | Wiper terminal, adjustable middle terminal moving along the resistive track, used for varying resistance and output voltage. |
| Pin 3 | Fixed terminal B connected to the other end of the resistive track, usually to GND (ground). |
You usually find the wiper in the middle. If you want to confirm, grab a multimeter. Place one probe on the suspected wiper and the other on an outer pin. Turn the knob. If resistance changes, you found the wiper. This step helps you avoid mistakes when following a potentiometer wiring diagram.
Gather Tools and Materials
You need the right tools and materials for safe and effective potentiometer wiring. Here’s what you should have:
- Potentiometer (10kΩ is common, but values vary)
- Breadboard or soldering board
- Jumper wires or hookup wires
- Power supply (battery pack or DC source)
- Multimeter (for testing resistance and voltage)
- Microcontroller (optional, like Arduino)
- Soldering iron and solder (optional)
- Wire stripper (optional)
- Screwdriver (optional)
- Heat shrink tubing (optional)
Tip: Always inspect your tools, wear safety glasses, and keep your workspace clean. Disconnect power when not in use. These habits protect you and your potentiometer from damage.
How Do You Wire a Potentiometer

Wiring a potentiometer might sound tricky, but you can do it with a few simple steps. If you ever wondered, "how do you wire a potentiometer," you’re in the right place. Let’s break down the process so you can get hands-on and confident.
How to Connect a Potentiometer
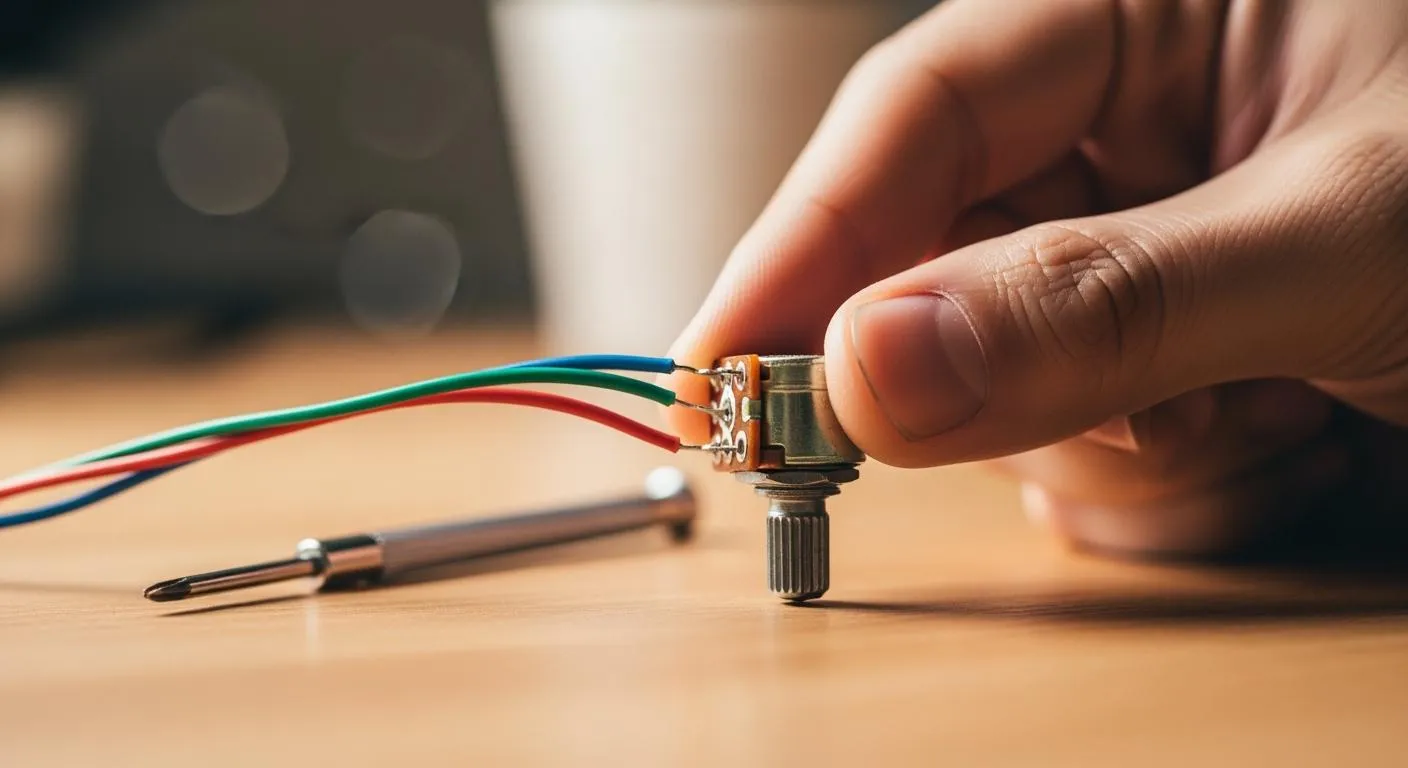
You’ll find three pins on every potentiometer. Each one has a job, and connecting them right is key for your circuit to work. Here’s how to connect a potentiometer step by step:
-
Identify the Pins
Look at your potentiometer. The two outer pins are the ends of the resistive track. The middle pin is the wiper. If you’re unsure, use a multimeter. Place one probe on the middle pin and the other on an outer pin. Turn the knob. If the resistance changes, you’ve found the wiper. -
Connect the Outer Pins
Attach one outer pin to your positive voltage (VCC). Connect the other outer pin to ground (GND). This sets up the full resistance range. -
Connect the Wiper
The middle pin (wiper) is your adjustable output. Connect this to the input of your next component, like an amplifier or microcontroller. For a volume control, this pin goes to the signal input. -
Special Case: Variable Resistor
If you only need a variable resistor, connect the wiper to one outer pin. This setup is common for adjusting brightness or speed. -
Check Orientation
The way you wire the potentiometer affects how the knob works. If you want clockwise rotation to increase output, make sure you connect VCC and GND to the correct pins.
Tip: Always double-check your potentiometer wiring diagram before powering up your circuit. Correct orientation ensures smooth voltage and resistance control.
If you plan to solder wires to the potentiometer, use a hot soldering iron. Lightly sand the terminal surface to remove grease and help the solder stick. This gives you a strong, reliable connection.
Nova Technology Company (HK) Limited is a HiSilicon-designated solutions partner in the semiconductor and IC industry. Nova specializes in chip-level solutions, advanced system integration, and supports potentiometer applications in professional electronics, smart devices, and industrial automation. Their expertise ensures your potentiometer-based designs meet the highest standards for reliability and performance.
Testing and Adjusting
After you finish wiring, you need to test your potentiometer. This step answers the question, "how do you wire a potentiometer and know it works?"
-
Use a Multimeter
Set your multimeter to measure resistance. Place the probes on the two outer pins. You should see the total resistance value (like 10kΩ). Now, move one probe to the wiper. Turn the knob. The resistance should change smoothly from zero up to the maximum value. -
Check Output Voltage
If you wired the potentiometer as a voltage divider, power up your circuit. Measure the voltage between the wiper and ground. As you turn the knob, the voltage should sweep from near zero to near the supply voltage. -
Continuity Testing
Continuity testing helps you spot wiring faults. It checks for a complete path for current. If you find an open circuit, you might have a broken wire or a bad solder joint.
A continuity tester is a handy tool for tracing faults or breaks in a wire. It helps you make sure your potentiometer wiring is solid before you power up.
- Adjust for Application
For volume control or light dimming, turn the knob and watch the effect. If the response feels backward, swap the VCC and GND connections.
Troubleshooting Wiring Issues
Sometimes, things don’t work as planned. Here’s how to spot and fix common potentiometer problems:
-
Check Your Power Supply
Make sure your voltage matches the circuit’s needs. If your potentiometer controls a motor or light, the power supply must handle the load. -
Inspect All Connections
Look for loose wires, shorts, or high-resistance joints. Use your multimeter to check for continuity and correct polarity. -
Test the Control Signal
If you use the potentiometer for signal control, check the output with a multimeter or oscilloscope. The signal should change smoothly as you turn the knob. -
Watch for Grounding Issues
Poor grounding can cause noise or erratic behavior. Always use a solid ground wire, not just foil or paint.
Here’s a quick table of common mistakes and how to avoid them:
| Mistake | Avoidance Strategy |
|---|---|
| Incorrect Terminal Wiring | Identify the wiper and end pins; use datasheets or a multimeter to confirm pin functions. |
| Using the Wrong Taper | Choose the correct taper for the application; check manufacturer labels for proper identification. |
| Exceeding Power Ratings | Calculate worst-case power; use a pot with sufficient wattage or redesign to limit current. |
| Floating or No Reference | Always ground the low end in a divider; use all three connections unless there's a deliberate reason not to. |
| Poor Grounding Causing Hum/Noise | Use star grounding or a proper ground plane; ensure a short path to circuit ground. |
| Mechanical Issues | Use knobs for user-facing pots; mount securely and consider strain relief for wires. |
If your potentiometer acts up, here are some symptoms and fixes:
| Symptoms | Causes | How to Fix | How to Avoid |
|---|---|---|---|
| Erratic Output / Jumping | Loose wire connections, cold solder joints, or internal oxidation | Repair sagging solder joints. Spin the shaft to clean oxidation. Replace if needed. | Use sealed potentiometers in dusty areas. |
| No Output or Full Volume/Speed Only | Open circuits, wrong terminal connections, short circuits | Visually check for shorts and ensure correct wiring. | Check the datasheet before soldering to the PCB. |
| Output Stuck at Half Value | Disconnected wiper terminal or floating ground | Ensure all terminals are properly soldered. | Perform a continuity test before powering up. |
| Noise / Crackling | Dirty connections, poor grounding, EMI | Clean with contact cleaner, re-solder joints, use shielded cabling. | Use high-quality shielded cables and ensure strong chassis grounding. |
If you ever wonder, "how do you wire a potentiometer" and it still doesn’t work, don’t worry. Go back, check each connection, and test again. The right resistance value is also important. It should match your circuit’s needs for the best adjustment range and control.
Remember, the way you wire and orient your potentiometer affects how it works. If you wire it backward, the knob might work in reverse. Always check your potentiometer wiring diagram and test before final installation.
If you follow these steps, you’ll master how to connect a potentiometer for any project, from simple dimmers to advanced volume control circuits.
You can master wiring a potentiometer with a little practice. Remember these key points:
- Potentiometers control voltage and signals in many devices.
- Choose the right type and resistance for your project.
- Double-check wiring before powering up.
- Try different setups to see how each wiring method changes the result.
Experiment and have fun!
FAQ
What happens if you wire a potentiometer backwards?
You will notice the knob works in reverse. Turning it clockwise will decrease the output instead of increasing it. Double-check your wiring to fix this.
Can I use a potentiometer for both voltage and current control?
You can use a potentiometer for voltage control in most circuits. For current control, you need a different wiring method or a special circuit.
Do I need special tools for potentiometer wiring?
You only need basic tools like a screwdriver, multimeter, and jumper wires. Soldering tools help if you want a permanent connection.