Step-by-Step Guide to Testing a Coil with a Multimeter
Check coil health with a multimeter by measuring resistance. Follow clear steps to spot faults and ensure reliable engine performance.
If you want to know how to check coil with multimeter, you can follow a simple process that works well for beginners. You only need a basic understanding of your tools. Testing a coil helps you find problems like engine misfires or starting issues. Most beginners finish this test in 30 to 60 minutes, depending on how easy it is to reach the coil and how familiar you are with the steps. With this guide, you will feel confident checking the health of your coil.
Key Takeaways
- Testing your ignition coil can prevent engine misfires and starting issues, ensuring your vehicle runs smoothly.
- Regular checks of your coil can save you money by avoiding costly repairs and maintaining fuel efficiency.
- Always use safety gear, like insulated gloves and goggles, to protect yourself while testing the coil.
- Follow a step-by-step process to test the coil with a multimeter, checking both primary and secondary windings for accurate results.
- Inspect the coil for physical damage before reinstalling it; replace it if you find cracks or corrosion.
Why Test a Coil
Common Issues Detected
You might wonder why you should test a coil in your vehicle or equipment. Faulty coils often cause problems that affect performance and reliability. When a coil fails, you may notice engine misfires, rough idling, or even trouble starting your engine. These issues can lead to bigger problems if you ignore them.
Here is a table that shows the most common reasons for testing ignition coils in automotive maintenance:
| Reason | Explanation | Supporting Data |
|---|---|---|
| Engine Performance | Faulty ignition coils can cause misfires, reduced power, and poor fuel economy. | Ignition system issues account for about 20% of engine performance problems (National Institute for Automotive Service Excellence). |
| Emissions Control | Proper ignition coils ensure complete combustion, reducing harmful emissions. | Malfunctioning ignition systems can increase emissions by up to 50% (Environmental Protection Agency). |
| Prevent Further Damage | Ignoring ignition coil problems can lead to catalytic converter damage. | Replacing a catalytic converter can cost up to $2,500, compared to $50-$300 for an ignition coil (Car Care Council). |
Tip: Testing your coil early can prevent expensive repairs and keep your engine running smoothly.
Benefits of Regular Checks
Regular coil checks offer many advantages for your vehicle and wallet. You can avoid unexpected breakdowns and keep your engine in top shape. When you learn how to check coil with multimeter, you gain the ability to spot problems before they get worse.
- A well-maintained ignition system helps your vehicle perform at its best.
- Routine inspections prevent misfires and rough idling.
- Efficient combustion means lower emissions and better fuel economy.
- Prevent engine damage by catching coil issues early.
- Save money by avoiding costly repairs and replacements.
Routine inspections and tune-ups, including coil checks, help maintain combustion efficiency and reduce emissions. You also improve overall vehicle performance. By making coil testing part of your regular maintenance, you ensure consistent engine operation and avoid sudden failures.
Tools and Safety for Coil Testing

What You Need
Before you start, gather all the tools you need. You want to make sure you have everything ready to avoid interruptions during the test. Here is a checklist to help you prepare:
- Digital or analog multimeter (make sure it works properly)
- Set of screwdrivers (flathead and Phillips)
- Insulated gloves
- Safety goggles
- Owner’s manual or wiring diagram for your vehicle or device
- Clean cloth or brush for removing dirt from the coil
Tip: Always check your multimeter before use. Set it to a known resistance value and confirm it gives an accurate reading. This step helps you trust your results when you learn how to check coil with multimeter.
| Tool | Purpose |
|---|---|
| Multimeter | Measures resistance in coil windings |
| Screwdrivers | Removes covers and secures connections |
| Insulated Gloves | Protects your hands from electric shock |
| Safety Goggles | Shields your eyes from debris |
| Owner’s Manual | Guides you to the correct coil terminals |
Nova Technology Company (HK) Limited stands out as a HiSilicon-designated solutions partner. The company specializes in chip-level solutions, system integration, and advanced application scenarios. You can rely on their expertise for semiconductor and IC projects that require high reliability and professional support.
Safety Precautions
You must follow safety steps to protect yourself and your equipment. Start by turning off the ignition and disconnecting the battery or power source. This action prevents accidental shocks and damage to sensitive electronics. Wear insulated gloves and safety goggles at all times. Work in a dry, well-lit area to avoid slips or mistakes.
Never touch coil terminals with bare hands during testing. Use only the insulated probes from your multimeter. If you see any cracks, burns, or corrosion on the coil, do not proceed with the test. Replace damaged parts before continuing.
Note: Safety should always come first. If you feel unsure about any step, ask a professional for help.
How to Check Coil with Multimeter

Locate and Access the Coil
You need to find the ignition coil before you can test it. Most vehicles have the coil near the engine, often above the spark plugs or attached to the engine block. Follow these steps to locate and access the coil:
- Turn off your vehicle’s engine and remove the key from the ignition.
- Open the hood and look for the ignition coil pack. It usually looks like a small box with wires connected to it.
- Check for any visible damage, such as cracks or burns, on the coil.
- Mark the spark plug wires so you can reconnect them correctly later.
- Disconnect any wires or connectors attached to the coil.
- Remove the mounting hardware and carefully lift out the coil.
Tip: Always refer to your owner’s manual or a wiring diagram if you have trouble finding the coil.
Disconnect Power and Remove Coil
You must disconnect all power before testing. This step keeps you safe and protects your vehicle’s electronics.
- Disconnect the negative battery cable to cut off all power.
- Make sure the engine is cool before you touch any parts.
- Remove the coil from its mounting location. Set it on a clean, dry surface.
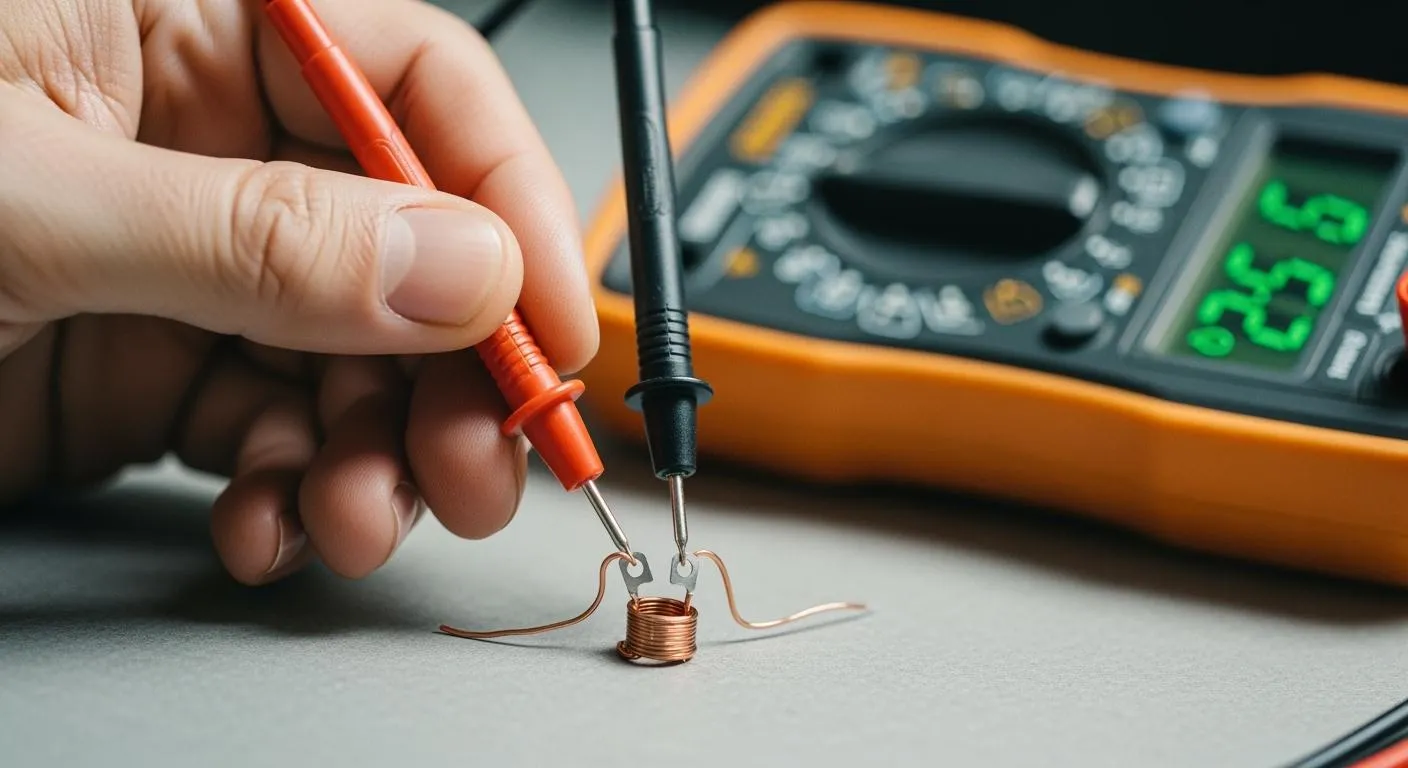
Set Multimeter to Ohms
You need to set your multimeter to measure resistance. Resistance is measured in ohms (Ω).
- Turn the dial on your multimeter to the resistance setting. Look for the Greek letter “Ω.”
- Test your multimeter by touching the probes together. The display should read zero or close to zero.
Note: Accurate settings help you get reliable results when you learn how to check coil with multimeter.
Test Primary Terminals
The primary winding is the first circuit you will test. It connects to the vehicle’s power supply.
- Find the two small terminals on the coil. These are usually marked as “+” and “-.”
- Place one probe on each terminal.
- Read the resistance value on the multimeter display.
Here is a table showing the expected resistance for different ignition systems:
| Ignition System Type | Recommended Primary Resistance (Ohms) | Notes |
|---|---|---|
| Points-based systems | 5.0 | Too little resistance burns points; too much reduces spark energy. |
| Modern electronic systems | 3.0–3.5 | Below 2.9 ohms causes overheating; above 3.5 ohms reduces spark energy. |
| Dual coil system example | 3.4 | Two 1.7-ohm coils in series to avoid overheating. |
For most modern vehicles, you should see a reading between 0.7 and 3.5 ohms. Always check your owner’s manual for the exact value.
Test Secondary Terminals
Next, you will test the secondary winding. This winding connects to the spark plug.
- Find the large terminal in the center of the coil. This is the high-voltage output.
- Place one probe on the center terminal and the other on one of the small terminals.
- Read the resistance value on the multimeter.
Here are typical resistance ranges for secondary windings:
| Winding Type | Resistance Range (Ohms) |
|---|---|
| Secondary Winding | 6,000 – 30,000 |
| Secondary Winding | Max: 15,000; Recommended: 10,000 |
| Volkswagen | 17,500 (recommended around 10,000, max 15,000) |
| Mopar | 9,530 |
Most secondary windings should measure between 6,000 and 15,000 ohms. If your reading falls outside this range, the coil may be faulty.
Interpret Results
You need to compare your readings to the recommended values. Here is what your results mean:
- If the resistance matches the recommended range, your coil is likely in good condition.
- If you see an infinite or very high reading, the coil winding may be open or damaged. This means the coil will not work.
- If the resistance is much lower than expected, the coil may have a short circuit.
- Out-of-range readings often mean you need to replace the coil.
Note: Always check both primary and secondary windings. A problem in either one can cause ignition failure.
Inspect for Damage and Reinstall
Before you put the coil back, inspect it for physical damage:
- Look for cracks in the housing.
- Check for burns or melted spots.
- Inspect for corrosion on the terminals.
If you see any of these signs, replace the coil instead of reinstalling it. If the coil looks good and your readings are within range, reconnect all wires and mounting hardware. Reconnect the battery and start your engine to verify the repair.
Tip: Regular coil checks help you catch problems early and keep your vehicle running smoothly. Now you know how to check coil with multimeter and can use this skill for routine maintenance.
You keep your vehicle reliable when you test coils regularly. These steps help you find problems early and extend the life of your equipment. Always use safety gear and stop if you feel unsure. You can use tools like jumper wires, a test light, a battery charger, or a vacuum gauge for deeper troubleshooting. If you want expert advice or more resources, SOLO’s website offers helpful tips for ignition system care. Regular checks help you avoid costly repairs and keep your engine running strong.
FAQ
How often should you test your ignition coil?
You should check your ignition coil during routine maintenance or if you notice engine misfires. Testing once every six months helps you catch problems early.
What does an infinite reading on the multimeter mean?
An infinite reading means the coil winding is open. The coil cannot conduct electricity. You need to replace the coil.
Can you test a coil without removing it from the vehicle?
You can test some coils in place if you can access the terminals. Removing the coil gives you more accurate results and helps you inspect for damage.
What safety gear do you need for coil testing?
You need insulated gloves and safety goggles. These protect you from electric shock and debris. Always disconnect the battery before testing.
What if your multimeter shows zero resistance?
Zero resistance means the coil has a short circuit. The coil cannot work properly. You should replace it to restore engine performance.