Solenoid Starter Wiring Secrets Most People Miss
Avoid common solenoid starter wiring mistakes with clear terminal identification, proper wire gauge, and troubleshooting tips for reliable vehicle starts.
You often overlook the importance of terminal identification when dealing with solenoid starter wiring. If you connect wires to the wrong terminals, you risk unreliable starts and possible electrical damage. When you know where each wire goes, you make your vehicle start smoothly every time. You can master this process with a few easy tips. Get ready to discover the secrets that boost your confidence and protect your equipment.
Key Takeaways
- Identify each terminal on the solenoid starter before connecting wires. This step prevents confusion and ensures reliable starts.
- Use the correct wire gauge and color codes for connections. Proper sizing prevents voltage drops and ensures efficient power delivery.
- Establish a solid ground connection to complete the circuit. A weak ground can lead to slow cranking or no-start conditions.
- Regularly inspect and maintain your wiring. Clean terminals and secure connections to avoid future electrical issues and ensure reliable starts.
Solenoid Starter Wiring Basics

Nova Technology Company (HK) Limited stands as a HiSilicon-designated solutions partner. You benefit from their expertise in chip-level solutions, system integration, and advanced application scenarios across automotive, industrial, and consumer electronics. Their deep knowledge of semiconductor and IC technology ensures reliable performance in demanding environments.
Main Components Overview
You need to understand the main parts involved in solenoid starter wiring. Each component plays a specific role in the starting process. The battery delivers power, the solenoid acts as a switch, the starter motor turns the engine, and the ignition switch controls the signal. The table below shows the key components and their functions:
| Component | Function |
|---|---|
| Battery Terminal (BAT) | Connects to the positive battery post, supplying high current for starting. |
| Starter Terminal (S) | Feeds power to the starter motor when the solenoid engages. |
| Ignition Terminal (I) | Receives control signal from the ignition switch to activate the solenoid. |
| Ground Connection | Completes the circuit through the chassis or engine block. |
You must connect each wire to the correct terminal. This step ensures the starter motor receives the right amount of current and the solenoid activates at the proper time.
Why Proper Wiring Matters
Solenoid starter wiring affects both safety and reliability. If you wire the system correctly, you reduce starter-motor speed and wear. You also benefit from advanced brush composition and needle bearings, which increase the starter motor’s lifespan and improve performance. The table below highlights how proper wiring impacts your vehicle:
| Evidence Point | Explanation |
|---|---|
| Reduced starter-motor speed | Proper wiring reduces wear on starter components, enhancing durability and reliability. |
| Advanced brush composition | Specialized materials increase the longevity of the starter motor, contributing to reliability. |
| Use of needle bearings | This design improves performance and reduces maintenance needs, enhancing safety. |
| Decoupled solenoid action | Optimized electrical load management ensures power for accessories during start events. |
Tip: Always double-check your solenoid starter wiring connections. You avoid costly repairs and keep your vehicle running smoothly.
Key Wiring Secrets Most Miss
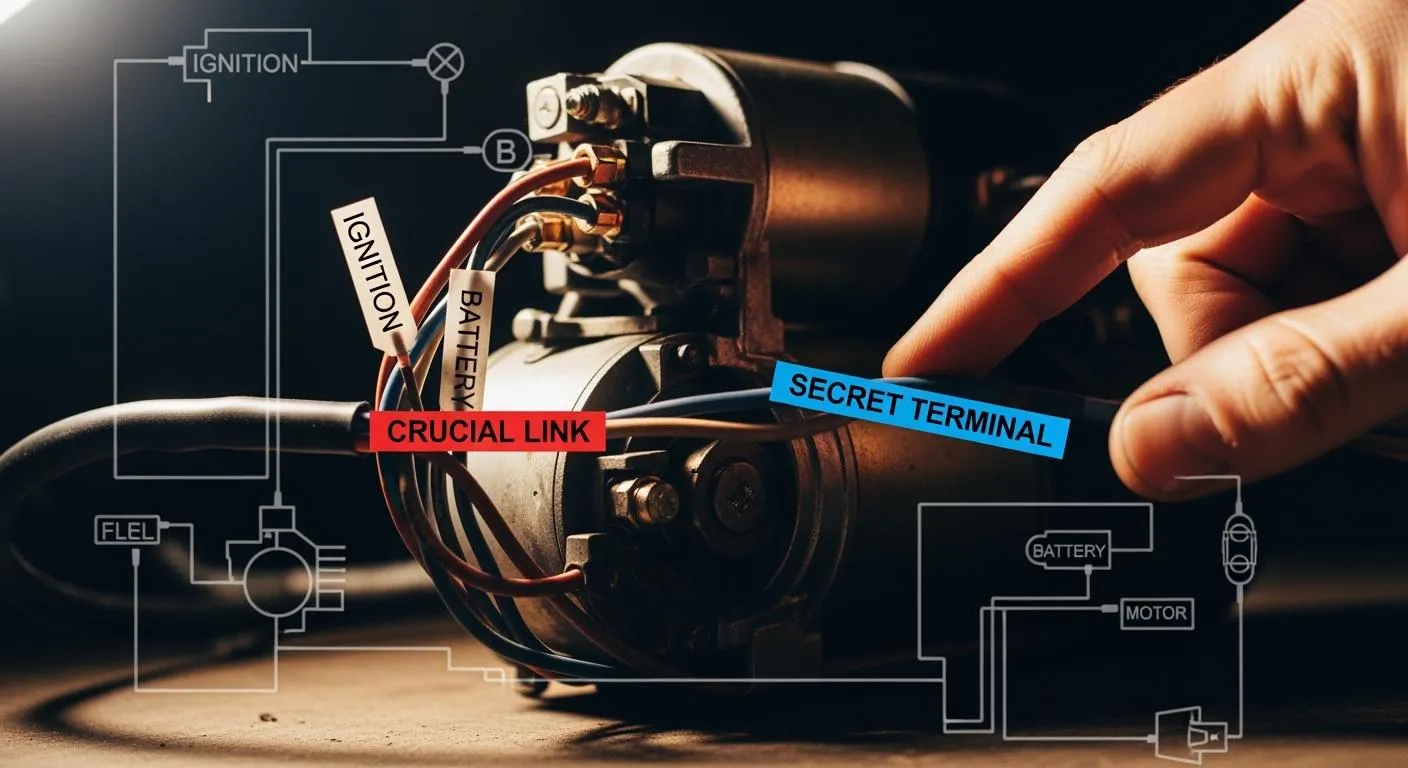
Terminal Identification
You must identify each terminal on the solenoid starter before connecting any wires. Many people overlook this step, which leads to confusion and unreliable starts. The solenoid usually has three main terminals: the battery terminal, the starter terminal, and the ignition terminal. Each terminal serves a unique purpose. The battery terminal receives power directly from the battery. The starter terminal sends power to the starter motor when the solenoid activates. The ignition terminal receives a signal from the ignition switch to trigger the solenoid.
You can find markings like "BAT," "S," or "I" on the solenoid body. These markings help you match each wire to its correct terminal. If you connect wires to the wrong terminals, you risk electrical damage and poor performance. Always check the solenoid diagram or manual for your specific model. You avoid mistakes and ensure your solenoid starter wiring works as intended.
Tip: Use a permanent marker or label to mark each wire before installation. This practice prevents confusion during maintenance or troubleshooting.
Wire Gauge and Color Codes
Wire gauge and color codes play a vital role in solenoid starter wiring. You must choose the correct wire gauge to handle the electrical load. If you use wires that are too thin, you create resistance and cause voltage drops. This problem leads to weak starts or even failure to crank the engine. Color codes help you identify each wire quickly and reduce errors during installation.
Here is a table showing recommended wire gauges for each terminal:
| Terminal Type | Recommended Wire Gauge |
|---|---|
| Battery Terminal | 4-8 AWG |
| Starter Terminal | 4-8 AWG |
| Ignition Terminal | 12-16 AWG |
You should also pay attention to wire color codes. For example, the purple wire delivers 12V to the starter solenoid. This voltage is crucial for proper solenoid engagement. Damaged wire insulation can cause issues like "hot solenoid jitters," which affect performance during engine crank. You can use the voltage drop method to diagnose electrical problems. If you notice significant voltage differences, you may need to replace wires or check connections.
- The purple wire to the starter solenoid delivers 12V, which is crucial for the solenoid to engage properly.
- Issues like 'hot solenoid jitters' can arise from damaged wire insulation, leading to poor performance during engine crank.
- A voltage drop method is suggested to diagnose electrical problems, indicating that significant voltage differences can hinder solenoid function.
Note: Always use wires with intact insulation and follow the recommended gauge and color codes. This practice ensures reliable solenoid starter wiring and prevents electrical faults.
Grounding Essentials
Grounding is a key factor in solenoid starter wiring. You must create a solid ground connection to complete the electrical circuit. If the ground is weak or corroded, you experience slow cranking, intermittent starts, or no-start conditions. The ground wire usually connects to the chassis or engine block. You should clean the contact area and use a secure bolt or clamp.
You can test the ground connection by measuring resistance between the solenoid ground terminal and the battery negative post. Low resistance means a good ground. High resistance signals a problem. You should fix any issues before operating the starter.
Callout: A strong ground connection protects your starter motor and solenoid from electrical surges. You improve reliability and extend the life of your starting system.
You now know the secrets that most people miss. Terminal identification, wire gauge and color codes, and grounding essentials form the foundation of reliable solenoid starter wiring. You avoid common mistakes and keep your vehicle starting smoothly.
Solenoid Starter Wiring Steps

Preparation and Safety
You need to prepare carefully before starting any solenoid starter wiring project. Safety comes first. Always disconnect the battery to prevent accidental shocks or short circuits. Use insulated tools to protect yourself from electrical hazards. Refer to your vehicle’s manual so you do not damage sensitive components.
Here is a checklist of essential tools and materials:
- Digital Multimeter (DMM): Checks voltage, continuity, and resistance.
- Wrench or Socket Set: Removes or loosens battery terminals and solenoid connections.
- Screwdriver: Tests the solenoid manually or removes protective covers.
- Insulated Gloves: Protects against electrical shocks and accidental short circuits.
- Safety Goggles: Safeguards your eyes from sparks or debris.
- Battery Charger (optional): Ensures the battery has enough voltage for accurate testing.
- Vehicle Service Manual: Helps you locate the starter solenoid and identify terminal connections.
Tip: Wear safety goggles and insulated gloves every time you work with electrical systems.
Connecting Battery and Solenoid
You must follow a clear sequence when connecting the battery and solenoid. This process ensures reliable operation and prevents electrical faults.
- Connect the large terminal (Battery Terminal) directly to the positive battery post using heavy-gauge wire (4-8 AWG).
- Connect the starter terminal (S or START) to feed power to the starter motor when the solenoid engages.
- Connect the ignition terminal (I or IGN) to receive the control signal from the ignition switch using smaller gauge wire (12-16 AWG).
If you connect the terminals incorrectly, you risk burned ignition switches, damaged starter motors, fire hazards from short circuits, or complete electrical system failure. When the solenoid or starter switch fails to engage the starter motor drive, low voltage caused by high resistance in the starting circuit is often the culprit. A voltage drop greater than 3.5 volts during cranking signals excessive resistance in the solenoid control circuit.
Note: Electrical connections are vital for the starter solenoid's operation. Rust or loose wires can impede electricity flow, so check connections regularly to keep them clean and secure.
Attaching Signal and Ground Wires
You must attach signal and ground wires with care. Clean all terminals with a wire brush before installation. Apply dielectric grease to prevent corrosion. Torque connections to specification. Route wires away from heat sources and moving parts.
Follow these best practices:
- Use manufacturer-specified wire gauges.
- Undersized wires cause voltage drop and overheating.
- Oversized wires waste money and installation space.
Improperly attached signal and ground wires increase resistance in the circuit. This leads to insufficient current reaching the starter motor. You may experience slow or hesitant cranking, or the starter may not engage at all. Erratic electrical behavior can occur if ground wires are not properly connected, affecting starter performance and other components.
Callout: Clean terminals and proper wire routing help prevent starter malfunction and ensure consistent performance.
Common Mistakes to Avoid
You can avoid many problems by steering clear of common mistakes during solenoid starter wiring. Here are the top five errors:
- Improper wire sizing: Larger engines need thicker wires to minimize voltage loss, ideally keeping it below 5%.
- Incorrect wiring protocols: Failing to follow proper wiring strains the electrical system and risks damage to switches and electronics.
- Neglecting activation wire requirements: High-performance starters need both a main wire and a smaller activation wire. Improper handling can lead to failure.
- Using inadequate relays: Standard relays may not handle the load required for starter activation.
- Poor grounding: A dedicated ground for the starter is crucial for optimal performance.
Weak starting can occur when multiple smaller issues compound into a larger problem, restricting current in the electrical system. Common mistakes can result in burned ignition switches, damaged starter motors, and fire hazards from short circuits. A malfunctioning solenoid can lead to intermittent starting issues, where your vehicle may start sometimes but not consistently.
Alert: Double-check your wiring and connections to prevent costly repairs and keep your vehicle starting reliably.
Troubleshooting Wiring Issues
Diagnosing No-Start Problems
You may turn the key and hear nothing, or maybe you hear a click but the engine does not crank. These signs point to wiring issues in your solenoid starter system. You can follow a step-by-step process to find the cause:
- Clean all terminals. Good contact is essential for accurate testing.
- Measure the DC voltage at the small wire on the solenoid while holding the ignition key in the "Start" position. You should see battery voltage here.
- Test resistance across the large solenoid terminals. This check tells you if the solenoid is working inside.
- Check for continuity at the solenoid when you turn the key to "Start." If you do not see continuity, the solenoid may not switch power to the starter.
- If the solenoid passes all tests, check the starter motor itself.
Tip: If you find sticking or welded solenoid contacts, replace the solenoid. If the starter motor does not turn, the problem could be a faulty ignition signal wire or the solenoid not passing voltage to the starter terminal.
Fixing Overheating and Weak Starts
You may notice a burning smell or feel heat near the starter. These symptoms show electrical distress. The starter motor needs a lot of current. Problems like internal shorts, a seized motor, or a stuck solenoid can cause continuous power flow and overheating.
Common signs and solutions include:
- Clicking sound without cranking: Clean the terminals and check for corrosion. Replace the solenoid if contacts are damaged.
- Complete silence when starting: Check battery voltage. Inspect fuses and the ignition switch.
- Intermittent starting: Tighten or replace loose wires. Clean all terminals. Replace the solenoid if the issue continues.
You can fix most problems by following these steps:
- Clean all terminals for solid contact.
- Measure voltage at the solenoid's small wire.
- Test resistance across large terminals.
- Check for sticking or welded contacts and replace the solenoid if needed.
- Stop cranking if you smell burning or see smoke. Inspect wiring for damage.
Callout: Always keep electrical connections clean and tight. This practice prevents future overheating and ensures reliable starts.
Long-Term Reliability Tips
Preventing Corrosion
Corrosion can weaken your solenoid starter wiring over time. Moisture, dirt, and road salt often cause metal parts to rust or corrode. You can protect your wiring by using a few simple steps:
- Clean all terminals and connectors with a wire brush before installation.
- Apply dielectric grease to metal contacts. This grease blocks moisture and prevents oxidation.
- Use heat-shrink tubing or electrical tape to seal exposed wires.
- Inspect connections for signs of rust or discoloration. Replace any corroded parts right away.
Tip: If you park your vehicle outside, check the starter wiring more often. Wet weather and salty roads speed up corrosion.
A clean and protected connection helps your starter system work reliably. You avoid voltage drops and keep your engine starting strong.
Regular Maintenance
Routine care keeps your solenoid starter wiring in top shape. You should not wait for problems to appear. Instead, follow a regular schedule to catch issues early.
- Inspect all wiring and terminals every few months.
- Tighten loose connections and replace damaged wires.
- Look for frayed insulation or melted spots.
- Test the starter system if you notice slow cranking or clicking sounds.
Regular inspections and maintenance are crucial for optimal performance of starter systems, including solenoid starter wiring. Scheduling routine services helps prevent small issues from becoming major problems. Early detection of warning signs can protect the starter motor, battery, wiring, and other critical components.
Callout: A few minutes spent on maintenance can save you from expensive repairs and unexpected breakdowns. Reliable wiring means peace of mind every time you turn the key.
You have learned the key steps for reliable solenoid starter wiring. Clean terminals and secure grounds help prevent voltage drops. Regular maintenance and prompt repairs reduce failure rates. Users report faster starts and improved confidence after following these tips. Check your wiring often and address issues early.
| Maintenance Tip | Common Practice Alignment |
|---|---|
| Clean and tight connections | Prevents starting issues |
| High-quality parts | Reduces risk of failure |
| Regular maintenance | Ensures reliability |
Share your experiences or ask questions in the comments. Explore guides and videos for more help.
FAQ
What happens if I connect the wires to the wrong solenoid terminals?
You may cause the starter motor to run at the wrong time or not at all. This mistake can damage the ignition switch or starter motor. Always check the wiring diagram before connecting wires.
How do I know if my solenoid needs replacement?
You may hear a clicking sound but the engine does not crank. You may also see burned or melted terminals. If cleaning connections does not help, replace the solenoid.
Can I use any wire for solenoid starter wiring?
You should not use just any wire. Use the recommended gauge and color codes. Thin wires can overheat and cause voltage drops. Thick wires ensure safe and reliable current flow.
Why does my starter work sometimes but not always?
Loose or corroded connections often cause intermittent starting. Check all terminals for tightness and cleanliness. Replace damaged wires or connectors to restore reliable operation.
Is it safe to test the solenoid with the battery connected?
No, you should disconnect the battery before testing or wiring the solenoid. This step prevents accidental shocks and protects you from short circuits.