Raspberry Pi and E-Ink The Ultimate Low-Power Duo
Your Raspberry Pi and an E-Ink display create the ultimate duo for low-power projects. E-Ink displays offer unmatched effici
Your Raspberry Pi and an E-Ink display create the ultimate duo for low-power projects. E-Ink displays offer unmatched efficiency, holding an image with zero power. This makes the raspberry pi e ink combination perfect for always-on projects with excellent readability. Unlike traditional displays, these displays solve battery drain. Your raspberry pi has very low power consumption.
This energy efficient e ink display is vital for low-power applications and raspberry pi projects. Your raspberry pi can run a wide range of projects.
- The world will have 27.1 billion connected IoT devices by 2025.
Your pi can control many e-ink displays. These e-ink displays are versatile displays. The pi and e-ink displays are a great match. This e-ink display is one of the best displays.
Key Takeaways
- Raspberry Pi and E-Ink displays save a lot of power. E-Ink screens only use energy when the picture changes. This makes them great for projects that run on batteries for a long time.
- E-Ink displays keep showing an image even when they have no power. This means your project can always show information, like a digital piece of paper, without using electricity.
- E-Ink screens are easy on your eyes. They reflect light like a book, so you can read them well in bright sunlight. They also do not cause eye strain like phone screens.
- You can choose different E-Ink displays. Consider the size, if it has color, and how fast it changes pictures. This helps you pick the best screen for your project.
- Setting up your E-Ink display is simple. You connect it to your Raspberry Pi and install some software. Then, you can make it show messages like 'Hello, World!'.
Core Benefits of the Raspberry Pi E-Ink Duo
When you pair a Raspberry Pi with an E-Ink screen, you unlock a unique set of benefits that traditional displays cannot offer. These advantages make your projects more versatile, durable, and user-friendly. Let's explore the core reasons why this combination is so powerful.
Unmatched Power Efficiency
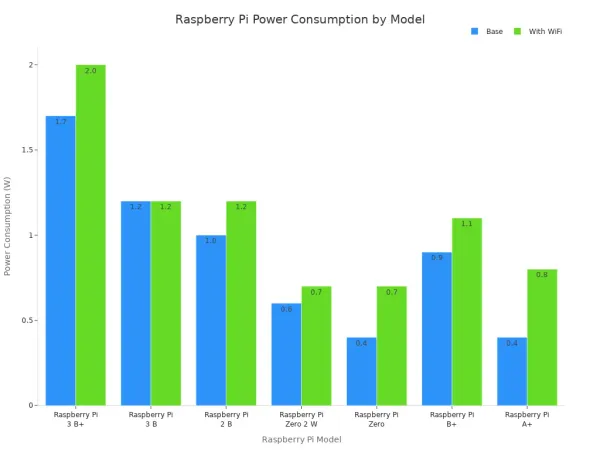
You gain incredible power efficiency advantages with this setup. An e-ink display consumes energy only when you change the image on the screen. The rest of the time, it uses virtually no power. This low power consumption is a game-changer for battery-powered projects. Your Raspberry Pi can enter a deep sleep mode, waking only to send a quick update to the e-ink display, which then holds that new image indefinitely.
This extreme efficiency means your projects can run for weeks or even months on a single battery charge. For instance, a Raspberry Pi project configured to wake up for a few minutes every few hours can last around 90 days on a small 2Ah battery. The power draw of e-ink displays in standby is incredibly small.
| Mode | Operating Current |
|---|---|
| Sleep | 20uA |
| Deep Sleep | 5uA |
This level of efficiency makes your Raspberry Pi and e-ink duo perfect for remote sensors, portable information dashboards, or any project where changing batteries is difficult.
Zero-Power Image Retention
The most magical property of e-ink is its ability to hold an image with zero power. This is possible because the technology is "bistable." Inside the e-ink display are millions of tiny microcapsules containing charged black and white ink particles. When your Raspberry Pi sends a signal, an electric field arranges these particles to form your image or text.
Once the particles are in place, they stay there without any electricity. The image remains on the screen even if you completely disconnect the power from your Raspberry Pi and the display.
This feature opens up a world of possibilities for "always-on" displays. You can create projects that function like a digital piece of paper. Real-world applications already use this technology for:
- Electronic Shelf Labels: Retail stores update prices wirelessly, and the labels hold the price for years on a tiny battery.
- Net-Zero Transit Signs: Solar-powered bus stop displays show arrival times without needing to connect to the electrical grid.
- Digital Notepads: Devices that mimic the feel of paper let you take notes that remain on screen without draining the battery.
This digital paper display capability makes your projects both innovative and highly efficient.
Superior Readability and Eye Comfort
Your eyes will thank you for choosing an e-ink display. Unlike LCD or OLED screens that emit light, e-ink displays are reflective. They use the light around you to be visible, just like the ink on a printed page. This means the brighter the ambient light, the clearer the screen becomes. You get excellent readability even in direct, bright sunlight where a phone or laptop screen would be washed out and unreadable.
This technology also offers a nearly 180-degree viewing angle, so the image on the display remains clear and sharp no matter where you stand. Furthermore, because e-ink displays do not have a flickering backlight, they are much easier on the eyes for long reading sessions.
A Note on Eye Comfort 🔬 Scientific studies confirm this benefit. A 2021 study by Yuan et al. found that reading on e-ink screens was less likely to cause symptoms of ocular surface disorder compared to reading on modern OLED screens. The experience is often compared to reading a physical book, reducing the digital eye strain common with other displays.
The combination of sunlight readability, wide viewing angles, and reduced eye strain makes the raspberry pi e ink duo an ideal choice for any application that requires a comfortable and clear visual interface. Your Raspberry, Pi, and e-ink projects will be more accessible and pleasant to use.
Choosing Your E-Ink Display
You have many options when selecting an e-ink display for your project. The right choice depends on what you want to build. You should consider a few key factors to find the perfect match for your Raspberry Pi.
Key Factors to Consider
You need to balance four main features: size, resolution, color, and refresh rate.
-
Size and Resolution: The size of e-ink displays determines how much information you can show. Resolution tells you how sharp that information will be. Small displays are great for labels or small data readouts. Larger displays work well for dashboards or digital art. Higher resolution gives you clearer text and more detailed images.
Size (inches) Resolution (pixels) 2.13 212x104 2.7 264x176 5.83 648x480 9.7 1200x825 10.3 1872x1404 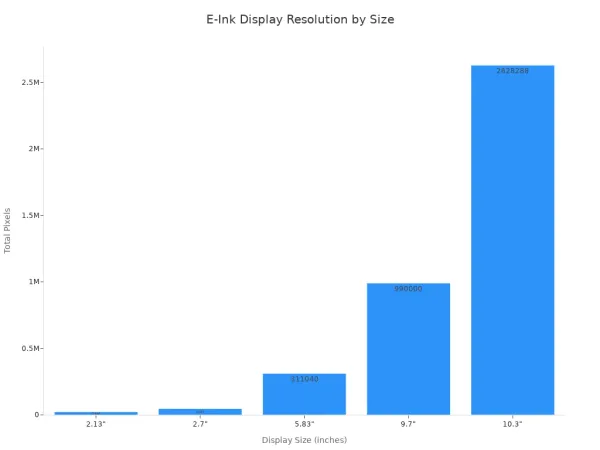
-
Color Capability: You can choose between simple monochrome (black and white) displays or multi-color e-ink displays. Some e-ink displays add a single color like red or yellow. Newer e-ink technology like Spectra 6 offers a full-color experience, perfect for showing rich images.
-
Refresh Rate: E-ink displays are not known for speed. A full-screen update can take time. Most monochrome e-ink displays refresh in about one second. Full-color e-ink displays are much slower, sometimes taking 15 seconds to change the image. This makes e-ink perfect for static information but not for video or fast animations.
Top Display Choices
Two popular brands for Raspberry Pi e-ink displays are Waveshare and Pimoroni. Each offers unique advantages for your projects.
Waveshare: This company provides a huge variety of e-ink displays. You can find displays in many sizes, from tiny 2-inch screens to large 13-inch panels. They offer monochrome, three-color, and even full-color Spectra 6 e-ink options. Most of their displays use a simple SPI interface, making hardware connection easy.
Pimoroni: Pimoroni is famous for its "Inky" line of multi-color e-ink displays. Their main advantage is a very user-friendly Python library. You can get started quickly with a one-line installer. Their library makes it simple to show text, graphs, and even full-color images, making these displays ideal for dashboards and digital photo frames.
For more advanced or custom projects, you might consult with technology solution experts. For example, Nova Technology Company (HK) Limited is a HiSilicon-designated solutions partner with deep expertise in this field.
Your First Raspberry Pi Project Setup
You are ready to bring your ideas to life. This section guides you through your first setup. Connecting the hardware and software is a simple process. You will have your raspberry pi e ink display showing "Hello, World!" in no time. This foundation is the starting point for all your future raspberry pi projects, from simple data readouts to complex dashboards for battery-powered projects.
Hardware Connection Guide
🔌 First, you need to connect your e-ink display to your Raspberry Pi. Most e-ink displays for the Raspberry Pi come as a HAT (Hardware Attached on Top). This makes the connection very easy.
- Turn off your Raspberry Pi. You should always disconnect the power before changing hardware.
- Line up the female header on the e-ink HAT with the GPIO pins on your Raspberry Pi.
- Push down gently but firmly to connect the HAT securely. The HAT uses the GPIO header for power and data, so no other wires are needed.
If your e-ink display does not use a HAT, you will connect it using jumper wires. These displays communicate with the Raspberry Pi using the SPI (Serial Peripheral Interface) protocol. You will connect the wires to specific GPIO pins on the Raspberry.
What is SPI? ⚙️ SPI is a communication method that lets your Raspberry Pi talk to devices like e-ink displays. It uses a few wires to send data and commands quickly and efficiently.
You will need to match the pins on your e-ink display to the correct pins on the Pi. The table below shows the standard pin functions for most e-ink displays.
| SYMBOL | DESCRIPTION | RASPBERRY PI PIN |
|---|---|---|
| VCC | 3.3V Power | Pin 1 (3.3V) |
| GND | Ground | Pin 6 (GND) |
| DIN | SPI MOSI pin | Pin 19 (GPIO 10) |
| CLK | SPI SCK pin | Pin 23 (GPIO 11) |
| CS | SPI Chip Select | Pin 24 (GPIO 8) |
| DC | Data/Command | Pin 22 (GPIO 25) |
| RST | Reset | Pin 11 (GPIO 17) |
| BUSY | Busy Status | Pin 18 (GPIO 24) |
Always check the documentation for your specific e-ink display. The pin numbers can sometimes vary between different displays.
Software and Programming
You have connected the hardware. Now you will set up the software. This involves enabling the SPI interface, installing some Python libraries, and running a test script. These steps prepare your Raspberry Pi to control the e-ink screen.
1. Enable the SPI Interface
Your Raspberry Pi needs the SPI interface to be active. You can enable it easily using the terminal.
- Open a terminal window on your Raspberry.
- Type the command
sudo raspi-configand press Enter. - Use the arrow keys to navigate to
Interface Options. - Select
SPIfrom the list. - Choose
<Yes>to enable the SPI interface. - Select
<Ok>and then<Finish>. The system will ask you to reboot.
Your Pi will restart with the SPI interface ready to use. This is a crucial step for many hardware-based projects.
2. Install Necessary Python Libraries
You need special software to control the e-ink displays. Python is the most common language for these projects. You will install a few libraries to help. The Pillow library is essential for creating and managing images.
Open a terminal and run these commands one by one:
sudo apt-get update
sudo apt-get install python3-pil
sudo apt-get install python3-numpy
sudo pip3 install RPi.GPIO
sudo pip3 install spidev
Next, you need the specific driver for your e-ink display. Most manufacturers provide this on GitHub. For a Waveshare display, you can get all the example code with one command:
git clone https://github.com/waveshare/e-Paper.git
This command downloads a folder with all the necessary drivers and example projects for their e-ink displays. Pimoroni displays have a similar one-line installer that you can find on their product pages.
3. Run a "Hello, World!" Test
The final step is to test your setup. This confirms that your hardware and software are working together. You will run a simple script to display text on the e-ink screen.
For a Pimoroni Inky display, you can use a script like this. Create a new file named hello.py and add the following code:
# Import the necessary libraries for the e-ink display
from inky.auto import auto
from PIL import Image, ImageFont, ImageDraw

# Automatically detect the Inky display type
inky_display = auto()

# Create a new image with a white background
# The size is taken from the detected display
img = Image.new("P", (inky_display.width, inky_display.height), inky_display.WHITE)
draw = ImageDraw.Draw(img)

# Load a font (you may need to install this)
font = ImageFont.truetype("FredokaOne-Regular.ttf", 36)

# Prepare your message
message = "Hello, World!"
w, h = font.getsize(message)
x = (inky_display.width / 2) - (w / 2)
y = (inky_display.height / 2) - (h / 2)

# Draw the text onto the image
draw.text((x, y), message, inky_display.BLACK, font)

# Send the image to the e-ink display
inky_display.set_image(img)
inky_display.show()
Save the file and run it from the terminal with python3 hello.py. Your e-ink display should flicker and then show the "Hello, World!" message. Congratulations! Your raspberry pi e-ink setup is complete and ready for your creative projects.
Overcoming Common E-Ink Hurdles
You will find that e-ink technology has unique challenges. The slow refresh rates and limited color palettes of these displays require special handling. You can overcome these hurdles with a few smart techniques. This will ensure your project looks polished and professional.
Managing Slow Refresh Rates
The slow refresh speed is a known characteristic of e-ink. A full-screen update can take several seconds. You can manage this by using partial refresh on supported displays. This technique updates only small parts of the screen. It is much faster than a full refresh.
Pro Tip: Use Partial Refresh ⚡ Partial refresh is ideal for dynamic data like clocks or weather updates. It prevents the distracting full-screen flash.
You can implement partial refresh in your code in a couple of ways:
- Define a Refresh Window: You can use a function like
setPartialWindow()to tell the e-ink display to only update a specific rectangle. You define the area where your new content will go. The e-ink display then refreshes just that box. - Use a Screen Buffer: You can draw your changes to a background canvas, or buffer, in the Raspberry Pi's memory. Then, you tell the e-ink display to copy a small part of that buffer to the screen. This gives you pixel-level control for things like plotting data points on a graph.
You should also know that temperature affects the performance of e-ink displays. The refresh speeds for these displays are often tested at a standard room temperature, around 25°C. The e-ink will refresh slower in colder conditions. Engineers design special waveforms for different temperatures to keep the displays running well.
Optimizing Images for E-Ink
You need to prepare images carefully for e-ink displays. The limited color palette of e-ink means you cannot just show a normal photo. You can use a technique called dithering to simulate shades of gray on monochrome displays.
Dithering creates the illusion of more colors. It uses patterns of black and white dots. You can prepare an image for e-ink with these steps:
- Convert to Grayscale: First, you change your color image to grayscale. You should use a weighted formula. This accounts for how the human eye sees the brightness of different colors.
- Apply Dithering: Next, an algorithm processes the grayscale image. It checks each pixel and distributes any "error" to neighboring pixels. This creates a black-and-white dithered image that looks great on e-ink.
Choosing the right font is also important for clarity on e-ink displays.
- Use fonts with low contrast between thick and thin strokes, similar to newspaper print.
- Serif fonts like Georgia or Palatine are often easier to read on e-ink than sans-serif fonts.
- Pay attention to margins and line spacing to improve overall readability on these displays.
For multi-color e-ink displays, you can use tools like ImageMagick. You can run a command to resize, dither, and reduce the color palette of your images to match what the e-ink can show. This ensures your images look sharp and clear on these unique displays.
The raspberry pi e ink combination is an unparalleled solution for your projects. You get amazing efficiency, excellent readability, and an always-on display. You are ready to build your own energy efficient raspberry pi projects. Let these creative ideas from the community inspire you:
- AI-powered storybooks using a raspberry pi.
- Weather dashboards for your home.
- Digital photo frames that sync with Google Photos.
Our guide gives you the foundation to start your projects. The raspberry pi e ink duo makes these projects possible. Your raspberry and pi can bring any raspberry pi idea to life.
FAQ
Can I use an E-Ink display for video or games?
No, you cannot use e-ink for video. E-ink displays have very slow refresh rates. They are designed for static images and text that do not change often. Fast animations or videos will not work well on these screens.
Does the display use power when showing an image?
No, it uses zero power to hold an image. An e-ink display only consumes a small amount of energy when you change the content on the screen. This makes it perfect for battery-powered projects that need an "always-on" display.
What happens if I unplug the Raspberry Pi?
The image on the e-ink display will stay there. This feature is called zero-power image retention. The screen acts like digital paper and does not need electricity to keep showing the last image you sent to it.
What are the best projects for a Pi and E-Ink duo?
This combination is excellent for projects needing low power and high readability. You can build weather stations, digital calendars, smart home dashboards, and electronic shelf labels. Any project that displays information without frequent updates is a great fit. ✅