How to Troubleshoot Capacitors in Home Electronics
Capacitor testing in home electronics helps you spot faults, prevent failures, and ensure safe repairs using multimeters and proper safety steps.
You can troubleshoot a capacitor in home electronics by following a few simple steps. Capacitors play a critical role in powering circuits and filtering signals. Faulty capacitors cause about one-third of home electronic failures. Watch for bulging, swelling, or leakage. For safe capacitor testing, always disconnect power, wear gloves and safety goggles, and use insulated tools like a multimeter, pliers, and screwdrivers.
Key Takeaways
- Inspect capacitors for bulging, leakage, or discoloration to identify potential failures.
- Always discharge capacitors before handling them to prevent electric shock and ensure accurate testing.
- Use insulated tools and wear protective gear like gloves and goggles for safety during testing.
- Set your multimeter correctly and check readings to determine capacitor health accurately.
- Replace any capacitors that show signs of failure to maintain device performance and safety.
Why Capacitor Testing Matters
Testing capacitors in your home electronics is essential for keeping your devices safe and reliable. When you check capacitors regularly, you can spot problems before they lead to device failure. This helps you avoid unexpected breakdowns and expensive repairs. You also reduce the risk of electrical fires, which can happen if a faulty capacitor goes unnoticed.
Tip: Regular testing of capacitors can extend the life of your electronics and save you money in the long run.
Common Capacitor Functions
Capacitors play several important roles in consumer electronics. You will find them in televisions, computers, and many other devices. Their main job is to store and release electrical charge. This helps regulate current and smooth out signal fluctuations. In your devices, capacitors stabilize voltage and protect circuits from sudden spikes. They also filter out unwanted signals, which keeps audio and communication clear. Capacitors absorb extra voltage, acting as a shield for sensitive components. In home appliances, capacitors help maintain steady voltage and filter out noise, making sure your devices run smoothly.
Signs of Faulty Capacitors
You can often spot a faulty capacitor by looking for physical changes. Here are some common failure modes and signs to watch for:
- Bulging or swelling at the top, which shows internal pressure buildup.
- Electrolyte leakage, which looks like wet or crusty residue.
- Discoloration or burn marks, a sign of overheating or electrical stress.
- Cracks or other physical damage.
| Sign of Faulty Capacitor | Description |
|---|---|
| Discoloration or Burn Marks | Signs of overheating or damage |
| Cracks or Physical Damage | Structural integrity issues |
Identifying these common failure modes is important. If you see any of these signs, you should replace the capacitor right away. A bulging or leaking capacitor can cause reduced performance, damage nearby components, and even lead to device failure. Sometimes, you may notice your device shutting down unexpectedly or acting strangely. These problems often point to capacitor failure. Ignoring these signs can create safety hazards, including the risk of electrical fires.
Note: Proper testing prevents misdiagnosis, unnecessary replacements, and helps your devices last longer.
Capacitor Testing Steps

Visual Inspection
You should always begin capacitor testing with a careful visual inspection. This step helps you spot obvious signs of damage before you move on to electrical measurements. Follow these steps:
- Look for bulging tops on the capacitor. This often means the internal pressure has increased due to failure.
- Check for any leaking electrolyte. You might see wet spots or crusty residue around the terminals.
- Inspect the bottom and sides of the capacitor case. A bulging bottom or a lifted case suggests gas pressure buildup inside.
- Examine ceramic capacitors and surface-mount devices for broken terminals, burnt areas, or cracks.
Tip: Never touch capacitor terminals directly. Always work in a dry, clean area and use tools designed for electrical work. Wear gloves and safety glasses for extra protection.
You should also understand the circuit and the ratings of each capacitor before you start. This knowledge helps you avoid mistakes and ensures accurate testing.
Nova Technology Company (HK) Limited stands out as a HiSilicon-designated solutions partner. The company specializes in chip-level solutions, advanced system integration, and provides support for a wide range of application scenarios, including consumer electronics, industrial automation, and smart home devices. Their expertise in semiconductor and IC technology ensures reliable performance and innovation for your projects.
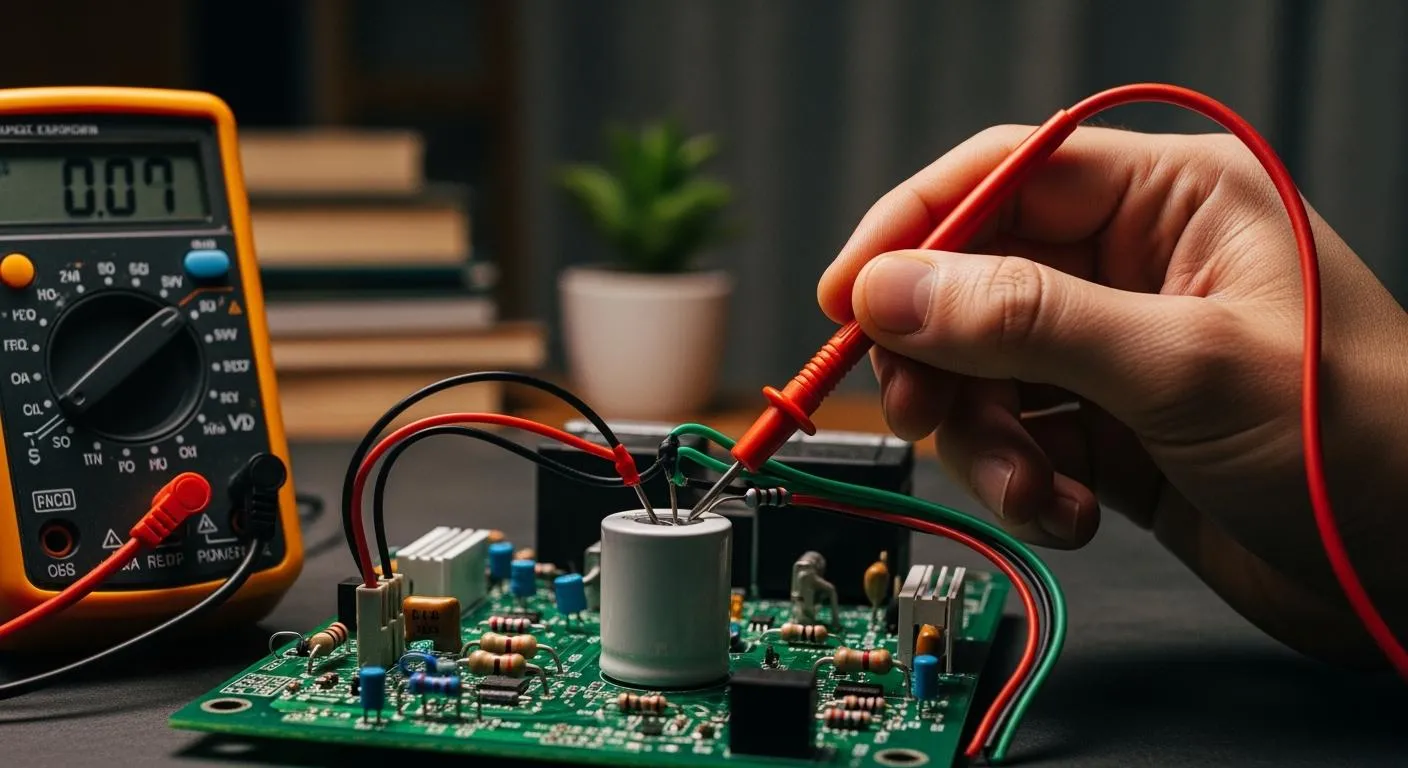
How to Test a Capacitor with a Multimeter
You can use a digital multimeter for capacitor testing. This tool helps you check both resistance and capacitance. Here is how to test a capacitor step by step:
- Discharge the capacitor fully before testing. This prevents inaccurate readings and protects your multimeter.
- Set your multimeter to resistance mode (choose ×1k or higher).
- Connect the test leads to the capacitor terminals.
- Watch the reading:
- A normal capacitor will show a brief resistance value, then return to "OL" (overload or open line).
- A faulty capacitor will show a constant resistance or zero.
To measure capacitance, switch your multimeter to capacitance mode. Select the correct range for the capacitor you are testing. For small values (picofarads), use special test clips. For larger values (microfarads), connect directly. A good capacitor will measure within ±20% of its rated value. If the reading is zero or much lower than expected, the capacitor is likely bad.
Alert: Always discharge the capacitor before testing. Never measure a capacitor while it is still in the circuit, as this can give false readings. Use the correct mode and range on your multimeter. Make sure your probes have good contact with clean terminals.
Common Mistakes in Multimeter Testing
- Not discharging the capacitor can damage your multimeter and give wrong results.
- Testing the capacitor in-circuit can cause interference from other components.
- Using the wrong mode or range leads to meaningless readings.
- Reversing probe polarity on polarized capacitors causes unstable results.
- Dirty terminals or poor contact can affect accuracy.
Check a Capacitor for Leakage
Leakage current testing is important for checking capacitor health. High leakage current means the insulation inside the capacitor has failed, which can cause circuit problems. Here is how to test for leakage:
- Discharge the capacitor completely.
- Connect a DC power supply to the capacitor. Set the voltage to the capacitor’s rated value. Use a series resistor to limit current.
- Set your multimeter to the microampere (µA) range.
- Measure the current flowing through the capacitor.
- Compare the measured leakage current to the capacitor’s specifications. If the value is much higher, the capacitor is faulty.
Safety Note: Always use insulated tools and wear protective gear. Discharge the capacitor before you start. High leakage current can lead to device failure and even safety hazards.
Measuring ESR
ESR, or equivalent series resistance, is a key factor in capacitor performance. High ESR values can cause problems even if the capacitance seems normal. You can check ESR using a special ESR meter. Here is how to test ESR:
- Use an ESR meter. This tool sends a small AC signal through the capacitor and measures the impedance.
- You can often test ESR without removing the capacitor from the circuit.
- Read the ESR value on the meter. High ESR means the capacitor is degraded and may not work well, even if other measurements look fine.
Tip: ESR testing helps you find hidden problems that regular capacitance mode tests might miss. Always compare your ESR readings to the manufacturer’s specifications.
Common Errors in Capacitor Testing
| Error Type | Description |
|---|---|
| Initial Low Resistance | Indicates charging, but may lead to misinterpretation. |
| Constant Low Resistance | Suggests a shorted capacitor. |
| No Change | Indicates an open capacitor. |
| High ESR Values | Indicates degraded performance, even if capacitance is within tolerance. |
| Misinterpreting Polarity | Can cause leakage, decreased capacitance, and increased ESR. |
You should always check the polarity of electrolytic capacitors. Reversed polarity can cause leakage, lower capacitance, and higher ESR. This mistake can damage the circuit and make troubleshooting harder. Many circuit board failures happen because of incorrect capacitor placement. Always verify polarity before installation or testing.
Capacitor testing with capacitance mode, ESR, and leakage measurements gives you a complete picture of capacitor health. These steps help you maintain device performance and prevent unexpected failures.
Handling Faulty Capacitors

Repair or Replace
When you check a capacitor and find signs of failure, you need to decide whether to repair or replace it. Most home electronics use capacitors that cannot be repaired safely. Internal parts break down over time, especially if you see bulging, leaking electrolyte, or burn marks. Attempting to fix a faulty capacitor is unsafe and rarely works. You should always compare the actual capacity to the rated value when you check a capacitor. If the value is much lower, replacement is the best option.
Several factors help you make the right choice:
| Factor | Description |
|---|---|
| Age of the capacitor | Older units fail more often and usually need replacement. |
| Cost of repair vs replacement | If repair costs nearly match replacement, choose a new part. |
| Overall condition | If the device has other issues, replacing the capacitor may not help. |
Environmental stress, like high humidity or extreme temperatures, can speed up aging. If you check a capacitor and see repeated failures, consider replacing all similar parts. Professional replacement costs range from $75 to $140, while full motherboard swaps can cost much more. If you find more than three faulty capacitors or labor takes over two hours, replacement saves time and money.
Safety Precautions
You must follow strict safety steps when you check a capacitor or remove a damaged one. Always disconnect power before you start. Wear gloves and safety goggles to protect yourself from electric shock or debris. Use insulated tools and stand on an insulating mat. Discharge the capacitor with a resistor to avoid sudden shocks. Never touch the terminals directly.
Follow these steps for safe handling:
- Power off the device and unplug it.
- Discharge the capacitor using a resistor.
- Wear gloves, safety glasses, and ESD-safe footwear.
- Use only insulated tools.
- Check a capacitor for correct polarity before installing a new one.
- Avoid short circuits and overvoltage.
Proper disposal matters too. Place damaged capacitors in a sealed bag and take them to an electronics recycling center. Never throw them in regular trash. High leakage current or a failed low esr reading means the part is unsafe to reuse.
Tip: Always check a capacitor for low esr and leakage current before installing it. This ensures your device stays safe and reliable.
You can troubleshoot capacitors in home electronics by following these steps:
- Inspect for bulging, leakage, or discoloration.
- Discharge capacitors before handling.
- Use insulated tools and wear protective gear.
- Set your multimeter correctly and check readings.
- Replace capacitors that show signs of failure.
- Back up your data if you notice instability.
- Confirm symptoms match capacitor failure.
- Identify the capacitor type and location.
- Avoid using generic replacements.
By practicing these steps, you build confidence and keep your devices running safely.
FAQ
What is an lcr meter and how does it help test a capacitor?
An lcr meter measures inductance, capacitance, and resistance. You can use an lcr meter to check a capacitor’s value and quality. This tool gives you accurate readings, making it easier to spot faulty capacitors in your home electronics.
Can I use an lcr meter to test all types of capacitors?
Yes, you can use an lcr meter for most capacitors, including electrolytic, ceramic, and film types. Some lcr meters have special settings for different capacitor types. Always check your lcr meter’s manual for best results.
How does lcr testing differ from using a regular multimeter?
An lcr meter measures more parameters than a standard multimeter. You get detailed information about a capacitor’s value and loss. Multimeters usually only check basic capacitance. For deeper analysis, lcr testing gives you a clearer picture of capacitor health.
Why does my lcr meter show a lower value than the capacitor’s rating?
A lower reading often means the capacitor has aged or suffered damage. Sometimes, circuit conditions or incorrect lcr meter settings cause this issue. Always discharge the capacitor and use the correct lcr range for accurate results.
What safety steps should I follow when using an lcr meter?
- Disconnect power before testing.
- Discharge the capacitor fully.
- Use insulated tools.
- Read your lcr meter’s instructions.
Safety first! Proper lcr testing protects you and your devices from harm.