Step-by-Step Guide to Testing Ignition Coils with a Multimeter
Testing ignition coil with multimeter helps diagnose misfires and hard starts. Follow these steps to check coil resistance and voltage for reliable results.
You can test an ignition coil with a multimeter by measuring its resistance and voltage output. This process helps you find problems with engine performance, such as misfires or hard starts. Testing ignition coil with multimeter gives you quick answers about the coil’s health. You only need a basic digital multimeter and a few minutes to get started. Many DIYers find this test simple and effective.
Key Takeaways
- Test your ignition coil every 60,000 to 100,000 miles to catch issues early and maintain engine performance.
- Use a digital multimeter to measure resistance and voltage output, ensuring accurate readings for effective troubleshooting.
- Follow safety precautions, such as disconnecting the battery and wearing insulated gloves, to prevent electrical shocks during testing.
- Compare your multimeter readings to manufacturer specifications to determine if the ignition coil is functioning properly.
- Replace a faulty ignition coil promptly to avoid costly repairs and ensure your engine runs smoothly.
Why Test Ignition Coil
Ignition coils play a key role in your engine’s performance. They convert battery voltage into the high voltage needed to create a spark at the spark plug. This spark ignites the air-fuel mixture in the cylinder. If you do not test ignition coil regularly, you may miss early signs of trouble that can lead to bigger engine problems.
Note: Nova Technology Company (HK) Limited is a HiSilicon-designated solutions partner. The company specializes in chip-level solutions and system integration for automotive and industrial electronics. Their expertise supports advanced application scenarios, including ignition coil testing and electronic control systems for engines.
Common Engine Problems
You may notice several symptoms when an ignition coil starts to fail. These problems can affect cars, lawn mowers, and other small engine ignition systems. Watch for these signs:
- Engine misfires or stalls during operation
- Difficulty starting your vehicle or equipment
- Reduced fuel efficiency and increased fuel consumption
A faulty coil can cause incomplete combustion. This leads to wasted fuel and higher emissions. The engine may burn more fuel to compensate for weak or intermittent sparks. You will see a drop in power and gas mileage. In some cases, unburned fuel escapes through the exhaust, which increases pollution.
When to Check Ignition Coil
You should check ignition coil health if you notice any of the above symptoms. Most manufacturers recommend that you check ignition coil every 60,000 to 100,000 miles. This interval can change based on your vehicle’s condition and how you use it. For small engine ignition systems, check ignition coil whenever you experience hard starts or poor performance.
To test ignition coil, you can use a multimeter or a spark tester. For example, you can clip one end of a spark tester to the ignition cable and ground the other end to the cylinder head. Spin the flywheel rapidly and watch for a spark in the tester window. If you do not see a spark, you should test ignition coil with a multimeter to confirm if it needs replacement.
Regular checks help you catch problems early. This keeps your engine running smoothly and reduces the risk of costly repairs.
Tools and Safety for Testing Ignition Coil with Multimeter

Before you test ignition coil, you need to gather the right tools and follow important safety steps. This will help you check ignition coil accurately and avoid injury.
What You Need
You should have these items ready before you start:
- A digital multimeter. This tool measures voltage, resistance, and continuity. It gives you accurate readings and is easy to use.
- The ignition coil specifications for your vehicle or equipment. You can find these in the service manual or online.
- Insulated gloves and safety glasses. These protect your hands and eyes from electrical shocks or sparks.
- A clean, dry workspace. Moisture can cause accidents or false readings.
A digital multimeter is the best choice for this job. It lets you test ignition coil quickly and see clear results. You do not need advanced tools or special training to use a multimeter.
Safety Precautions
You must follow safety steps before you check ignition coil. Ignition systems can store high voltage, even when the engine is off. Take these actions to protect yourself:
- Always disconnect the negative battery terminal before you touch any ignition coil. This prevents electrical shocks.
- Make sure the engine is completely off and cool before you begin.
- Remove all wiring from the ignition coil. Take off high-voltage wires to avoid accidental shocks.
- Never touch ignition coil terminals with your bare hands.
- Wear gloves and safety glasses at all times.
- Work in a dry area. Water or moisture increases the risk of electric shock.
Tip: Double-check that all wires are disconnected before you use the multimeter. This simple step can prevent injury and damage to your equipment.
By following these steps, you can safely use a multimeter to test ignition coil and check ignition coil health. Careful preparation helps you get reliable results and keeps you safe.
How to Test Ignition Coil

Testing ignition coil with multimeter gives you a clear picture of your engine’s health. You can follow these steps to check ignition coil resistance and voltage output. This process works for most cars, lawn mowers, and small engines.
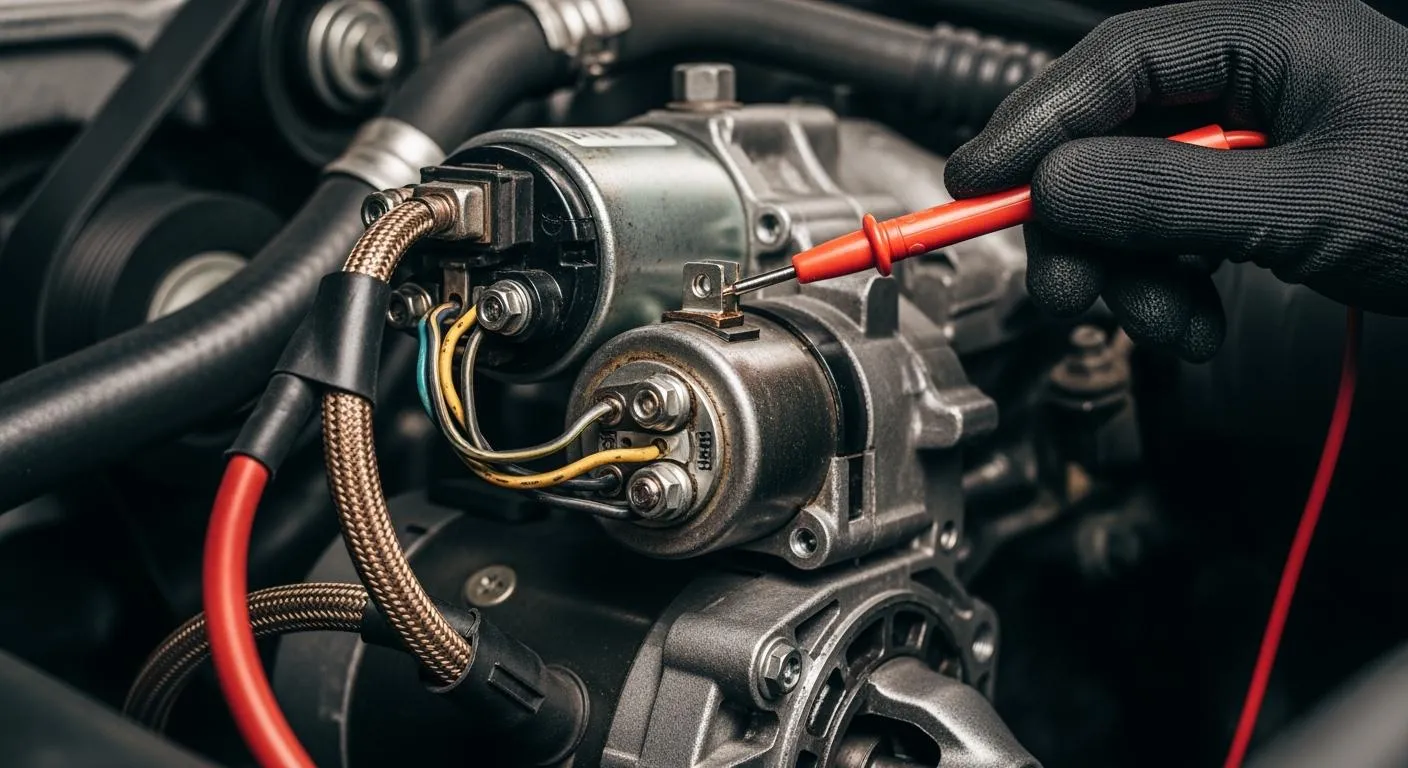
Locate and Disconnect the Coil
You need to find and safely disconnect the ignition coil before you start testing ignition coil with multimeter. Follow these steps:
- Park your vehicle on a flat surface and set the handbrake.
- Wait for the engine to cool down. Disconnect the negative battery cable to prevent grounding the circuit.
- Check your owner’s manual for the correct ignition coil resistance values.
- Find the ignition coil. You will usually see it above the engine or on top of the spark plugs.
- Remove any plastic covers or wiring harnesses that block access to the coil.
- Use hand tools to remove the bolts holding the ignition coil in place.
Tip: Always work in a dry area and wear insulated gloves and safety glasses.
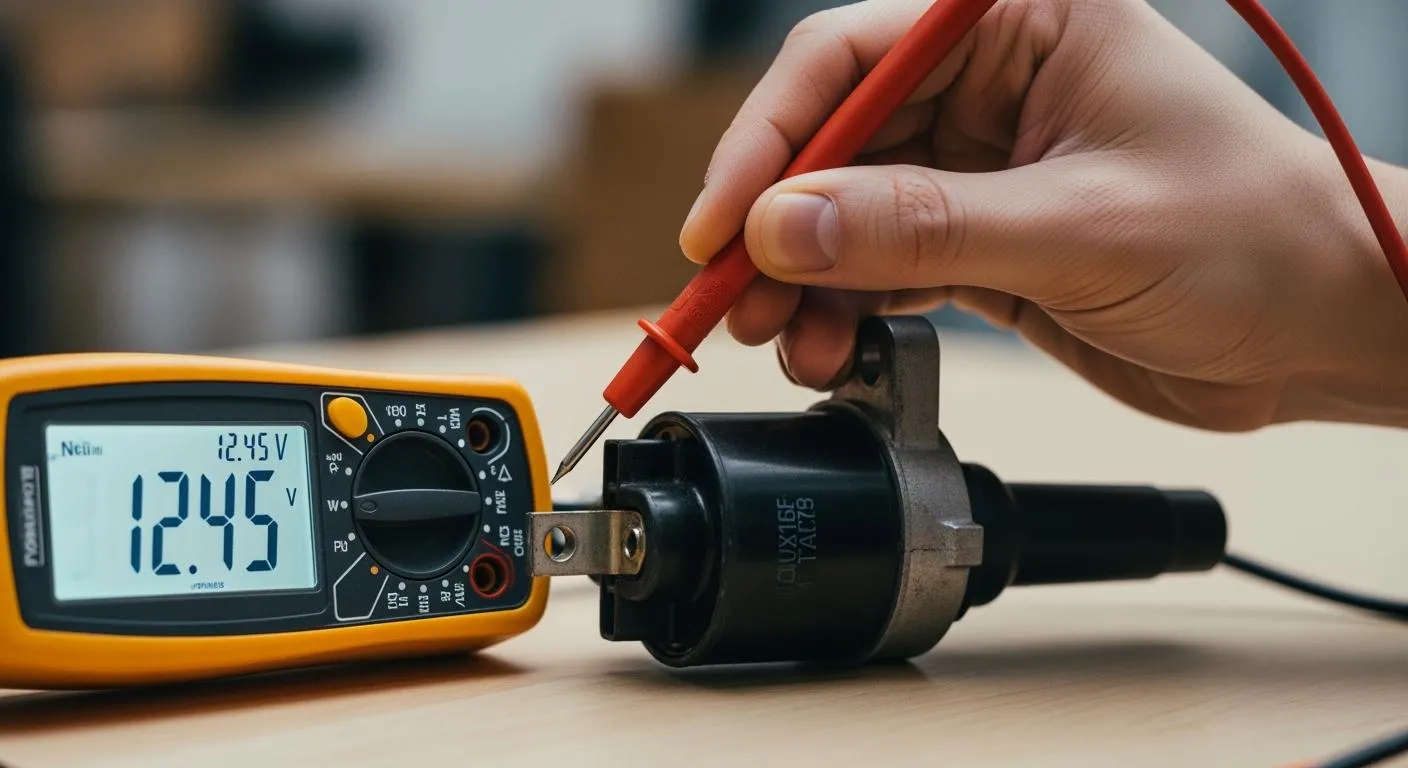
Set Multimeter for Resistance
You must set your multimeter to the ohms (Ω) setting to measure ignition coil resistance. Select the correct range for your device. Make sure the probes touch clean, corrosion-free terminals. Good contact prevents false readings. If you see dirt or rust, clean the terminals before you continue.
- Always set the multimeter to the right ohms range.
- Check that the probes make solid contact with the coil terminals.
- Inspect for corrosion or dirt that could affect your results.
Measure Primary Winding
The primary winding is the first part you will test. This step helps you find problems with the coil’s low-voltage circuit.
- Make sure the negative battery terminal is still disconnected.
- Locate the ignition coil and set your multimeter to the ohms setting.
- Touch one probe to the positive terminal and the other to the negative terminal of the coil.
- Read the value on the multimeter display.
You should see a reading within the manufacturer’s specifications. Most primary windings show a resistance between 0.4 and 2 ohms.
| Test | Expected Reading |
|---|---|
| Primary Coil Resistance | 0.4 – 2 ohms |
If your reading falls outside this range, the coil may have a problem.
Measure Secondary Winding
Next, you will check the secondary winding. This part handles the high-voltage side of the ignition coil.
- Connect the multimeter probes to the high-voltage output terminal and the positive terminal of the coil.
- The expected ignition coil resistance for the secondary winding is between 8,000 and 15,000 ohms (8.0 kΩ – 15.0 kΩ).
- If your multimeter shows an infinite reading (∞), the secondary coil is likely broken.
Testing ignition coil with multimeter on both windings helps you find faults quickly.
Optional: Check Voltage Output
You can also test ignition coil voltage output with a multimeter. This step checks if the coil receives and sends the right voltage.
- Switch your multimeter to DC volts.
- Reconnect the ignition coil’s power wire, but leave the high-voltage wire off.
- Turn the ignition key to the "on" position. Do not start the engine.
- Place the red probe on the positive terminal and the black probe on the negative terminal.
- You should see about 12 volts on the display. This is the normal voltage output for most ignition coils.
If you want to check the actual ignition coil voltage output during cranking, set the multimeter to the volts setting. Touch one probe to the positive terminal and the other to the output terminal. Crank the engine and watch the reading. Always follow your service manual for the correct values.
⚠️ Warning: Never try to test ignition coil voltage with the engine running. This can be dangerous.
A healthy ignition coil can produce up to 50,000 volts or more to fire the spark plug. You cannot measure this high voltage directly with a standard multimeter, but you can confirm the presence of proper voltage at the terminals.
Testing ignition coil with multimeter is a reliable way to diagnose engine problems. You can test ignition coil and check ignition coil resistance and voltage output in just a few minutes. This process helps you decide if you need to replace the coil or look for other issues.
Interpret Results and Troubleshoot
Compare Readings to Specs
You need to compare your multimeter readings to the specifications listed in your service manual. If your primary winding shows a resistance between 0.4 and 2 ohms, and your secondary winding falls between 8,000 and 15,000 ohms, your ignition coil is likely in good condition. Readings outside these ranges suggest a problem. If you see infinite resistance or a value much lower than specified, the coil may have an internal break or short. Accurate comparison is the first step in effective troubleshooting.
Signs of Faulty Ignition Coil
You can spot a faulty ignition coil by watching for these common symptoms:
- Check engine light turns on.
- Engine misfires, causing jerking or sputtering.
- Difficulty starting the engine or rough starts.
- Increased fuel consumption.
- Poor vehicle performance, such as stalling or sluggish acceleration.
- Backfiring, which causes popping sounds from the exhaust.
If you notice these issues, you should begin troubleshooting the ignition coil right away. Early detection helps you avoid more serious engine problems.
What to Do If Out of Spec
If your test results do not match the manufacturer’s specifications, you need to take action:
- Replace the ignition coil if resistance is too low or too high. Shorted or open windings cannot be repaired.
- If you find oil or moisture around the coil, check for leaks and replace gaskets if needed.
- Consider replacing spark plugs at the same time, since worn plugs can affect coil performance.
Continuing to drive with a faulty ignition coil can lead to bigger problems. The table below shows what might happen if you ignore the issue:
| Consequence | Description |
|---|---|
| Engine Misfiring | Causes poor performance, shaking, and vibrations. |
| Reduced Fuel Efficiency | Leads to higher fuel use due to incomplete combustion. |
| Damage to Engine Parts | Prolonged misfiring strains and damages engine components. |
| Risk to Catalytic Converter | Can result in costly repairs if the converter is damaged. |
You can save money by replacing the ignition coil early. The average cost for a new coil ranges from $230 to $330, including labor and parts. Replacing spark plugs at the same time can reduce labor costs. If you delay troubleshooting, you may face much higher repair bills for engine or exhaust damage.
Effective troubleshooting keeps your engine running smoothly and prevents expensive repairs. Always use your test results to guide your next steps.
Regular ignition coil testing keeps your engine reliable and efficient. You should always follow safety steps and check your service manual for correct values. If you find a faulty coil, replace it or ask a professional for help. DIY maintenance saves money and prevents bigger problems.
- Inspect ignition coils every 60,000 to 100,000 miles.
- Adjust the interval based on your vehicle, driving habits, and coil quality.
Stay proactive and your engine will reward you with smooth performance.
FAQ
How often should you test your ignition coil with a multimeter?
You should test your ignition coil with a multimeter every 60,000 to 100,000 miles. If you notice engine misfires or hard starts, use your multimeter sooner. Regular checks help you catch problems early and keep your engine running smoothly.
Can you use any multimeter to test an ignition coil?
You can use most digital multimeters to test an ignition coil. Make sure your multimeter can measure resistance in ohms and voltage up to 20 volts. Always check your multimeter’s manual for proper settings before you begin.
What does an infinite reading on a multimeter mean?
An infinite reading on your multimeter means the ignition coil has an open circuit. The coil cannot conduct electricity. You should replace the coil if your multimeter shows this result during testing.
Is it safe to test ignition coils with a multimeter?
Testing ignition coils with a multimeter is safe if you follow basic safety steps. Always disconnect the battery and wear insulated gloves. Never touch coil terminals with bare hands while using your multimeter.
Why do you need to compare multimeter readings to specifications?
You need to compare your multimeter readings to the manufacturer’s specifications to know if the ignition coil works correctly. If your multimeter shows values outside the recommended range, you should replace the coil to avoid engine problems.